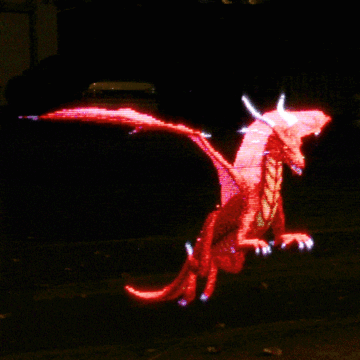
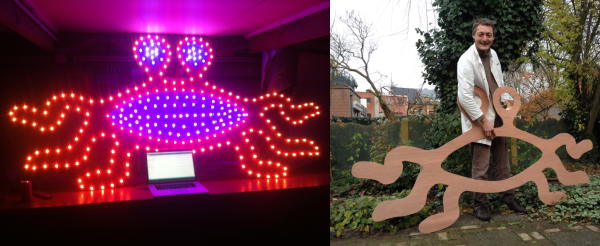
HaDuino: Open Your Beer Using Arduino

Frankly we’re tired of Arduino having a bad name here at Hackaday. So [Brian Benchoff] came up with a way to make it useful to a wider audience. His creation, which we call the HaDuino, lets you use the Arduino clone to open a tasty bottle of beer.

Continue reading “HaDuino: Open Your Beer Using Arduino”

Arduino-based Sieve Of Eratosthenes

ofTs7UD

[Darkmoonsinger’s] sister is finishing her graduate degree in mathematics, and [Darkmoonsinger] wanted to give her a gift that fit with her achievement. Naturally, building a Sieve of Eratosthenes using an LED matrix and an Arduino made perfect sense. If you’re unfamiliar, a Sieve of Eratosthenes is a simple, but very efficient, technique for finding prime numbers. Starting with a group of numbers, you step through each one in order. If it’s prime, you eliminate any multiples from the list. After a few iterations, the numbers remaining are all primes. After getting the LED matrix and sieve algorithm running, [Darkmoonsinger] designed an enclosure for the project. She made a couple of mistakes with this part, and happily included them for everyone’s benefit.

It only figures primes up to 64, and she lights the LED for 1 because it ‘makes the array look prettier’. Also, we couldn’t help but think that mounting the components a bit differently would have made a cleaner install (here’s a prime number generator with a backlit faceplate). However, that probably doesn’t matter to his sister. As they say, it’s the thought that counts, and we never get tired of seeing people build rather than buy!

Pokewithastick, An Arduino Programmable Web-logger/server


[Stewart] tipped us about his very nice project: pokewithastick. It is an Arduino compatible board (hardware, not footprint) based on the ATMEGA1284P which can be programmed to collect and post data to internet logging sites such as Thingspeak or Xively.

As you can see in the picture above, it has a small 50x37mm footprint (roughly 2″x1.5″). The pokewithastick is composed of an Wiz820 Ethernet module, a micro-SD card slot, 2 serial ports, one battery backed Real Time Clock (RTC), one radio connector (for the usual nRF24L01 2.4GHz radio), one power & user LED and finally a reset button. There are two power rails on the board which can be split (5v + 3.3V) or combined (3.3v only) which may allow you to connect Arduino shields to it. You can program the board using the standard 6-pin header or via a serial programmer if an appropriate (Arduino) bootloader is installed.

The project is open hardware, has been designed using Kicad and all the files can be downloaded as a zip file.

Halloween Doorknocker Decoration Hack

halloweenDoorHack

If you’re new to hacking, Halloween is a great excuse to get started, and [Chuck] has put together an inexpensive animated Halloween decoration that you can show off on your front door. After scoring a $5 plastic Halloween doorknocker from Wal-Mart, [Chuck] gathered together a small pile of components and then set about breathing some life (death?) into its scary but motionless face.

Though he opted to use a Digispark, you should be able to use any Arduino that is small enough to stuff inside the plastic head. [Chuck] cut some holes in the eyeballs and glued in two RGB LEDs, then cobbled together a quick-and-dirty mount in the mouth area to hold a small servo. The lights and the servo are wired to the Digispark, which turns the lights on and instructs the servo to slam the ring against the door. It’s is battery powered and currently has only two settings: on or off. This should be good enough to scare the kids for this year, but [Chuck] has plans to add a much-needed motion sensor and sound via a Bluetooth connection. 

As simple as this build is, it could be just the thing to get you in the holiday spirit, or to introduce the young hacker in your home to the world of electronics and coding. Check out the short video of the doorknocker after the break, then swing by [Chuck’s] website for detailed build instructions and his Github for the source code. If you’re having trouble finding this doorknocker at Wal-Mart, [Chuck] recommends a similar one on Amazon. Don’t stop now! Make some Flickering Pumpkins too, or if you want a challenge, hack together your very own Pepper’s Ghost illusion.

Continue reading “Halloween Doorknocker Decoration Hack”

Temp-Sensitive Automatic Blinds

blindMinder

Any opportunity to shave a few bucks off your power bill is probably worth considering, especially if it’s a device like [Steve Hoefer’s] Mini Blind Minder. This little guy staves off (or welcomes) the sun by monitoring the room with a temperature sensor and checking against a setpoint. If the room is too warm or too cool, the top-mounted servo will spin the wand and close or open the blinds, respectively.

[Steve] started by building a homemade Arduino shield from some perfboard to which he added a handful of discrete components: some current-limiting resistors for the RGB LED indicator light and a 10k trim pot for fine-tuning the temp sensor. Although this build forgoes an LCD readout to display precise information, it does provide feedback by stepping the RGB LED’s color through a spectrum of blue to red to indicate how the current room temperature compares to your setpoint. The two momentary pushbuttons beneath the light allow the user to adjust the setpoint up or down.

See the video below for a detailed guide to building your own, and take a look at a similar automatic blinds build from earlier this year that opens and closes in response to ambient light.

Continue reading “Temp-Sensitive Automatic Blinds”

Arduino-based Enigma Replica Is Fully Functional

This open-source Enigma replica by the folks at [ST-Geotronics] is simply stunning. They drew their inspiration from a hilarious build we saw a few years ago that hacked a children’s toy into an Enigma machine. Their project is instead modeled on the original Enigma M4 cipher machine, and aside from a bit of artistic license, we think they nailed the visual style. As for functionality, the guide claims everything works, right down to the plugboard.

Rather than try to immediately cram everything into the final enclosure, the [ST-Geotronics] gang painstakingly worked out a prototype to be sure the four 16-segment LED displays had been wired correctly and functioned properly. The next step was laying out a swarm of buttons and resistors on a 6″x8″ perfboard. They used charlieplexing to handle the 16-segment displays (which actually have 17 LEDs each), and deceptively disguised each display as a nixie tube by mounting them vertically and encasing them in a transparent dome. The case follows the M4’s original dimensions and consists of a plywood box with scrap steel for the top plate.

Swing by their Instructables page for more details. There you can find several Arduino sketches to test functionality and the code for five different M4 operation modes.

Remote Servo-controlled Lightswitch

remoteServoLightSwitch

We frequently get home automation tips, many of which have simple circuit-based on/off control for lights. [Paulo Borges] has created something quite different, however, with his in-the-wall servo-controlled light switch. This build forgoes the need of any relay to switch mains power, and because it’s physically flipping your switch, provides a distinct advantage over other builds that require a phone or tablet interface: you can use your switches as you normally would.

[Paulo] picked up a rocker-type switch at the local hardware store and carefully pried off the large, flat switch plate to notch out a small hole at its fulcrum. He then carefully shaped a piece of 12 gauge wire to provide a pivot point for the servo. His choice to use wire here seems to be entirely to provide a sturdy yet bendable component that functions mechanically rather than electrically. A small 9G servo fits to the back of the switch’s housing, and the servo’s arm connects up to the previously attached 12 gauge wire. He pieced together the remote control feature with an RF link kit with an inexpensive 433mhz Code duplicator from eBay.

[Paulo] explains that his Instructable is simply an overview rather than a step-by-step guide, so if you’re eager to reproduce this hack you’ll have to work out the code and the remote control portion yourself. He also acknowledges the biggest remaining hurdle: finding space in the wall to shove all the microcontroller guts. Check out a couple of videos of the switch after the break, and remember, there’s always the option of doing away with all light switches.

Continue reading “Remote Servo-controlled Lightswitch”