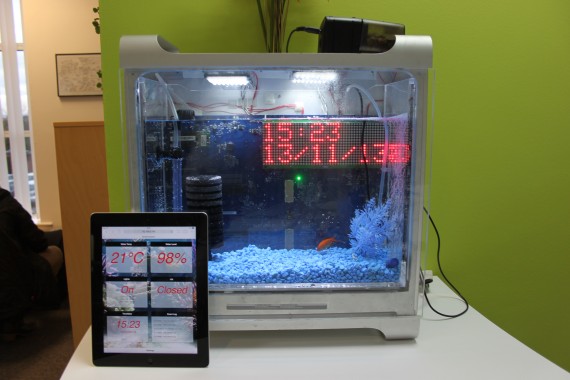
Tre: When Arduino Meets Beagle Bone

Although yesterday saw the announcement of an x86-based Arduino powered by an Intel chip. This may have not been the big story to come from [Massimo] at Maker Faire Rome. Announced along with the x86 Arduino Galileo was the Arduino TRE, a collaboration between Arduino and the BeagleBoard foundation.

The TRE is really two Arduinos in one: in the center is basically an Arduino Leonardo with the standard Arduino headers and an ATmega32u4. Elsewhere on the board is a TI Sitara ARM Cortex A-8 processor running at 1GHz with 512 MB of RAM, 10/100 Ethernet, HDMI out, USB host and device ports, and a bunch of connectors intended for an LCD and a ZigBee.

There is, of course, the obvious comparison between the TRE and Raspberry Pi. Hardware-wise, the TRE is very close to the BeagleBone Black, a bit more powerful than the Raspberry Pi, and able to do some very cool stuff (i.e. OpenCV) the Pi just can’t handle.

There is – I think – no official price for the Arduino TRE quite yet. It will be available in spring, 2014, though. You can check out all the press release photos in the gallery below.

Continue reading “Tre: When Arduino Meets Beagle Bone”

The Intel-powered Arduino

Dev boards based on microcontrollers and ARM System on Chips are everywhere, but finding a small pocketable computer based on an Intel processor has been difficult to find. [Massimo] of Arduino just unveiled a new Intel architecture Arduino-compatible board at the Rome Maker Faire. It’s called the Galileo, and it has everything you’d expect from a juiced-up Arduino running x86.

The main chip is an Intel Quark SoC running at 400MHz with 256 MB of DRAM. On board is a Mini-PCIe slot, 100Mb Ethernet port, Micro SD slot, RS-232, and USB host and client ports. Here’s the datasheet for the Galileo with all the applicable information.

The Galileo can be programmed with the standard Arduino IDE, but from the getting started guide, it looks like this board is running Yocto, a stripped down Linux for embedded environments.

Realistically, what we have here is a board with about the same processing power as a Raspberry Pi, but with Arduino compatibility, and a Mini PCIe port for some really fun stuff. It will be interesting to see what can be made with this board, but if you have any ideas on what to do with a Galileo before it’s released in two months, drop a note in the comments.

Smart Citizen: Arduino-compatible And Packed With Sensors

smartCitizenBoard

If you’re going to develop another Arduino-compatible board these days, you might as well take a “kitchen sink” approach. The Smart Citizen Kit piles it on, including Wi-Fi, an SD card slot, and EEPROM on its base. The attached shield—dubbed the “Ambient Board”—is a buffet of sensors: temperature, humidity, CO, NO2, light intensity, and a microphone for reading sound levels. The board’s intended purpose is to provide an open-source, interactive, environmental database by crowdsourcing data from multiple Smart Citizen Kits, but you can add your own stuff or yank the shield off altogether. Additional shields are also under development, aimed at providing agricultural data, monitoring biometrics, and more.

Stick the Smart Citizen somewhere and it can send sensor data to the web over a WiFi connection. The result is worth a look. Here’s the map with the real-time data from early release models scattered over Europe, most of which appear to be solar-powered with a small LiPo battery to keep them going overnight. There’s also an accompanying iPhone app that lets you set up the Smart Citizen, retrieve data from nearby sensors, and allows you to match your phone’s GPS location to any data you collect while carrying the board around.

The developers met their Kickstarter goals earlier this summer and the board has recently entered the manufacturing process, Rummage through their GitHub files here, and watch a video preview of the Smart Citizen below.

Continue reading “Smart Citizen: Arduino-compatible And Packed With Sensors”

Passive Bluetooth Keyless Entry System

Modern smart keys allow you to keep the key fob in your pocket or purse while you simply grab the handle and tug the door open. [Phil] decided he would rather ditch the fob altogether and instead implemented a passive Bluetooth keyless entry system with his Android phone. It’s probably unlikely for car manufacturers to embrace phone-based keys anytime soon, and [Phil] acknowledges that his prototype poses a landslide of challenges. What he’s built, however, looks rather enticing. If the car and phone are paired via Bluetooth, the doors unlock. Walk out of range and the car automatically locks when the connection drops.

His build uses an Arduino Mega with a BlueSMiRF Silver Bluetooth board that actively searches for his phone and initiates a connection if in range.  Doors are unlocked directly through a 2-channel relay module, and an LED indicator inside the vehicle tells the status of the system. A pulsing light indicates it’s searching for the phone, while a solid ring means that a connection is established.

We hope [Phil] will implement additional features so we can make our pockets a bit lighter. Watch a video demonstration of his prototype after the break, then check out the flood of car-related hacks we’ve featured around here recently: the OpenXC interface that adds a smart brake light, or the Motobrain, which gives you Bluetooth control over auxiliary electrical systems.

Continue reading “Passive Bluetooth Keyless Entry System”

Breadboard Tetris Is Wire Artwork

RGB-module-breadboard-tetris

Look closely at the colored pixels on this pair of 8×8 RGB LED modules and you’ll be able to pick out some of the familiar shapes of Tetris pieces. It’s impressive that [Jianan Li] built his own color Tetris including the theme music, but look at this breadboard! The layout of his circuit is as equally impressive as the code he wrote to get the game up and running. It takes a fair amount of planning to get a circuit of this complexity to fit in the space he used, right?

There are two microcontrollers at work, each running the Arduino bootloader. The main chip is an ATmega328 which is responsible for monitoring the buttons and controlling game play. The other is an ATmega85. The eight pin chip listens to it’s bigger brother, playing the theme song when the game starts, and pausing or resuming to match the user input So is the next stop for this project playing Tetris on the side of a building?

Don’t miss the demo video after the break. We’ve also rolled in a video of his Arduino-based piano. It’s built on a breadboard that’s nearly as impressive as this. But what delights us is his skill at playing Pokemon themes on the two-octave tactile switch keyboard. Obviously those piano lessons his parents shelled out for really paid off!

Continue reading “Breadboard Tetris Is Wire Artwork”

Wi-Fi Enabled Garage Door Opener

Normally, internet-controlled household devices are a cobbled together mashup of parts. This is great for a prototype, but if you’re looking for something that will last a decade in your garage, you’ll need something a little cleaner and more robust. [Phil]’s Internet-enabled garage door opener is just that, replete with a custom-made enclosure for his Arduino powered system.

The main hardware for [Phil]’s build is a Freetronix EtherTen, an Arduino clone with a built-in Ethernet interface. Aside from that, the electronics are simple: a relay, transistor, and diode provide the connection from the EtherTen to the garage door opener.

The software for this setup consists of a main file that sets up the web page, the serial monitor, and loops through the main program. There are a bunch of classes for initializing the web page, writing passwords to the EEPROM, activating the door, and setting the MAC and IP addresses.

Opening the door with this remote is a snap: with any WiFi enabled smartphone or tablet, [Phil] only needs to log onto his network, surf on over to the page hosted on the Arduino, and enter a password. From there, opening the door is just a press of a button. Passwords and other configuration settings cane be entered with MegunoLink. This software also includes a serial monitor to log who opened the door and when.

It’s an interesting and compact system, and handy to boot. You might sometimes forget your garage door opener, but we’re thinking if you ever find yourself without your phone, a closed garage door is the least of your problems.

Self-balancing Arduino Does It Without An IMU

The miniscule size of this self-balancing robot makes it a cool project. It actually uses the motor and wheels from a small toy car. But when you look into how the balancing act is performed it gets way more interesting. The larger versions of this trick pretty much all use Inertial Measurement Units (IMUs) which are usually made up of an accelerometer and a gyroscopic sensor. This has neither.

The black PCB seen to the right of the robot is an IR reflectance sensor. It shines an IR led at the floor and picks up what reflects back. [Sean] added this hack because the gyro sensor he ordered hasn’t arrived yet. The board has a trimpot which is used to adjust the sensitivity. You have to tweak it until it stands on its own. See for yourself after the break.

Self balancing robot builds are a great way to teach yourself about Proportional-Integral-Derivate (PID) algorithms used in a lot of these projects.

Continue reading “Self-balancing Arduino Does It Without An IMU”