Tunes You Can Eat

This week retro-gadget collector and video blogger [Techmoan] featured perhaps the most delicious audio recording format that we know of — a chocolate gramophone record. (Video, embedded below.) Compared to his typical media format explorations, the chocolate record is of quite recent vintage. He first heard of them back in 2015 when Tasmanian artist [Julia Drouhin] offered chocolate recordings as part of her art project. The one that [Techmoan] finally obtained was from a UK chocolatier who offers them with custom labelling and your choice of two songs. There are some pointers in the video about how to playback your chocolate disk without ruining it (use the lightest stylus tracking force as possible). These disks are recorded at 45 RPM on one side only, and are about the same size as a standard single. But being about five times thicker, they pack a lot more calories than your typical phonograph disk.

No reflection on the Tewkesbury Town Band, but this is probably the lowest fidelity recording media ever, but at least you can eat it when you’re done listening — label and all. We hope the Mission Impossible movie producers are paying attention so we can see the secret audio briefing being eaten instead of going up in smoke next film.

Continue reading “Tunes You Can Eat”

A 3D – To – 2D Converter To Make Plots From STLs.

We’ve become used to finding models on websites such as Thingiverse and downloading them to print. After all, whose hackerspace doesn’t have a pile of novelty prints? How about printing them on paper? For the plotter enthusiast that can be particularly annoying. Never fear, [Trammell Hudson] is here with an online 3D to 2D converter just for plotters. [Trammell’s] creation makes a vector image suitable for a plotter while eliminating spurious behind-the-scenes lines.

Plotter drawings are the pen-and-paper equivalent of a vector CRT display, in which the graphics are printed as continuous strokes. Rendering a 3D model as a wireframe for a plotter requires the removal of any pen strokes that comes from the 3D space behind the surface in view. Loading various models into the web page seemed to do a pretty good job of this, though the ubiquitous Benchy 3d printer test model lived up to its billing as a torture test in taking several minutes to render.

As anyone who has followed the #PlotterTwitter social media hashtag will know, there is a considerable community of pen plotter enthusiasts who are pushing the boundaries of what their machines can do. [Trammell] has posted his plotter producing some of the work created with this tool, and we can see that it’s likely to work better with lower-poly models.

We’ve featured a lot of plotters over the years as they seem to be a popular project. If you’d like one then they can be made from the most available parts, including those scavenged from scrap DVD drives, or printers.

CNC Router Frame Repurposed For Colorful String Art Bot

Pandemic lockdowns have been brutal, but they’ve had the side-effect of spurring creativity and undertaking projects that are involved enough and complex enough to keep from going stir crazy. This CNC string art robot is a great example of what’s possible with a little imagination and a lot of time. (Video, embedded below.)

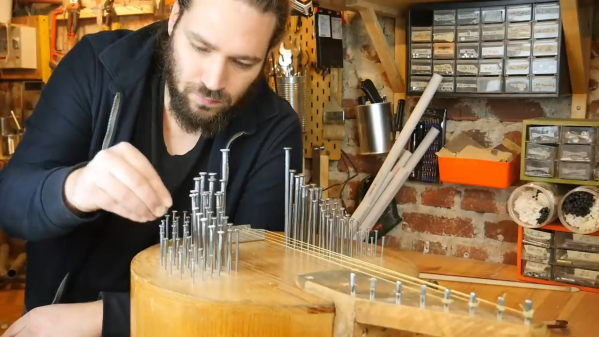
According to [knezuld11], the robot creates its art through mathematical algorithms via a Python program that translates them into nail positions and string paths. The modified CNC router frame, constructed of laser-cut plywood, has two interchangeable tool heads. The first places the nails, which are held in a small hopper. After being picked up by a servo-controlled magnetic arm and held vertically, a gear-driven ram pushes each nail into a board at just the right coordinates. After changing to a different tool, the robot is able to pick up one of nine different thread dispensers. A laser sensor verifies the thread nozzle position, and the thread starts its long journey around the nails. It’s a little mesmerizing to watch, and the art looks great, with a vibe that brings us right back to the 70s. Groovy, man.

This reminds us a little of a recent [Barton Dring] project that makes art from overlapping strings. That one was pretty cool for what it accomplished with just one thread color, while this one really brings color to the party. Take your pick, place your nails, and get stringing.

Continue reading “CNC Router Frame Repurposed For Colorful String Art Bot”

A PCB Diary

[Gijs Gieskes] has made another eye-catching PCB wonder, this time a diary built from several circuit boards which are assembled into a book, not unlike a PC/104 system. But with [Gijs]’s system you can easily open the stack-up to access single boards without disassembling the whole thing. We don’t see brass piano hinges on PCB assemblies very often, but [Gijs]’s PCB designs are anything but conventional. Hint: if you wanted to recreate this technique using more ordinary hardware, you can find hinged PCB standoffs from various suppliers.

Bicycle, soccer ball, smoke on the “No no no no no…” PCB

Apparently it’s more than a passive piece of art.  Each board has several circuits, some of which (all?) are functioning is ways not clearly described, which seems to be intentional. According to his build log, different things happen when you mix and match the inter-board ribbon cables in various ways. We are told in the instructions “to just try and see what happens”. No schematics are posted, but there is a partial description of the circuits in the manual and parts on the two-layer boards are well-labeled. Although after spot checking a few circuits board photos, we’d guess that no small number of traces, and perhaps some parts, are wild goose chases.

The project claims to be a diary for the years 2018 and 2019, but we will leave it as an exercise for the reader to interpret the messages that [Gijs] has embedded into this fascinating piece. We have written about several of his projects over the years, such as this crazy bent Casio SK-1 from all the way back in 2005. And before dismissing this “book” style of circuit board stack-up as only for artists, check out this teardown of a Soyuz clock we covered back in January.

How To Get Into Lost Wax Casting (with A Dash Of 3D Printing)

I’ve always thought that there are three things you can do with metal: cut it, bend it, and join it. Sure, I knew you could melt it, but that was always something that happened in big foundries- you design something and ship it off to be cast in some large angular building churning out smoke. After all, melting most metals is hard. Silver melts at 1,763 °F. Copper at 1,983 °F. Not only do you need to create an environment that can hit those temperatures, but you need to build it from materials that can withstand them.

Turns out, melting metal is not so bad. Surprisingly, I’ve found that the hardest part of the process for an engineer like myself at least, is creating the pattern to be replicated in metal. That part is pure art, but thankfully I learned that we can use technology to cheat a bit.

When I decided to take up casting earlier this year, I knew pretty much nothing about it. Before we dive into the details here, let’s go through a quick rundown to save you the first day I spent researching the process. At it’s core, here are the steps involved in lost wax, or investment, casting:

  1. Make a pattern: a wax or plastic replica of the part you’d like to create in metal
  2. Make a mold: pour plaster around the pattern, then burn out the wax to leave a hollow cavity
  3. Pour the metal: melt some metal and pour it into the cavity

I had been kicking around the idea of trying this since last fall, but didn’t really know where to begin. There seemed to be a lot of equipment involved, and I’m no sculptor, so I knew that making patterns would be a challenge. I had heard that you could 3D-print wax patterns instead of carving them by hand, but the best machine for the job is an SLA printer which is prohibitively expensive, or so I thought. Continue reading “How To Get Into Lost Wax Casting (with A Dash Of 3D Printing)”

Remoticon Video: Circuit Sculpture Workshop

Circuit Sculpture was one of our most anticipated workshops of Hackaday Remoticon 2020, and now it’s ready for those who missed it to enjoy. A beginning circuit sculptor could hardly ask for more than this workshop, which highlights three different approaches to building firefly circuit sculptures and is led by some of the most prominent people to ever bend brass and components to their will — Jiří Praus, Mohit Bhoite, & Kelly Heaton.

For starters, you’ll learn the different tools and techniques that each of them uses to create their sculptures. For instance, Kelly likes to use water-based clay to hold components in specific orientations while forming the sculpture and soldering it all together. Jiří and Mohit on the other hand tend to use tape. The point is that there is no right or wrong way, but to instead have all of these tips and tricks under your belt as you sculpt. And that’s what this workshop is really about.

Continue reading “Remoticon Video: Circuit Sculpture Workshop”

Escape Tunnel In Your Living Room: A Different Take On The Infinity Mirror

Most infinity mirrors are just minor variations on the same old recipe. Take a frame, add a normal mirror in the back, a one-way mirror on the front, and put some LEDs between them. [Stevens Workshop] took a slightly different approach and built an escape tunnel coffee table that really caught our attention.

To create the tunnel and ladder illusion, [Steven] kept the mirrors, but made a deeper wood frame, installed a light bulb in an industrial-looking socket instead of the usual LEDs, and added a single ladder rung. The end result makes for a very interesting conversation piece, and some of us prefer it to the multicolored LED look. Though he added his own touches, the idea was actually borrowed from from [asthhvdrt36] and [BreezleSprouts] on Reddit who used slightly different light and ladder designs.

While there’s nothing groundbreaking here, it’s certainly a case of “why didn’t I think of that”. Sometimes the old and familiar just needs a different perspective to create something fascinating. One of the advantages of the classic infinity mirror is the thin profile, which we’ve seen integrated into everything from guitars to coasters.