Auto Tuning For A Vintage Stereo

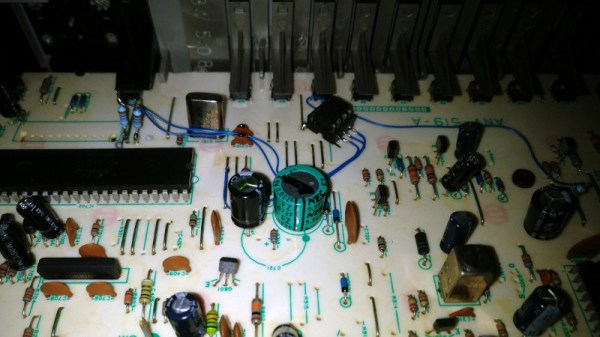
In 1984 there weren’t many ways to listen to high-quality music, so an FM tuner was an essential part of any home hi-fi system. The Pioneer TX-950 picked up by [The Curious Lorenz] would have been someone’s pride and joy, with its then-cutting-edge microprocessor control, digital PLL tuning, and seven-segment displays. Astoundingly it doesn’t have an auto-tuning function though, so some work to implement the feature using an ATtiny85 was called for.

A modern FM tuner would be quite likely to use an all-in-one tuner chip using SDR technology under the hood, but this device from another era appears to be a very conventional analog tuner to which the PLL and microprocessor have been grafted. There are simple “Up” and “Down” buttons and a “Station tuned” light. One might imagine that given these the original processor could have done autotune. At least the original designers were kind enough to provide the ATtiny with the interfaces it needs. Pressing either button causes it to keep strobing its line until the “Station tuned” line goes high, at which point it stops. It’s an extremely simple yet effective upgrade, and since the ATtiny is so small it’s easily placed on top of the original PCB. The result is an ultra-modern tuner from 1984, that’s just that little bit more modern than it used to be.

If you don’t have a vintage FM radio, you can always build its modern equivalent.

Little Red Night Light Is Just Right

Don’t you hate getting up in the middle of the night to use the bathroom? The worst part is not being able to see what you’re doing, but if you turn on a light, you’ll lose your night vision. Nightlights are supposed to be the best solution, but are usually too bright for 3 AM excursions and can end up leaking light into the bedroom. What the bathroom needs is a purpose-built nightlight that uses red light so you don’t lose your night vision.

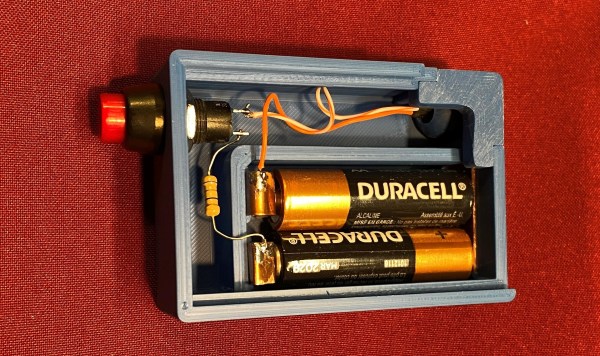
This simple, wall-mounted night light is just the thing. All it takes is two AA batteries, a resistor, a red LED, and an SPST push button. [Vchaney] even made their own battery contacts. The genius part of this build is in the adjustable LED, which is fitted into a ball that moves around in a socket so you can aim it wherever you need to see. All the files are available if you want to print one for yourself.

Those who sit might prefer to shine the light on the toilet paper roll. Here’s a smart roll holder that doubles as a night light, albeit a terribly bright one.

Hackaday Links Column Banner

Hackaday Links: December 13, 2020

Our Sun is getting a bit frisky these days, and has rewarded us with perhaps the best screensaver image ever taken. The incredibly detailed photo of a sunspot was actually taken back in January by the Daniel K. Inouye Solar Telescope, a 4-meter instrument with adaptive optics that can image the sun from the near-infrared to visible wavelengths and resolve surface details down to 20 km. The photo, with a distinct “Eye of Sauron” look, shows the massive convection cells surrounding the dark sunspot; an accompanying animation shows the movement of plasmas along the tortured lines of magnetic flux that cause the sunspot to form. It’s fascinating to watch, and even more interesting to mull over the technology that went into capturing it.

With the dustup surrounding the youtube-dl DCMA takedown by GitHub fresh on the open-source community’s minds, GitHub Universe 2020 had an interesting discussion about maintaining open-source software projects that’s worth watching. They focused on the challenges that youtube-dl maintainers face in keeping the tool working, and the impact their effort has on the people and groups that rely on them. To underscore that point, they featured a researcher with Human Rights Watch who depends on youtube-dl in her work, and made it quite clear that keeping up with all the API changes that constantly break open source tools like youtube-dl make the role of the maintainers that much more critical.

Speaking of GitHub, here’s a frightening and fascinating new tool: Depix, the password de-pixelizer. Developer Sipke Mellema noticed that his company often used pixelization to obscure passwords in documentation, and wondered if he could undo the process. He wrote up an article describing the pixelization process using a linear box filter and his method for attacking it, which involves generating a De Bruijn sequence in the same font, text size, and colors as the original document and feeding a screenshot of that and the pixellated password into the tool. We suspect it’ll only work for a subset of obfuscated passwords, but it’s still pretty clever.

‘Tis the season for Advent calendars, and the folks at QEMU have posted theirs. Open each of 24 doors on the calendar and you’re rewarded with a downloadable QEMU disk image that implements something fun. Minesweeper, a ray tracer that fits into a boot loader, and of course Conway’s Game of Life. The GW-BASIC image on Day 3 caught our eye — brings back some memories.

For anyone who has ever watched a Pixar film and wondered how all that animation actually works, here’s a great lesson in making art with math. The video is by Inigo Quilez and goes through the basics of rendering images using raymarching SDFs, or signed distance functions. In the beginning, it seemed like it was going to be a little bit like drawing an owl, but his descriptions of the math involved and how each element of the animation is just another formula is fascinating. What’s more, there’s a real-time rendering tool where you can inspect the code and edit it. Alas, my changes only made things worse, but it was still fun and instructive to play with. Check out the video after the break!

Continue reading “Hackaday Links: December 13, 2020”

A 3D – To – 2D Converter To Make Plots From STLs.

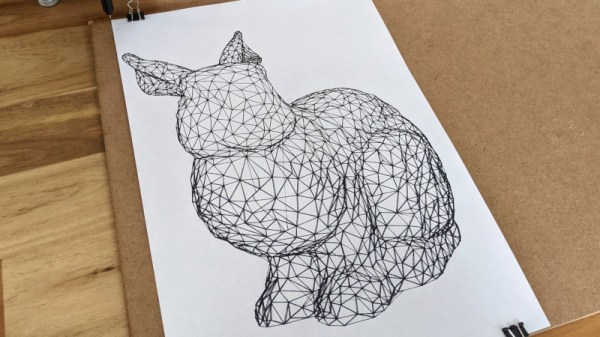
We’ve become used to finding models on websites such as Thingiverse and downloading them to print. After all, whose hackerspace doesn’t have a pile of novelty prints? How about printing them on paper? For the plotter enthusiast that can be particularly annoying. Never fear, [Trammell Hudson] is here with an online 3D to 2D converter just for plotters. [Trammell’s] creation makes a vector image suitable for a plotter while eliminating spurious behind-the-scenes lines.

Plotter drawings are the pen-and-paper equivalent of a vector CRT display, in which the graphics are printed as continuous strokes. Rendering a 3D model as a wireframe for a plotter requires the removal of any pen strokes that comes from the 3D space behind the surface in view. Loading various models into the web page seemed to do a pretty good job of this, though the ubiquitous Benchy 3d printer test model lived up to its billing as a torture test in taking several minutes to render.

As anyone who has followed the #PlotterTwitter social media hashtag will know, there is a considerable community of pen plotter enthusiasts who are pushing the boundaries of what their machines can do. [Trammell] has posted his plotter producing some of the work created with this tool, and we can see that it’s likely to work better with lower-poly models.

We’ve featured a lot of plotters over the years as they seem to be a popular project. If you’d like one then they can be made from the most available parts, including those scavenged from scrap DVD drives, or printers.

A Pair Of Steppers Are Put To Work In This Automatic Instrument Pickup Winder

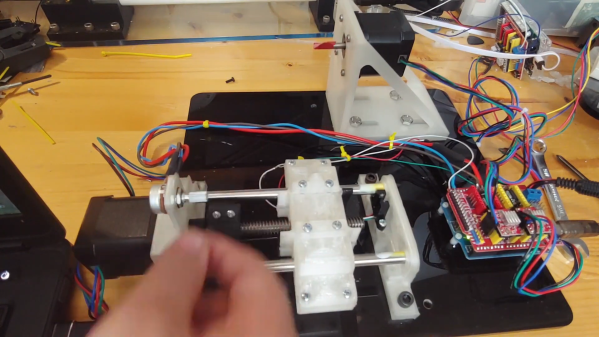
For something that’s basically a coil of wire around some magnetic pole pieces, an electric guitar pickup is a complicated bit of tech. So much about the tone of the instrument is dictated by how the pickup is wound that controlling the winding process is something best accomplished with a machine. This automatic pickup winder isn’t exactly a high-end machine, but it’s enough for the job at hand, and has some interesting possibilities for refinements.

First off, as [The Mixed Signal] points out, his pickups aren’t intended for use on a guitar. As we’ve seen before, the musical projects he has tackled are somewhat offbeat, and this single-pole pickup is destined for another unusual instrument. That’s not to say a guitar pickup couldn’t be wound on this machine, of course, as could inductors, solenoids, or Tesla coils. The running gear is built around two NEMA-17 stepper motors, one for the coil spindle and one for the winding carriage. The carriage runs on a short Acme lead screw and linear bearings, moving back and forth to wind the coil more or less evenly. An Arduino topped with a CNC shield runs the show, allowing for walk-away coil winding.

We do notice that the coil wire seems to bunch up at the ends of the coil form. We wonder if that could be cured by speeding up the carriage motor as it nears the end of the spool to spread the wire spacing out a bit. The nice thing about builds like these is the ease with which changes can be made — at the end of the day, it’s just code.

Continue reading “A Pair Of Steppers Are Put To Work In This Automatic Instrument Pickup Winder”

RC Starship Perfects Its Skydiving Routine

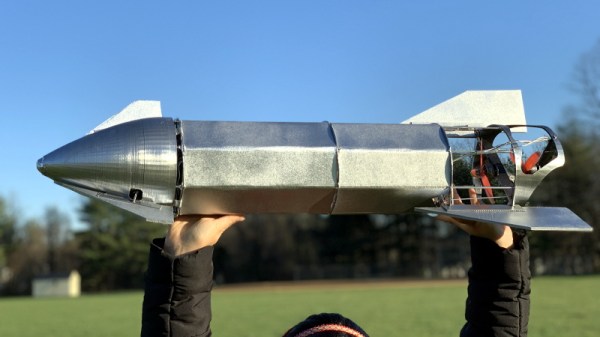
There’s a good chance you already saw SpaceX’s towering Starship prototype make its impressive twelve kilometer test flight. While the attempt ended with a spectacular fireball, it was still a phenomenal success as it demonstrated a number of concepts that to this point had never been attempted in the real world. Most importantly, the “Belly Flop” maneuver which sees the 50 meter (160 foot) long rocket transition from vertical flight to a horizontal semi-glide using electrically actuated flight surfaces.

Finding himself inspired by this futuristic spacecraft, [Nicholas Rehm] has designed his own radio controlled Starship that’s capable of all the same aerobatic tricks as the real-thing. It swaps the rocket engines for a pair of electric brushless motors, but otherwise, it’s a fairly accurate recreation of SpaceX’s current test program vehicle. As you can see in the video after the break, it’s even able to stick the landing. Well, sometimes anyway.

Just like the real Starship, vectored thrust is used to both stabilize the vehicle during vertical ascent and help transition it into and out of horizontal flight. Of course, there are no rocket nozzles to slew around, so [Nicholas] is using servo-controlled vanes in the bottom of the rocket to divert the airflow from the motors. Servos are also used to control the external control surfaces, which provide stability and a bit of control authority as the vehicle is falling.

As an interesting aside, Internet sleuths looking through pictures of the Starship’s wreckage have noted that SpaceX appears to be actuating the flaps with gearboxes driven by Tesla motors. The vehicle is reportedly using Tesla battery packs as well. So while moving the control surfaces on model aircraft with battery-powered servos might historically have been a compromise to minimize internal complexity, here it’s actually quite close to the real thing.

Unfortunately, the RC Starship made a hard landing of its own on a recent test flight, so [Nicholas] currently has to rebuild the craft before he can continue with further development. We’re confident he’ll get it back in the air, though it will be interesting to see whether or not he’s flying before SpaceX fires off their next prototype.

Continue reading “RC Starship Perfects Its Skydiving Routine”

Creality WiFi Takes On Octoprint

A very common hack to a 3D printer is to connect a Raspberry Pi to your printer and then load Octoprint or a similar program and send your files to the printer via the network. [Teaching Tech] noticed that Creality now has an inexpensive WiFi interface that promises to replace Octoprint and decided to give it a quick review.

You might wonder why you’d want this system when Octoprint exists? Mainly, the value proposition is the price. You can buy the Creality box for about $20. A Raspberry Pi with a similar case would be at least twice that price. In addition, the box integrates with a Thingiverse-like library and does cloud slicing, which is attractive when you have a very small computer connected to your printer.

However, [Teaching Tech] found some issues. The box was pretty picky about connecting to printers and there were many other problems. The 3D model library wasn’t very comprehensive, although that could change if the thing got very popular. Worse, the slicer didn’t really produce stellar results.

We have to admit, an attractive network interface for $20 would be of interest. But it is hard to see how this would be a better value than Octoprint unless you were very short on cash and had no Raspberry Pi surplus laying around. You still need an SD card and a power supply, so those extras are a wash.

On the other hand, if Creality fixes the problems and expands the 3D model library, we’d buy one. But it remains to be seen if either of those things will happen, much less both of them. We do wish [Teaching Tech] had opened the thing up for us. Maybe next time.

Continue reading “Creality WiFi Takes On Octoprint”