Surfing The Web With 7400 Logic

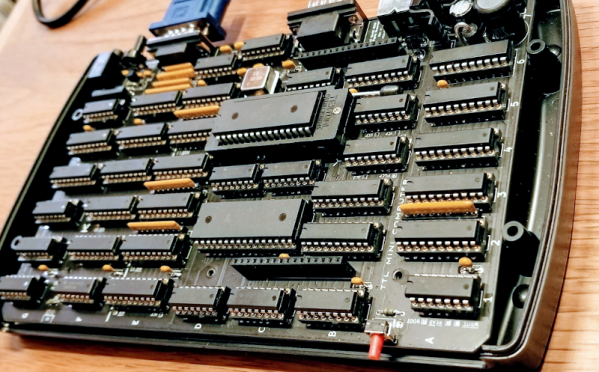
We see more computers built from logic gates than you might expect. However, most of them are really more demonstration computers and can’t do much of what you’d consider essential today. No so with [Alastair Hewitt’s] Novasaur. Although built using 34 TLL chips (and a few memory and analog chips, too, along with one PAL), it boasts some impressive features:

  • Dual Processor CPU/GPU (Harvard Architecture).
  • 33 MHz dot clock, 16.5 MHz data path, 8.25 MHz per processor (~3.5 CPU MIPs)
  • 256k ROM: 96k ALU, 64k native program, 64k cold storage, 32k fonts.
  • 128/512k RAM: 1-7 banks of 64k user, 60k display, 4k system.
  • 76 ALU functions including multiply/divide, system, and math functions.
  • Bitmapped Graphics: Hi-res mode up to 416×240 with 8 colors and 4 dithering patterns. Lo-res mode up to 208×160 with 256 colors, double-buffered.
  • Text Mode: 8 colors FG/BG, 256 line buffer, up to 104×60 using 8×8 glyphs, 80×36, and 64×48 rows usingĀ  8×16 glyphs.
  • Audio: 4 voice wavetable synthesis, ADSR, 8-bit DAC, 8Hz-4.8kHz.
  • PS2 Keyboard: Native interface built-in.
  • RS232 Serial Port: Full duplex, RTS/CTS flow control, 9600 baud.
  • Expansion Port: 7 addressable 8-bit register ports, 4 interrupt flags

Continue reading “Surfing The Web With 7400 Logic”

A Thousand Feet Under The Sea

If you were to plumb the depth of the oceans, you could only get so far with a snorkel or a SCUBA tank. We don’t know the price, but if you have enough money, you might consider the Triton 3300/6 — a six-person submersible that can go down to 3,300 feet (hence the name–get it–3300/6). Billed as “diving for the entire family,” we aren’t sure we can load grandma and the kids in something like this, but that doesn’t mean we wouldn’t like to try.

The machine can carry up to 1,760 pounds and can make 3 knots which isn’t going to set any speed records. At around 24,000 pounds, the two main thrusters are lucky to make that speed. The view bubble is apparently optically perfect acrylic made by a German company and the company claims the 100-inch diameter bubble is the world’s largest spherical acrylic pressure hull.

Continue reading “A Thousand Feet Under The Sea”

Microstepping A PCB Motor

Over the last 2 years [Carl Bujega] has made a name for himself with his PCB motor designs. His latest adventure is to turn it into a stepper motor by adding position control with microstepping.

The NEMA stepper motors most of us know are synchronous stepper motors, while [Carl]’s design is a permanent magnet design. It uses four coils on the stator, and two permanent magnets on the rotor/dial. By varying the current through each of the four poles with a stepper driver (microstepping), the position of the rotor should theoretically be controllable with good resolution. Unfortunately, this was easier said than done. He achieved position control, but it kept skipping steps in certain positions.

The motor and controller consist of a single flexible PCB, to reduce the layer spacing and increase the coils’ magnetic field strength. However, this created other problems, since the motor shaft didn’t have a solid mounting point, and the PCB flexed as the stator coils were energized. Soldering the controller was also a problem, as the through-hole headers ripped out easily and the PCB bulged while reflowing on a hot plate, in one case even popping off components. [Carl] eventually mounted one of the PCB motors inside a 3D printed frame to rigidly constrain all the motor components, but it still suffered from missed steps. Any suggestions for fixing the problem? Drop them in the comments below.

Like his other PCB motors, the torque is very low, but should be suitable for gauges or clocks. A PCB clock with an integrated motor would be pretty cool to have on the workshop wall.

The TMC2300 stepper driver [Carl] used belongs to the same family of drivers that enable silent stepping for 3D printers. We’ve covered a few of [Carl]’s PCB actuator adventures, from his original design to linear actuators and a flexible POV display.

Continue reading “Microstepping A PCB Motor”

Putting The Finishing Touches On A 60W Laser

At this point if you’re even remotely interested in home laser cutters, you know about the K40. These imported machines are very impressive considering they only cost around $400 USD, but naturally, quite a few corners had to be cut to get the price down. If you’re looking for something with a bit more punch and much higher build quality, a new breed of 60 watt lasers have started popping up on the usual import sites for around $2,000 USD.

While these more expensive machines are certainly much higher quality than the K40, [Jeremy Cook] found there was still plenty of room for improvement. For example, the machine didn’t have any switch cut off the laser when somebody opens the lid. While we don’t doubt some readers will consider this more of a feature than a bug, it’s hard to believe that a tool that costs this much wouldn’t at least offer such a thing as an option.

Drilling a hole for the ammeter.

[Jeremy] also decided to add his own ammeter so he could see how much power the laser is drawing. While not strictly required for day to day operation, it turns out that the controller in many of these machines has a tendency to push the laser tubes beyond their design limits on the higher power settings. With the spec sheet for your tube and a permanent in-line ammeter, you can verify you aren’t unwittingly shortening the life of your new cutter.

Even if you ignore the modifications [Jeremy] makes in his video, it’s still a very illuminating look at what it takes to get one of these lasers ready for operation. Not only do you have to get the thing out of its shipping crate safely, but you need to come up with some way to deal with the fumes produced and get the water cooling system hooked up. It’s a decent amount of work, but the end results certainly look impressive.

While the K40 is still probably the better bet for new players, it’s good to see that there are some viable upgrades for anyone who’s outgrown their entry level machine but isn’t in a position to spend the money on an Epilog.

Continue reading “Putting The Finishing Touches On A 60W Laser”

Remoticon Video: Breaking Encrypted Firmware Workshop

If only you could get your hands on the code to fix the broken features on your beloved electronic widget. But wait, hardware hackers have the skills to write their own firmware… as long as we can get the compiled binary into a format the hardware needs.

Luckily, we have Uri Shaked to walk us through that process. This workshop from the 2020 Hackaday Remoticon demonstrates how to decipher the encryption scheme used on the firmware binary of a 3D printer. Along the way, we learn about the tools and techniques that are useful for many encrypted binary deciphering adventures.

Continue reading “Remoticon Video: Breaking Encrypted Firmware Workshop”

Bare-Metal STM32: Blinky And The Secret Of Delay Functions

One of the very first examples for an MCU or SoC usually involves the famous ‘Blinky‘ example, where an LED is pulsed on and off with a fixed delay. This is actually a lot more complicated than the ‘Pushy‘ example which we looked at in the first installment of this series. The reason for this is that there’s actually quite a story behind a simple call to delay() or its equivalent.

The reason for this is that there are many ways to implement a delay function on a microcontroller (MCU), each of which comes with their own advantages and disadvantages. On an STM32 MCU, we get to choose between essentially an active delay (while loop), one implemented using the SysTick timer and using one of the peripheral timers. In the latter two cases we also have to use interrupts.

In this article we’ll take a look at all three approaches, along with their advantages and disadvantages.

Continue reading “Bare-Metal STM32: Blinky And The Secret Of Delay Functions”

Hackaday Podcast 097: We ♥ MicroMice, The Case Of The Missing Drones, And 3D Prints Tested For Rocketry And Food Prep

Hackaday editors Mike Szczys and Elliot Williams round up the latest hardware hacks. This week we check out the latest dead-simple automation — a wire cutting stripping robot that uses standard bypass strippers. Put on your rocket scientist hat and watch what happens in a 3D-printed rocket combustion chamber. Really small robots are so easy to love, this micromouse is the size of a coin. And whatever happened to those drone sightings at airports? We talk about all that, and round up the episode with Hyperloop, and Xiaomi thermometers.

Take a look at the links below if you want to follow along, and as always, tell us what you think about this episode in the comments!

Direct download (~60 MB)

Places to follow Hackaday podcasts:

Continue reading “Hackaday Podcast 097: We ♥ MicroMice, The Case Of The Missing Drones, And 3D Prints Tested For Rocketry And Food Prep”