Old Thermostat Gets Smarts

A smart thermostat is nothing new. But making one built a decade or more ago takes a few tricks. If you want to upgrade your thermostat without replacing it, [geektechniquestudios] shares their solution using a Raspberry Pi Zero to smarten up that dumb controller.

The hardware is decidedly simple: just a Pi Zero and a pair of relays. The relays act as button presses to the old thermostat. The software, though, is decidedly complex. There’s a React server and a Redis database along with some other bits and pieces.

Continue reading “Old Thermostat Gets Smarts”

Why Your Scanner Has A Hole In It

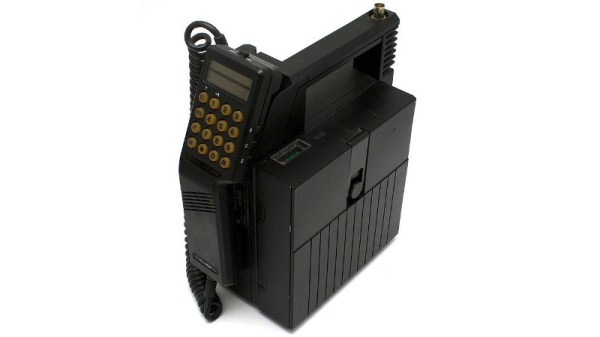
The SDR revolution has completely changed the way radio enthusiasts pursue their hobby, but there is still a space for the more traditional scanning receiver. If you are an American, have you ever noticed that it has a gap in its coverage between 800 and 900 MHz? The curious reason for this is explored by [J. B. Crawford], and it’s a tale of dusty laws relating to a long-gone technology, remaining on the books only because their removal requires significant political effort.

What we might today refer to as “1G” phones used an entirely analogue transmission scheme, with an easily-receivable FM carrier for the voice and extremely low-bandwidth bursts of serial data only for the purposes of managing the call. Listening to these calls was an illegal activity, but for those with the appropriate scanners it became a voyeuristic hobby within a hobby. It even made the world news via the pages of the gossip sheets, when (truthfully or not) it was credited for the leak of a revealing and controversial conversation involving Diana Princess of Wales.

This caused significant worry to the cellular phone companies who understandably didn’t want their product to become associated with insecurity. Thus they successfully petitioned the US Congress to include a clause restricting the capabilities of scanning receivers into another telecoms-related Act, and here we are three decades later with analogue phones a distant memory and the law still on the books. It may be ancient and unnecessary but there is neither the will nor the resources to remove it, so it seems destined to become one of those curious legal oddities that remains on the books for centuries. Whether an RTL-SDR breaks it is something we’ll leave for the lawyers, but the detail in the write-up makes it well worth a read.

Header image: krystof.k (Twitter) & nmuseum, CC BY-SA 3.0.

Hamster Wheel Tacho Measures Tiny Pet Performance

Humans often like to monitor their exercise habits with the use of a pedometer, which tracks steps taken during a walk. Such devices are a little cumbersome for smaller creatures however, but no matter. Hamsters tend to get most of their workouts done on a wheel anyway, so it’s simple enough to instrument the equipment instead.

The build is a simple tachometer, using an infrared emitter and sensor pair to read the rotation speed of the hamster wheel. The wheel itself is light-colored plastic, so a strip of black felt is used to create a non-reflective section, creating a pulse one per revolution that can be read by the Adafruit Feather 32U4 running the show. Data on peak speed and total rotations is available for tracking the exercise habits of the hamster in question, output on a set of 14-segment displays.

It’s a fun project, and one that would be a great way to teach kids about pet care and basic embedded systems. Hamster performance could even be uploaded to the cloud with a more advanced build, and training milestones linked to rewards a la Premier League footballers. At the end of the day, a hamster wheel is just an exercise bike for our four-legged friends, and we’ve seen those hacked too. Video after the break.

Continue reading “Hamster Wheel Tacho Measures Tiny Pet Performance”

How Researchers Used Salt To Give Masks An Edge Against Pathogens

Masks are proven tools against airborne diseases, but pathogens — like the COVID-19 virus — can collect in a mask and survive which complicates handling and disposal. [Ilaria Rubino], a researcher at the University of Alberta, recently received an award for her work showing how treating a mask’s main filtration layer with a solution of mostly salt and water (plus a surfactant to help the wetting process) can help a mask inactivate pathogens on contact, thereby making masks potentially re-usable. Such masks are usually intended as single-use, and in clinical settings used masks are handled and disposed of as biohazard waste, because they can contain active pathogens. This salt treatment gives a mask a kind of self-cleaning ability.

Analysis showing homogenous salt coating (red and green) on the surface of fibers. NaCl is shown here, but other salts work as well.

How exactly does salt help? The very fine salt coating deposited on the fibers of a mask’s filtration layer first dissolves on contact with airborne pathogens, then undergoes evaporation-induced recrystallization. Pathogens caught in the filter are therefore exposed to an increasingly-high concentration saline solution and are then physically damaged. There is a bit of a trick to getting the salt deposited evenly on the polypropylene filter fibers, since the synthetic fibers are naturally hydrophobic, but a wetting process takes care of that.

The salt coating on the fibers is very fine, doesn’t affect breathability of the mask, and has been shown to be effective even in harsh environments. The research paper states that “salt coatings retained the pathogen inactivation capability at harsh environmental conditions (37 °C and a relative humidity of 70%, 80% and 90%).”

Again, the salt treatment doesn’t affect the mask’s ability to filter pathogens, but it does inactivate trapped pathogens, giving masks a kind of self-cleaning ability. Interested in the nuts and bolts of how researchers created the salt-treated filters? The Methods section of the paper linked at the head of this post (as well as the Methods section in this earlier paper on the same topic) has all the ingredients, part numbers, and measurements. While you’re at it, maybe brush up on commercially-available masks and what’s inside them.

Bringing Full Colour PCB Art To Production

One of the Holy Grails in the world of electronic badges has been full-colour PCB art as a logical progression from the limited palette of traditional PCB artwork. In the progression towards achieving this goal there have been a variety of techniques applied, and it’s become an expensive commercial possibility rather than an unachievable dream. Has it become practical for mere mortals then? [Tom Clement] has put together a write-up of his progression towards achieving full-colour PCB artwork on a limited production run , and it makes for a fascinating read.

The board in question is the Pixel badge, an improved commercial version of the CampZone 2019 I-Pane badge we reviewed last year. It’s a very bright large multicolour LED matrix that has caught the eye of campgoers at events ever since the original, and has generated enough demand for a new production run. As well as a few electronic enhancements it replaces the original’s dithered monochrome silkscreen rear art with a full-colour design, and it is that with which the write-up is concerned.

It starts with UV printing, and goes through the various iterations of the process until a satisfactory result is achieved. We learn about the effect of reflow temperatures on UV printing inks, it seems that white ink discolours with temperature and the inventive solution is to transfer all the whites to the PCB silkscreen layer. He closes with a discourse on alignment, and we start to appreciate the achievement behind producing this badge. A colour print isn’t necessary for the Pixel’s eye-searing light show, but the point of badges is as much to show off the cutting edge of the art.

As the regular Hackaday reader will know, colour PCB art is a long-time topic of interest here at Hackaday.

Label Your Shtuff!

Joshua Vasquez wrote a piece a couple of weeks ago about how his open source machine benefits greatly from having part numbers integrated into all of the 3D printed parts. It lets people talk exactly about which widget, and which revision of that widget, they have in front of them.

Along the way, he mentions that it’s also a good idea to have labels as an integrated part of the machine anywhere you have signals or connectors. That way, you never have to ask yourself which side is positive, or how many volts this port is specced for. It’s the “knowledge in the head” versus “knowledge in the world” distinction — if you have to remember it, you’ll forget it, but if it’s printed on the very item, you’ll just read it.

I mention this because I was beaten twice in the last week by this phenomenon, once by my own hand costing an hour’s extra work, and once by the hand of others, releasing the magic smoke and sending me crawling back to eBay.
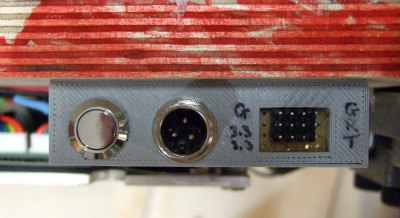
The first case is a 3D-printed data and power port, mounted on the underside of a converted hoverboard-transporter thing that I put together for last year’s Chaos Communication Congress. I was actually pretty proud of the design, until I wanted to reflash the firmware a year later.

I knew that I had broken out not just the serial lines and power rails (labelled!) but also the STM32 SWD programming headers and I2C. I vaguely remember having a mnemonic that explained how TX and RX were related to SCK and SDA, but I can’t remember it for the life of me. And the wires snake up under a heatsink where I can’t even trace them out to the chip. “Knowledge in the world”? I failed that, so I spent an hour looking for my build notes. (At least I had them.)
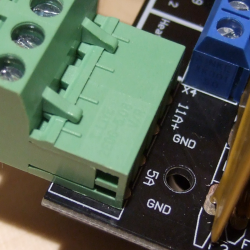
Then the smoke came out of an Arduino Mega that I was using with a RAMPS 1.4 board to drive a hot-wire cutting CNC machine. I’ve been playing around with this for a month now, and it was gratifying to see it all up and running, until something smelled funny, and took out a wall-wart power supply in addition to the Mega.

All of the parts on the RAMPS board are good to 36 V or so, so it shouldn’t have been a problem, and the power input is only labelled “5 A” and “GND”, so you’d figure it wasn’t voltage-sensitive and 18 V would be just fine. Of course, you can read online the tales of woe as people smoke their Mega boards, which have a voltage regulator that’s only good to 12 V and is powered for some reason through the RAMPS board even though it’s connected via USB to a computer. To be honest, if the power input were labelled 12 V, I still might have chanced it with 18 V, but at least I would have only myself to blame.

Part numbers are a great idea, and I’ll put that on my list of New Year’s resolutions for 2021. But better labels, on the device in question, for any connections, isn’t even going to wait the couple weeks until January. I’m changing that right now.

Logitech Joystick Gets A Mechanical Sidekick

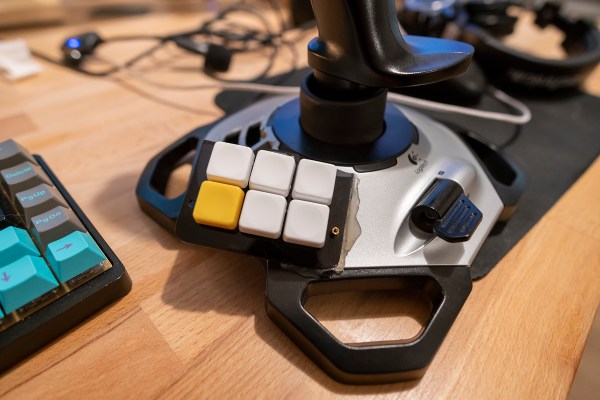
The mechanical keyboard rabbit hole is a deep one, and can swallow up as much money and time as you want to spend. If you’ve become spoiled on the touch and responsiveness of a Cherry MX or other mechanical switch, you might even start putting them on other user interfaces as well, such as this Logitech joystick that now sports a few very usable mechanical keys for the touch-conscious among us.

The Logitech Extreme 3D Pro that [ErkHal] and friend [HeKeKe] modified to accept the mechanical keys originally had a set of input buttons on the side, but these were unreliable and error-prone with a very long, inconsistent push. Soldering some mechanical switches directly on the existing board was a nice improvement, but the pair decided that they could do even better and rolled out an entire custom PCB to mount the keys more ergonomically. The switches are Kailh Choc V2 Browns and seem to have done a great job of improving the responsiveness of the joystick’s side buttons. If you want to spin up your own version, they’ve made the PCBs available on their GitHub page.

While [ErkHal] notes the switches aren’t the best and were only used since they were available, they certainly appear to work much better than what the joystick shipped with originally. In fact, we recently saw similar switches used to make a custom mechanical keyboard made for the PinePhone.