A Minitel Terminal As A USB Linux Terminal

If you paid a visit to France in the 1980s the chances are you’d have been surprised to see a little brown screen and keyboard sitting next to the telephones wherever you went. At the time, it was another reason apart from the food, wine, and super-fast trains to envy our Gallic cousins. This was Minitel, their take on the cutting-edge of online data services of the day.

Minitel stood apart from similar services of the day in most other countries, because of its business model. Unlike the UK’s Prestel or West Germany’s BTX for which you had to spend significant money on a terminal, the French Minitel terminals were free. Thus in the early 1980s everybody in France was busy using videotext while most of the rest of Europe was still excited by chipping bits of flint into arrow heads. Or at least, that’s how it seemed at the time to those of us who didn’t have Minitel.

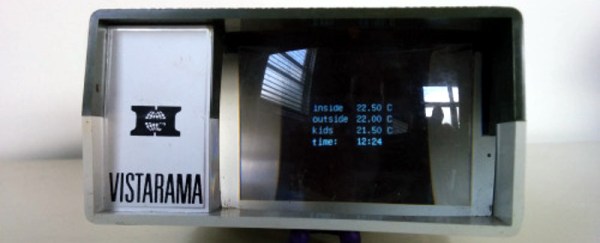
The Minitel service was finally shuttered in 2012, but the terminals can still be found. [Tony Pigram] bought one, an Alcatel Minitel 1, and made it into something useful by turning it into a USB serial terminal for his Raspberry Pi. Surprisingly the physical interface between the Minitel and the USB port is a relatively simple level shifter, but the configuration of both the Minitel and the Pi was anything but.

The problem was that Minitel terminals were meant to work with Minitel, and [Tony]’s difficulties were increased by his machine being an earlier model without the handy function key to access settings found on later terminals. A lot of research paid dividends though, and he now has what must be one of the most compact and stylish CRT serial terminals available. We can’t help noticing it has a QWERTY keyboard and English menus, it would be interesting to know which non-French market it was made for.

We’ve featured an RS-232 integration into a Minitel terminal before here at Hackaday, but if you are really interested in Gallic retro-tech take a look at our discussion of their 8-bit scene.

Build A Replica Apple ///

[Mr. Name Required] pointed us to a great video on the modeling of a replica Apple /// to the small scale needed to contain a Raspberry Pi by [Charles Mangin].

[Mr. Name] pointed out that the video was a great example of the use of reference photos for modeling. [Charles] starts by finding the references he needs for the model. Google image search and some Apple history websites supplied him with the required images.

He modeled the Apple /// in Autodesk 123. It has sketch tools, but he chose to craft the paths in iDraw and import them into the software. This is most likely due to the better support for boolean combination tools in vector editing software. Otherwise he’d have to spend hours messing with the trim tool.

Later in the video he shows how to change the perspective in photographs to get a more orthographic view of an object. Then it’s time for some heavy modeling. He really pushes 123 to its limit.

The model is sent off for professional 3D printing to capture all the detail. Then it’s some finishing work and his miniature Apple /// is done. Video after the break.

Continue reading “Build A Replica Apple ///”

A Dis-Integrated 6502

The 6502 is the classic CPU. This chip is found in the original Apple, Apple II, PET, Commodore 64, BBC Micro, Atari 2600, and 800, the original Nintendo Entertainment System, Tamagotchis, and Bender Bending Rodriguez. This was the chip that started the microcomputer revolution, and holds a special place in the heart of every nerd and technophile. The 6502 is also possibly the most studied processor, with die shots of polysilicon and metal found in VLSI textbooks and numerous simulators available online.

The only thing we haven’t seen, until now, is a version of the 6502 built out of discrete transistors. That’s what [Eric Schlaepfer] has been working on over the past year. It’s huge – 12 inches by 15 inches – has over four thousand individual components, and so far, this thing works. It’s not completely tested, but the preliminary results look good.

The MOnSter 6502 began as a thought experiment between [Eric] and [Windell Oskay], the guy behind Evil Mad Scientist and creator of the discrete 555 and dis-integrated 741 kits. After realizing that a few thousand transistors could fit on a single panel, [Eric] grabbed the netlist of the 6502 from Visual6502.org. With the help of several scripts, and placing 4,304 components into a board design, the 6502 was made dis-integrated. If you’re building a CPU made out of discrete components, it only makes sense to add a bunch of LEDs, so [Eric] threw a few of these on the data and address lines.

This is the NMOS version of the 6502, not the later, improved CMOS version. As such, this version of the 6502 doesn’t have all the instructions some programs would expect. The NMOS version is slower, more prone to noise, and is not a static CPU.

So far, the CPU is not completely tested and [eric] doesn’t expect it to run faster than a few hundred kilohertz, anyway. That means this gigantic CPU can’t be dropped into an Apple II or commodore; these computers need a CPU to run at a specific speed. It will, however, work in a custom development board.

Will the gigantic 6502 ever be for sale? That’s undetermined, but given the interest this project will receive it’s a foregone conclusion.

Correction: [Eric] designed the 555 and 741 kits

Classic Amplifier Reborn With Modern Transistors

Someone brought a dead Marantz amplifier to [Lansing]’s attention, a rather nice model from the 1980s with one channel entirely dead and the other very quiet. His account of its repair is straightforward, but provides some insights should you find yourself with a similar item on your bench.

Opening up the box, he was presented with 35 years of accumulated dust. It’s the annoying side of cracking open classic kit, we all have our dusty horror stories. His first task was routine: to replace all the unit’s capacitors. The mains voltage in France has gone up by 10 volts from 220V to 230V as part of EU harmonization in the years since the amp was built, so he used capacitors with an appropriately higher rating to compensate. We might have waited until the rest of the amp was proven fixed before splashing the cash on caps, but maybe we’re more thrifty.

The quiet channel fix turned out to be from a muting circuit designed to keep the amp quiet during the turn-on phase and suppress that annoying “thump”. A dead transistor replaced, and all was well. The dead channel though had a whole slew of dead transistors in it, which turned the problem from one of repair to one of transistor equivalence. Quite a few of the 1980s parts were no longer available, so modern replacements had to be found.

It is tempting to think of particularly all small-signal transistors as functionally equivalent. You will get away with this in logic and switching circuits in which the device is either On or Off and never in between, but in an audio amplifier like the Marantz things are not so simple. A lot of effort will have been made by the designers to calculate resistances for the current passing through them to deliver the right DC bias points without sending the circuit into wild oscillation. An important part of that calculation comes from the current gain of the transistors involved. [Lansing] had to carefully select his transistors for equivalence, though it some cases he had to do a bit of creative lead-bending to fit a different pin-out.

So, all dead transistors replaced with appropriate equivalents, and the amp was reborn. Success, and very much worth the effort!

We’ve covered a lot of amplifiers here in the past. Some were dead, like this little amp with blown capacitors or this smokin’ subwoofer. Others are more esoteric, like this ion wind 1KV tube creation.

Custom Case Lends Retro Look To Smart TV

Refits of retro TVs and radios with the latest smart guts are a dime a dozen around Hackaday. And while a lot of these projects show a great deal of skill and respect for the original device, there’s something slightly sacrilegious about gutting an appliance that someone shelled out a huge portion of their paycheck to buy in the middle of the last century. That’s why this all-new retro-style case for a smart TV makes us smile.

GE 806 restored by Steve O'Bannon
1940s GE 806 restored by Steve O’Bannon

Another reason to smile is the attention to detail paid by [ThrowingChicken]. His inspiration came from a GE 806 TV from the 1940s, and while his build isn’t an exact replica, we think he captured the spirit of the original perfectly. From the curved top to the deep rectangular bezel, the details really make this a special build. One may quibble about not using brass for the grille like the original and going with oak rather than mahogany. In the end though, you need to work with the materials and tooling you have. Besides, we think the laser cut birch ply grille is pretty snazzy. Don’t forget the pressure-formed acrylic dome over the screen – here’s hoping that our recent piece on pressure-forming helped inspire that nice little touch.

This project was clearly a labor of love – witness the bloodshed after a tangle with a tablesaw while building the matching remote – and brought some life to an otherwise soulless chunk of mass-produced electronics.

[via r/DIY]

Chibiterm Is A Tiny Low-Cost VGA Terminal

A common sight in the days before cheap PCs conquered the world was the dumb terminal. A keyboard and a monitor with a serial port on the back that was usually hooked up to a minicomputer or even a mainframe, these were simple devices. Anything that came into the serial port was rendered on the screen, anything typed on the keyboard was sent out through the serial port. They didn’t need to contain a microprocessor. If you are old enough, you may remember electronics magazines of the 1970s and early 1980s publishing terminal designs based entirely on 74 series logic.

The serial terminal might seem like a redundant historical footnote when viewed from 2016, but they can still find a use among those working with systems such as small embedded microcontrollers that only possess a serial port. To address this application, Hackaday.io user [K.C.Lee] has created a low-cost terminal module for a VGA monitor and a PS/2 keyboard based around an inexpensive STM32F030F4 processor.

Continue reading “Chibiterm Is A Tiny Low-Cost VGA Terminal”

Home Brew Vacuum Tubes Are Easier Than You Think

It all began with a cheap Chinese rotary vane vacuum pump and a desire to learn the witchcraft of DIY vacuum tubes. It ended with a string of successes – a working vacuum chamber, light bulbs, glow tubes, diodes, and eventually this homebrew power triode and the audio amplifier built around it.

[Simplifier]’s workshop seems like a pretty cool place. It must have a bit of an early 20th-century vibe, like the shop that [John Fleming] used for his early work on vacuum tubes. Glass work, metal work, electronics – looks like [Simplifier] has a little bit of everything going on. True to his handle, once [Simplifier] had a cheap but effective vacuum rig he started with the easiest projects – incandescent and gas discharge lamps. Satisfied that he could make solid electrical and physical connections and evacuate the tubes, he moved on to diodes and eventually triodes. The quality of the tubes is pretty impressive – stray gasses are removed with a bake-out oven and induction-heated titanium getters. And the performance is pretty solid, as the video below reveals.

Very impressive overall, and it’s not just the fact that he’s building tubes from scratch – we’ve seen that before. What shines here is that specialized equipment is not needed to make working and reliable tubes – just a MAPP torch, simple hand tools, and a low-end vacuum rig. Anybody could – and probably should – give this a try.

Continue reading “Home Brew Vacuum Tubes Are Easier Than You Think”