Game Boy Camera In Wedding Photo Booth

For those of a certain age the first digital camera many of us experienced was the Game Boy Camera, an add-on for the original Game Boy console. Although it only took pictures with the limited 4-tone monochrome graphics of this system, its capability of being able to take a picture, edit it, create drawings, and then print them out on the Game Boy Printer was revolutionary for the time. Of course the people who grew up with this hardware are about the age to be getting married now (or well beyond), so [Sebastian] capitalized on the nostalgia for it with this wedding photo booth that takes pictures with the Game Boy Camera.

The photo booth features the eponymous Game Boy Camera front-and-center, with a pair of large buttons to allow the wedding guests to start the photography process. The system takes video and then isolates a few still images from it to be printed with the Game Boy Printer. The original Game Boy hardware, as well as a Flask-based web app with a GUI, is all controlled with a Raspberry Pi 4. There’s also a piece of Game Boy hardware called the GB Interceptor that sits between the Game Boy console and the camera cartridge itself which allows the Pi to capture the video feed directly.

The booth doesn’t stop with Game Boy hardware, though. There’s also a modern mirrorless digital camera set up in the booth alongside the Game Boy Camera which allows for higher resolution, full color images to be taken as well. This is also controlled with the same hardware and provides a more modern photo booth experience next to the nostalgic one provided by the Game Boy. There have been many projects which attempt to modernize this hardware, though, like this build which adds color to the original monochrome photos or this one which adds Wi-Fi capability.

Continue reading “Game Boy Camera In Wedding Photo Booth”

Read QR Codes On The Cheap

Adding a camera to a project used to be a chore, but modern camera modules make it simple. But what if you want to read QR codes? [James Bowman] noticed a $7 module that claims to read QR codes so he decided to try one out.

The module seems well thought out. There’s a camera, of course. A Qwiic connector makes hooking up easy. An LED blinks blue when you have power and green when a QR code shows up.

Reading a QR code was simple in Python using the I2CDriver library. There are two possible problems: first, if the QR code contains a large amount of data, you may exceed the I2C limit of 254 bytes. Second, despite claiming a 110-degree field of view, [James’] testing showed the QR code has to be almost dead center of the camera for the system to work.

What really interested us, though, was the fact that the device is simply a camera with an RP2040 and little else. For $7, we might grab one to use as a platform for other imaging projects. Or maybe we will read some QR codes. We’d better pick up a few. Then again, maybe we can just do it by hand.

A Look Through The Eye Of A Bowling Ball

If you are anything like us, last time you went bowling, you thought more about how the ball came back to you than actually knocking down the pin. Perhaps you even wondered what it would be like to be a bowling ball making its way back through mysterious and hidden machines. [Wren] and [Erik Beck] did as well, so they set out to make a bowling ball camera to find out.

At the heart of the contraption is an Insta360 X5 camera nestled between water-jet cut metal plates. Because each lens of the camera has a 200 degree field of view, anything in the overlap of the two lenses simply does not appear, so the two metal plates likewise, do not appear. This does leave a somewhat noticeable seam down the middle of the footage, but overall worked out very well. To prevent vibrations in the bowling ball, it can only be rolled along the plate line, making said seam appear in all the footage. Because the stabilization is happening purely digitally, and the camera itself is spinning with the ball, motion blur became an issue immediately. Fortunately increasing the shutter speed fixed the issue, along with an increase in ISO to compensate for the decreased exposure.

Continue reading “A Look Through The Eye Of A Bowling Ball”

Digitally-Converted Leica Gets A 64-Megapixel Upgrade

Leica’s film cameras were hugely popular in the 20th century, and remain so with collectors to this day. [Michael Suguitan] has previously had great success converting his classic Leica into a digital one, and now he’s taken the project even further.

[Michael’s] previous work saw him create a so-called “digital back” for the Leica M2. He fitted the classic camera with a Raspberry Pi Zero and a small imaging sensor to effectively turn it into a digital camera, creating what he called the LeicaMPi. Since then, [Michael] has made a range of upgrades to create what he calls the LeicaM2Pi.

The upgrades start with the image sensor. This time around, instead of using a generic Raspberry Pi camera, he’s gone with the fancier ArduCam OwlSight sensor. Boasting a mighty 64 megapixels, it’s still largely compatible with all the same software tools as the first-party cameras, making it both capable and easy to use. With a  crop factor of 3.7x, the camera’s Voigtlander 12mm lens has a much more useful field of view.

Unlike [Michael’s] previous setup, there was also no need to remove the camera’s IR filter to clear the shutter mechanism. This means the new camera is capable of taking natural color photos during the day.  [Michael] also added a flash this time around, controlled by the GPIOs of the Raspberry Pi Zero. The camera also features a much tidier onboard battery via the PiSugar module, which can be easily recharged with a USB-C cable.

If you’ve ever thought about converting an old-school film camera into a digital shooter, [Michael’s] work might serve as a great jumping off point. We’ve seen it done with DSLRs, before, too! Video after the break.

Continue reading “Digitally-Converted Leica Gets A 64-Megapixel Upgrade”

All You Need To Know About Photographic Lenses

If you have ever played around with lenses, you’ll know that a convex lens can focus an image onto a target. It can be as simple as focusing the sun with a magnifying glass to burn a hole in a piece of paper, but to achieve the highest quality images in a camera there is a huge amount of optical engineering and physics at play to counteract the imperfections of those simple lenses.

Many of us in the hardware world aren’t optical specialists but our work frequently involves camera modules, so [Matt Williams]’ piece for PetaPixel laying out a primer on lens design should be essential reading well beyond its target audience of photographers.

In it we learn how a photographic lens is assembled from a series of individual lenses referred to as elements, combined together in groups to lend the required properties to the final assembly. We are introduced to the characteristics of different types of glass, and to the use of lens coatings to control reflections. Then we see examples of real lens systems, from some famous designs with their roots in the 19th century, to the lenses of today.

Sometimes a piece written for an entirely different audience can bring really useful insights into our field, and this is one of those times. We learned something, and we think you will too.


Header image: 4300streetcar, CC BY 4.0.

Dual RGB Cameras Get Depth Sensing Powerup

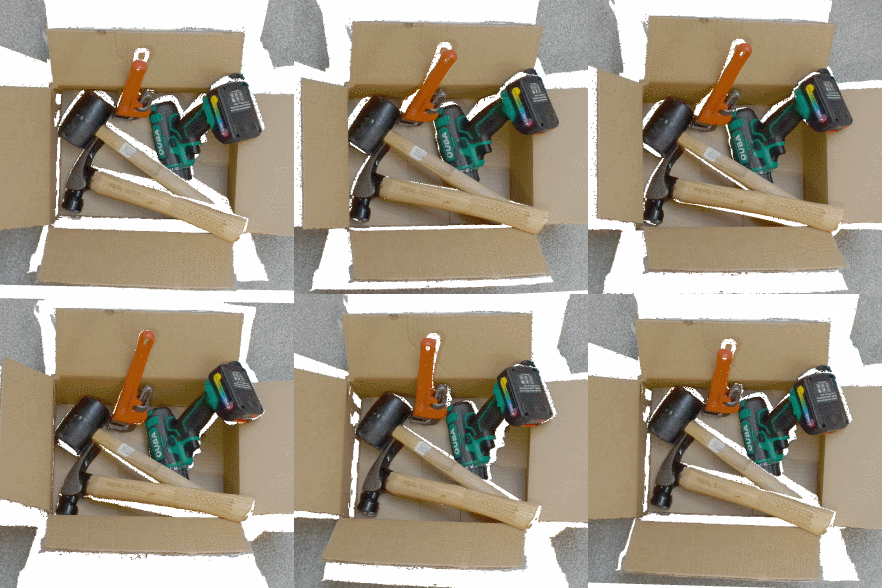
It’s sometimes useful for a system to not just have a flat 2D camera view of things, but to have an understanding of the depth of a scene. Dual RGB cameras can be used to sense depth by contrasting the two slightly different views, in much the same way that our own eyes work. It’s considered an economical but limited method of depth sensing, or at least it was before FoundationStereo came along and blew previous results out of the water. That link has a load of interactive comparisons to play with and see for yourself, so check it out.

A box of disordered tools at close range is understood very well, and these results are typical for the system.

The FoundationStereo paper explains how researchers leveraged machine learning to create a system that can not only outperform existing dual RGB camera setups, but even active depth-sensing cameras such as the Intel RealSense.

FoundationStereo is specifically designed for strong zero-shot performance, meaning it delivers useful general results with no additional training needed to handle any particular scene or environment. The framework and models are available from the project’s GitHub repository.

While products like Microsoft’s Kinect have struggled to keep the consumer’s attention, depth sensing remains an enabling technology that opens possibilities and gives rise to interesting projects, like a headset that allows one to see the world through the eyes of a depth sensor.

The ability to easily and quickly gain an understanding of the physical layout of a space is a powerful tool, and if a system like this one can deliver such fantastic results with nothing more than two RGB cameras, that’s a great sign. Watch it in action in the video below.

Continue reading “Dual RGB Cameras Get Depth Sensing Powerup”

Learning The Basics Of Astrophotography Editing

Astrophotography isn’t easy. Even with good equipment, simply snapping a picture of the night sky won’t produce anything particularly impressive. You’ll likely just get a black void with a few pinpricks of light for your troubles. It takes some editing magic to create stunning images of the cosmos, and luckily [Karl Perera] has a guide to help get you started.

The guide demonstrates a number of editing techniques specifically geared to bring the extremely dim lights of the stars into view, using Photoshop and additionally a free software tool called Siril specifically designed for astrophotograpy needs. The first step on an image is to “stretch” it, essentially expanding the histogram by increasing the image’s contrast. A second technique called curve adjustment performs a similar procedure for smaller parts of the image. A number of other processes are performed as well, which reduce noise, sharpen details, and make sure the image is polished.

While the guide does show some features of non-free software like Photoshop, it’s not too hard to extrapolate these tasks into free software like Gimp. It’s an excellent primer for bringing out the best of your astrophotography skills once the pictures have been captured, though. And although astrophotography itself might have a reputation as being incredibly expensive just to capture those pictures in the first place, it can be much more accessible by using this Pi-based setup as a starting point.

Continue reading “Learning The Basics Of Astrophotography Editing”