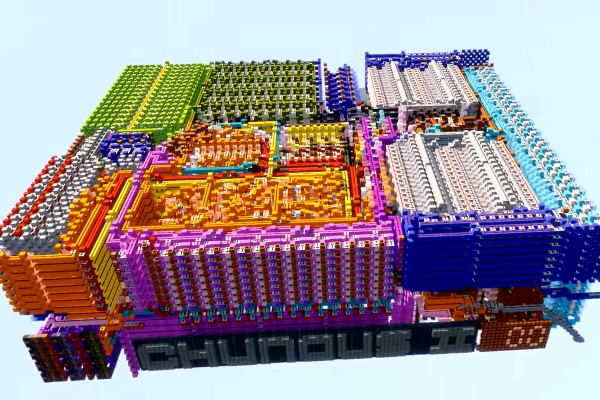
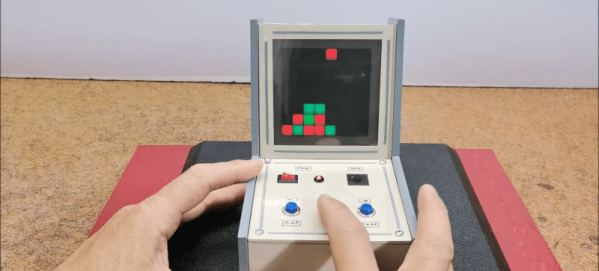
Cardboard Game Tokens Become Shiny Click-Clacks With DIY Treatment

Tabletop games and cardboard tokens go hand-in-hand for a good reason: they are economical and effective. However, their tactile attributes leave a little to be desired. There’s something really great about high-quality pieces possessing a shiny, pleasing smoothness and click-clack handling that cardboard simply can’t deliver, but that all changes with [Dzhav]’s simple method for converting cardboard tokens into deluxe versions of themselves with a little work and a resin coating.

The result is a token with a crystal-clear, smooth, and slightly-convex coating of hardened resin on it. They feel (and sound) like plastic, rather than cardboard. The resin used is a two-part clear jewelry resin, used for casting things like pendants. It benefits from a long working time and unlike UV-cured resin (like the SLA 3D printer resin) it won’t be affected by light.

Careful application of resin relies on surface tension to prevent messes.

Like with most things, good results come from careful preparation and technique. [Dzhav] suggests preparing the tokens by sanding the edges completely smooth with fine sandpaper, then using a black marker to color them. Then, tokens are coated one side at a time with a paintbrush and correctly-mixed resin: while holding a token down with a toothpick, resin is brushed right to (but not over) the edges. Then, additional resin can be dropped in the center of the token, and gravity and surface tension will work together to ensure an even coating that doesn’t drip.

After the resin has had plenty of time to cure, the tokens are flipped over and the process repeated. The end result are tokens with both sides coated in a nice, smooth, ever-so-slightly-convex shield of resin.

They look fantastic, and sound even better. Turn up your volume and play the two-second video embedded below to listen for yourself. And when you’re ready for another gamer that didn’t settle for what was in the box, check out this redesigned Catan version.

Continue reading “Cardboard Game Tokens Become Shiny Click-Clacks With DIY Treatment”

IRL minesweeper render showing game on top of a campaign map

Meat-Space Minesweeper Game Hits The Mark

Hackers of a certain age will remember that before the Internet was available to distract us from our work, we had to find our own fun. Luckily, Windows was there to come to our aid, in the shape of “Minesweeper” – a classic of the age that involved figuring out/occasionally just guessing where a selection of mines had been hidden on a grid of squares via numerical clues to their proximity. For those missing such simple times, [Martin] has brought the game into physical space with his 3D-printed travel-game version.

GIF showing how to play IRL minesweeper game

A number of pre-determined game fields can be inserted (by a friend… or enemy, we presume!) and covered by tiles, which the mine-clearing player can then remove with their plastic shovel to reveal the clues. The aim of the game is to avoid uncovering a bomb, and to place flags where the bombs are hiding.

Aficionados of the game may remember that a little guessing was often inevitable, which sometimes ended in disaster. On the computer version, this merely entailed clicking the Smiley Face button for a new game, but in this case would require a new sheet to be inserted. Blank sheet templates are included for producing your own fiendish bomb-sites, and all the pieces pack away neatly into a handy clam-shell design that would be ideal for long car journeys when the data package on the kids’ tablets has run out.

We wonder what other classic games may lend themselves to a travel remake and look forward to the first 3D-printed travel set of Doom with anticipation!

If you’re above solving your own Minesweeper games, then you can learn how to write a solver in Java here. Continue reading “Meat-Space Minesweeper Game Hits The Mark”

A smartphone-sized PCB is in a person's hand. A large blue chip package houses a 486 and the board has a SoundBlaster card and a 40 PIN Raspberry Pi Connector along one edge for attaching a Raspberry Pi Zero.

TinyLlama Is A 486 In Your Pocket

We love retrocomputing and tiny computers here at Hackaday, so it’s always nice to see projects that combine the two. [Eivind]’s TinyLlama lets you play DOS games on a board that fits in your hand.

Using the 486 SOM from the 86Duino, the TinyLlama adds an integrated Crystal Semiconductor audio chip for AdLib and SoundBlaster support. If you populate the 40 PIN Raspberry Pi connector, you can also use a Pi Zero 2 to give the system MIDI capabilities when coupled with a GY-PCM5102 I²S DAC module.

Audio has been one of the trickier things to get running on these small 486s, so its nice to see a simple, integrated solution available. [Eivind] shows the machine running DOOM (in the video below the break) and starts up Monkey Island at the end. There is a breakout board for serial and PS/2 mouse/keyboard, but he says that USB peripherals work well if you don’t want to drag your Model M out of the closet.

Looking for more projects using the 86Duino? Checkout ISA Sound Cards on 86Duino or Using an 86Duino with a Graphics Card.

Continue reading “TinyLlama Is A 486 In Your Pocket”

Real Minecraft Furnace Generates Electricity From Coal

There’s a furnace in Minecraft that is used to power all kinds of things in the game. [Joel] of Joel Creates decided he wanted to build a real-world replica, and did exactly that.

The furnace consists of a 30 cm aluminium cube, inside which the coal is burned. Thermoelectric generators (TEGs) are then placed on the sides of the furnace to turn the heat into useful electricity. The TEGs are installed in a sandwich of aluminium plates designed to maximize heat transfer through the TEGs themselves. They’re fitted with heatsinks to help create the maximum thermal gradient for greater power output. The entire setup is housed in a larger aluminium cube that’s finished to look like the Minecraft furnace — achieved by using a CNC machine to draw on the aluminium with high-temperature Sharpies.

With the coal a-burning inside, the furnace was able to generate enough power to run its own cooling and exhaust fans. It even had a little power left over to charge a phone. Overall though, [Joel] hopes that with some improvement, it can one day power his Minecraft car replica up to its top speed of 25 mph.

Continue reading “Real Minecraft Furnace Generates Electricity From Coal”

A 12" LCD screen sits between speakers (on lower half of bezel) and joycon controllers are attached on the upper half of the bezel.

Portable Monitor Extension For Nintendo Switch

Handheld consoles are always a tradeoff between portability and screen real estate. [Pavlo Khmel] felt that the Nintendo Switch erred too much on the side of portability, and built an extension to embiggen his Switch. (YouTube)

[Khmel] repurposed a Dell XPS 12 LCD panel for the heart of this hack and attached it to an LCD controller board to serve as an external monitor for the Switch. A 3D printed enclosure envelops the screen and also contains a battery, speakers, and a dock for the console. Along the top edges, metal rails let you slide in the official Joy-Cons or any number of third party controllers, even those that require a power connection from the Switch.

Since the Switch sees this as being docked, it allows the console to run faster and at higher resolution than if it were in handheld mode. The extension lasts about 5 hours on battery power, and the Switch inside will still be fully charged if you don’t mind being constrained to its small screen while you charge it’s bigger-screened exoskeleton.

Need more portable goodness? Be sure to check out our other handheld and Nintendo Switch hacks.

Continue reading “Portable Monitor Extension For Nintendo Switch”

Taking Pokémon On A Walk

Emulating old computers or video game systems isn’t always about recreating childhood nostalgia or playing classics on hardware that doesn’t exist anymore. A lot of the time it can be an excellent way to learn about the mechanics of programming a video game. Plenty of older titles have available source code that anyone can pour over and modify, and one of those is Pokémon Emerald. This was the first Pokémon game that [Inkbox] played, and he added a few modern features to it with this custom ROM file.

The first thing to add to this game was the ability to have one’s Pokémon follow their character around in the overworld map. This is common in later games, but wasn’t yet a feature when Emerald and Ruby first came out. [Inkbox] needed to import sprites from later games into the Emerald game file, convert their color palettes to match the game’s palette, and then get to work on the mechanics. After everything was finished, the Pokémon not only follow the player around the map but are animated, enter and exit their Pokéballs, and even jump off ledges in a believable, 32-bit way.

One of the great things about older games like these is that they’ve been around long enough to have source code or decompiled code available, they often have plenty of documentation, and the platforms they operate on are well-known by now as well. Pokémon Emerald is not alone in this regard; in fact, there is a huge Game Boy Advance homebrew scene that is not too difficult to get involved in.

Continue reading “Taking Pokémon On A Walk”

An M1 Mac mini sits next to a white Wii on a wooden table. In the background are various Edison-style LED light fixtures with an incadescent-like light profile.

This Wii Has An Apple M1 Inside

The conveniently tiny logic board of the M1 Mac mini has lead to it giving the Mini ITX format a run for its money in case mods. The latest example of this is [Luke Miani]’s M1 Wii. (Youtube via 9to5Mac)

[Miani] chose the Wii as a new enclosure for this Mac mini given its similar form factor and the convenient set of doors in the top to maintain access to the computer’s I/O, something he wasn’t able to do with one of his previous M1 casemods. The completed build is a great stealth way to have a Mac mini in your entertainment center. [Miani] even spends the last several minutes of the video showing the M1 Wii running Wii, GameCube, and PS2 games to really bring it full circle.

A Microsoft Surface power brick was spliced into the original Wii power cable since the Wii PSU didn’t have enough wattage to supply the Mac mini without significant throttling. On the inside, the power runs through a buck converter before making its way to the logic board. While the Mini’s original fan was too big to fit inside the Wii enclosure, a small 12V fan was able to keep performance similar to OEM and much higher than running the M1 fanless without a heat spreader.

If you’d like to see some more M1 casemods, check out this Lampshade iMac or the Mac Mini Mini.

Continue reading “This Wii Has An Apple M1 Inside”