Motorized Magic Over HDMI

There is a certain warmth that seems to emanate from stereo receivers of the 70s, 80s, and 90s. Despite their large footprint and considerable heft, the soft glow of the indicator lights and solid kerthunk of switches provide a sense of coziness. When [Tom] recently swapped his receiver for a 1970s Pioneer SX-950, he found himself getting up from the couch to adjust the volume when watching TV far too often for his liking. Resolving to do something about it, he added some magic in the form of a motorized volume knob. One of the coolest tricks for stereos was to have a small motor attached to the volume knob so that it could turn the volume up or down via a remote.

The first obstacle came when [Tom] had to forgo the center tap on the potentiometer to get a motorized one. This meant the volume compensation feature would be disabled, which is but a small price to pay for convenience. After scouring the internet, he finally had the part in hand only to discover some troublesome capacitors in the way. The new pot had a rather large motor hanging off the back that the previous one didn’t have. Fortunately, there was a good bit of space between the PCB and the bottom of the chassis, so Tom was able to just flip the capacitors to the underside of the board and bend them on their sides.

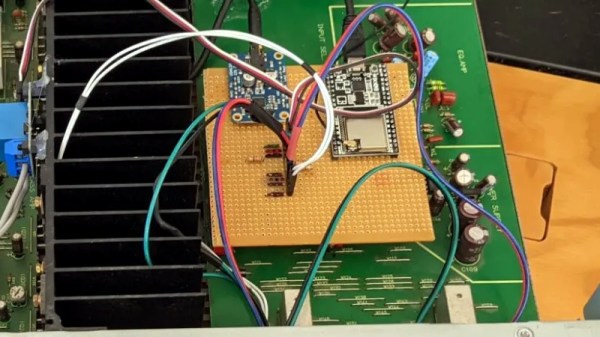
The next problem to solve was how to change the volume remotely. IR was considered as well as optical cable control signals. What [Tom] did instead was to implement HDMI CEC (consumer electronics control). CEC was well documented and seemed simple to implement on an ATTINY4313 with the help of a half-H driver. The CEC protocol implemented by [Tom’s] TV seemed to be very sensitive to timing, so an external crystal was used to get more precise timing and additional handshaking was implemented to get the TV to accept the microcontroller as valid. A few fail-safes were added to make sure the motor didn’t burn out if something went wrong with the CEC protocol and a nice enclosure wrapped up the build quite nicely.

We’ve seen CEC implemented before on a PIC 18F87J50, but as a sender of CEC commands not a receiver. [Tom’s] code is available on GitHub and might prove useful if you’re looking to implement CEC on an AVR.

Thanks [Tom] for sending this one in!

Reactive Pixel Lamps Create Colourful Vibes On Command

Phillips Ambilight technology is a curious thing, never quite catching on in the mainstream due to its proprietary nature. Consisting of an LED array that sits behind a television screen, it projects colours relevant to the content on screen to create a greater feeling of ambience. [Ed Chamberlain]’s reactive pixel lamps aim to do much the same thing in a more distributed way.

Each pixel lamp consists of a Wemos D1 controller fitted with an old-school 4-wire RGB LED. The components are placed in a 3D printed translucent cube, which serves as an attractive enclosure and diffuser. With WiFi connectivity on board, it’s possible to connect the individual cubes up to a Raspberry Pi serving as a Phillips Hue bridge thanks to DIYHue. Once setup, the lights can be configured as an Ambilight system within the Phillips Hue app.

It’s an impressive way to give a room reactive lighting on a budget, without resorting to costly off-the-shelf solutions. We’d love to see this expanded further, as we’re sure a room full of reactive lights would be truly a sight to behold. Other methods to recreate the Ambilight technology are possible, too. Video after the break.

Continue reading “Reactive Pixel Lamps Create Colourful Vibes On Command”

E-Paper Display Shows Movies Very, Very Slowly

How much would you enjoy a movie that took months to finish? We suppose it would very much depend on the film; the current batch of films from the Star Wars franchise are quite long enough as they are, thanks very much. But a film like Casablanca or 2001: A Space Odyssey might be a very different experience when played on this ultra-slow-motion e-paper movie player.

The idea of displaying a single frame of a movie up for hours rather than milliseconds has captivated [Tom Whitwell] since he saw [Bryan Boyer]’s take on the concept. The hardware [Tom] used is similar: a Raspberry Pi, an SD card hat with a 64 GB card for the movies, and a Waveshare e-paper display, all of which fits nicely in an IKEA picture frame.

[Tom]’s software is a bit different, though; a Python program uses FFmpeg to fetch and dither frames from a movie at a configurable rate, to customize the viewing experience a little more than the original. Showing one frame every two minutes and then skipping four frames, it has taken him more than two months to watch Psycho. He reports that the shower scene was over in a day and a half — almost as much time as it took to film — while the scene showing [Marion Crane] driving through the desert took weeks to finish. We always wondered why [Hitch] spent so much time on that scene.

With the proper films loaded, we can see this being an interesting way to really study the structure and flow of a good film. It’s also a good way to cut your teeth on e-paper displays, which we’ve seen pop up in everything from weather stations to Linux terminals.

ESPFLIX Brings Streaming Video To The World Of Microcontrollers

These days, if you’ve got a TV that’s a little too old to directly access streaming services, you’ve got plenty of options. Apple TV, Chromecast, and a cavalcade of Android boxes are available to help get content on your screen. However, if you’re really stuck in the past, ESPFLIX might just be for you.

Control of the system is achieved by an Apple TV remote.

Yes, that’s right – it’s an online streaming service running on an ESP32. [rossumur] has achieved this feat through a careful use of codecs, and some efficient coding strategies to make it all come together. Video is MPEG1, at just 352×192 resolution. Audio is via the SBC codec, originally intended for use with Bluetooth devices. It’s chosen here for its tiny sample buffers, making it easier to decode in the limited RAM of the ESP32. Output is via composite video, generated on the ESP32 itself.

The titles themselves consist of public domain content, running off an Amazon Web Services instance. With limited RAM on the ESP32, there’s not much buffering to be had, so [rossumur] is bankrolling an AWS Cloudfront instance which should make it possible to use ESPFLIX from most places around the world with a solid internet connection.

We’ve seen [rossumur]’s work before, with the ESP_8_BIT serving as a prelude to this project’s capabilities. Video after the break.

Continue reading “ESPFLIX Brings Streaming Video To The World Of Microcontrollers”

This Tube Preamp Has A Nixie Volume Display

The pursuit of audiophile hi-fi is one upon which many superlatives and perhaps a little too much money are lavished. But it’s also a field in which the self-builder can produce their own equipment that is as good or often better than that which can be bought, so it provides plenty of interesting projects along the way. [Justin Scott]’s tube preamplifier is a great example, with its novel use of a pair of Nixie tubes to indicate the volume to which it has been set.

The audio side of the preamp comes courtesy of a four-tube kit from tubes 4 hi-fi, in which we notice another tube as power supply rectifier. The case is a beautifully made wooden affair with a professional front panel, but it’s the Nixies which make it a bit special. A high quality motorised potentiometer is used as a volume control, one of its multiple outputs is used as a simple potential divider to provide a voltage. This is read by an Arduino, which in turn drives the Nixies via a BCD-to-decimal decoder. The attention to detail in the whole project is at a very high level, and though he’s not shred any of its audio measurements with us, we’d expect it to sound as good as it looks.

If tube amplifiers interest you, we’ve delved into their design in the past, and it’s worth directing you to Justin’s matching amplifier, as well.

A True 4K Projector From Scrap EBay Components

Cinemas all over the world have become no-go zones with COVID-19 around, but watching the latest blockbuster on the small screen at home is simply not the same. You could bring the big screen home, but buying a quality projector is going to set you back a small pile of cash. Fortunately [Matt] from [DIY Perks] has an alternative for us, demonstrating how to build your own true 4K projector with parts bought off eBay, for a fraction of the price.

The core of the projector is a small 4K LCD panel, which is from a modified Sony smartphone. [Matt] disassembled the phone, removed the backlight from the LCD, which leaves it semi-transparent, and mounted it at a right angle to the rest of the phone body. The battery was also replaced with a voltage regulator to simulate a full battery. To create a practical projector, a much brighter backlight is needed. [Matt] used a 100W 10 mm diameter LED for this purpose. The LED needs some serious cooling to prevent it from burning itself out, and a large CPU cooler does the job perfectly. Two Fresnel lenses in series are used to turn the diverging light from the LED into a converging light source to pass through the LCD. An old 135 mm large format camera lens is placed at the focal point of light to act as a projection lens. The entire assembly is mounted on a vertical frame of threaded rods, nuts, and aluminium plates. [Matt] also used these threaded rods with GT2 pulleys to create a simple but effective moving platform for the projection lens that allows the focus of the projected image to be adjusted. The frame is topped off by a 45-degree mirror to project the image against a wall instead of the roof, and the frame is covered with aluminium panels.

The video after the break goes into incredible detail on how projector functions and how to build your own down. It definitely looks like a doable build for most hackers. [Matt] will also be releasing a complete PDF build guide in the next few weeks. Continue reading “A True 4K Projector From Scrap EBay Components”

This Old Console Stereo Hides A Liquor Cabinet

There was a time when consumer electronics were statement items, designed to resemble quality furniture that would be shown off as a centerpiece of the home. Televisions in ornate wooden cabinets, or stereos looking for all the world like sideboards. [Zethus] had just such a huge record player and radio combo in a sideboard, and having little use for the cream of 1950s home entertainment technology, he rebuilt it as a concealed liquor cabinet with electronic controls and a much more modern stereo that forms part of a Logitech Media Server multi-room system.

After removing the tube-based radio chassis and Garrard jockey-wheel turntable it was time to gut their supporting woodwork and install the platform derived from a standing desk. With suitably impressive lighting and a pair of VFD displays for the music choice, there is the inevitable Raspberry Pi running the show. Control is achieved by a set of hidden capacitive buttons, and there’s a Web interface to allow both music and magical appearance of alcohol from the comfort of a smartphone. The whole can be seen in the video below the break.

Whenever a piece of vintage electronics is gutted in this way there will always be people who find it disquieting, but the truth is that these all-in-one stereos were made in huge quantities during the mid-century period and do not have a significant value. This one may have lost its original electronics, but it lives on safe from the dump that has claimed so many of its brethren. Happily this isn’t the first one we’ve seen saved with a Pi.

Continue reading “This Old Console Stereo Hides A Liquor Cabinet”