Minimal 433 MHz Web Home Automation

How minimal can a decent home automation setup be? If you need an HTML frontend, you’re going to need a webserver. An ESP8266 will do the trick. And then you need to be able to control your electronics. The cheapest and easiest way to do that is with the ubiquitous 433 MHz remote-controlled outlets and a $1 radio unit from an online auction site. Add in a cheap ESP8266 module, and your total outlay is going to be under $20.

That’s exactly what [Nikos Kantarakias] did. He combined a bunch of available ESP8266 Arduino libraries — one for driving the 433 MHz radio modules, [Paul Stoffregen]’s libraries for keeping time and for setting alarms, and another for keeping track of time zones — with some of his own code for setting up WiFi access, and it’s done.

It’s all available on GitHub for your perusal. The code does some strange things — like requiring a complete reboot every time you set an alarm — but it does let you set recurring and one-off activations of the attached devices with a web interface that’s served off the ESP8266 itself. If you want your coffee machine to turn itself on in the mornings, and want a system that’s easy for the other inhabitants of your house to configure, something like this might be just the ticket.

But if you’re looking for a project on the other end of the ESP-tech spectrum, [CNLohr] wrote a standalone Ethernet controller for the thing. Woah.

Smart Mirror Reflects Hacker

Did [TobiasWeis] build a mirror that’s better at reflecting his image? No, he did not. Did he build a mirror that’s better at reflecting himself? We think so. In addition to these philosophical enhancements, the build itself is really nice.

The display is a Samsung LCD panel with its inconvenient plastic husk torn away and replaced with a new frame made of wood. We like the use of quickly made 3D printed brackets to hold the wood at a perfect 90 degrees while drilling the holes for the butt joints. Some time with glue, band clamps, and a few layers of paint and the frame was ready. He tried the DIY route for the two-way mirror, but decided to just order a glass one after some difficulty with bubbles and scratches.

A smart mirror needs an interface, but unless you own stock in Windex (glass cleaner), it is nice to have a way to keep it from turning into an OCD sufferer’s worst nightmare. This is, oddly, the first justification for the Leap Motion controller we can really buy into. Now, using the mirror does not involve touching the screen. [Tobias] initially thought to use a Raspberry Pi, but instead opted for a mini-computer that had been banging around a closet for a year or two. It had way more go power, and wouldn’t require him to hack drivers for the Leap Motion on the ARM version of Linux.

After that is was coding and installing modules. He goes into a bit of detail about it as well as his future plans. Our favorite is programming the mirror to show a scary face if you say “bloody mary” three times in a row.

Energy Monitor Optically Couples To Smart Meter

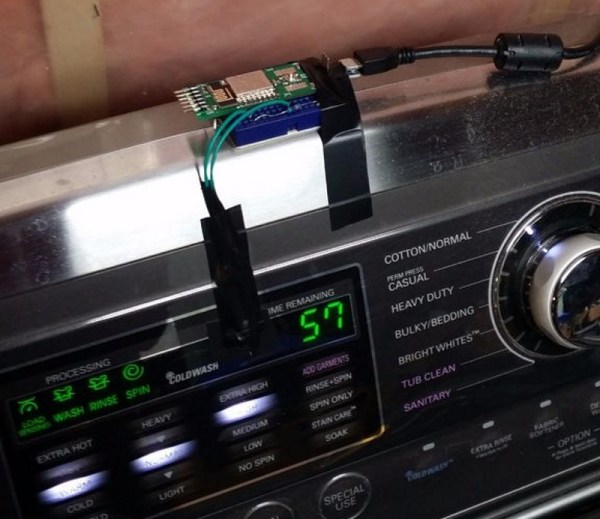
Hackers love to monitor things. Whether it’s the outside temperature or the energy used to take a shower, building a sensor and displaying a real-time graph of the data is hacker heaven. But the most interesting graphs comes from monitoring overall power use, and that’s where this optically coupled smart-meter monitor comes in.

[Michel]’s meter reader is pretty straightforward. His smart wattmeter is equipped with an IR LED that pips for every watt-hour consumed, so optical coupling was a natural approach. The pulse itself is only 10 ms wide, so he built a pulse stretcher to condition the pulse for a PIC microcontroller. The PIC also reads the outside temperature with a DS18B20 and feeds everything to the central power monitor, with an LCD display and a classic Simpson meter to display current power usage. The central monitor sends the power and temperature data to Thingspeak, along with data from [Michel]’s wood-stove monitor and a yet-to-be-implemented water heater monitor.

[Michel] is building out an impressive suite of energy and environmental monitors for his Quebec base of operations. We’re looking forward to seeing how he monitors that water heater, and to see what other ideas he comes up with.

Continue reading “Energy Monitor Optically Couples To Smart Meter”

Small Experiments In DIY Home Security

[Dann Albright] writes about some small experiments he’s done in home security.

He starts with the simplest. Which is to purchase an off the shelf web camera, and hook it up to software built to do the task. The first software he uses is the free, iSpy open source software. This adds basic features like motion detection, time stamping, logging, and an interface. He also explores other commercial options.

Next he delves a bit deeper. He starts by making a simple motion detector. When the Arduino detects motion using a PIR sensor it gets a computer to text an alert. After the tutorial begins to veer a little and he adds his WiFi light bulbs to the mix. Now he can send an email and change the color of the lights.

We suppose, that from a security standpoint. It would really freak a burglar out if all the lights turned red when they walked into a room. Either way, there’s definitely a fun weekend project in playing around with all these systems.

Automated Blinds Open The Window To Our Heart

[Brian Harms] made his living room window blinds open and close automatically using servos, an Arduino, and a SmartThings Arduino shield. Best of all, it’s connected to his Amazon Echo so that merely saying “Alexa, turn on/off the blinds” will open and close them.

To accomplish the feat [Brian] used two laser cut acrylic gears; one of which was attached to the servo horn, and the other to the long square rod running the length of the blinds. Despite using the bulky Arduino and shield, the finished product is inconspicuous and streamlined, and the single Arduino controls all three of the blinds in the living room. [Brian] answered a bunch of questions on a Reddit thread.

Blinds are a common connected home hack, and while none of the hacks we’ve covered in the past were voice activated, we have seen temp-sensitive blinds and a Raspberry Pi-based solution.

Continue reading “Automated Blinds Open The Window To Our Heart”

Add Bluetooth To A Cheap Electronic Lock

[James] works from home. His office is filled with objects that can be described with adjectives such as, “expensive,” and, “breakable.” His home, however, is filled with professional object-breakers known as children. To keep these two worlds from colliding, he installed a keypad lock on his office door. The potential side-effect of accidentally training his children to be master safe-crackers aside, the system seems to work so far.

However, being a hacker, the tedium of entering a passcode soon grew too heavy for him. Refusing to be a techno-peasant, he set out to improve his lock. The first step was to reverse engineer the device. The lock is divided into two halves, one has a keypad and handle, the other actually operates the lock mechanism. They are connected with a few wires. He hooked an oscilloscope to the most likely looking candidates, and looked at the data. It was puzzling at first, until he realized one was a wake-up signal, and the other was the data. He then hooked the wires up to a Bluetooth-enabled Arduino, and pressed buttons until he had all the serial commands the door lock used.

After that it was a software game. He wrote code for his phone and the Arduino to try out different techniques and work out bugs. Once he had that sorted, he polished the app and code until he reached his goal. All of the code is available on his GitHub.

Finally, through his own hands, he elevated himself from techno-peasant to wizard. He need but wave his pocket oracle over the magic box in front of his wizard’s lair, and he will be permitted entry. His wizardly trinkets secure from the resident orcs, until they too begin their study of magic.

Alarm System Upgrade Tips The Functionality Scale

Residential-grade commercial alarm systems are good at a few things but terrible at others, like keeping pace with telephone technology. So what to do when a switch to VOIP renders your alarm system unable to call in reinforcements? Why not strip out the old system and roll your own value-added alarm and home automation system?

Generally, the hardest part about installing an alarm system is running the wires to connect sensors to the main panel, so [Bill Dudley] wisely chose to leverage the existing wiring and just upgrade the panel. And what an upgrade it is. [Bill]’s BOM reads like a catalog page from SparkFun or Adafruit – Arduino MEGA 2560, Ethernet shield, a sound board, stereo amplifier, X10 interface, and a host of relays, transformers, and converters. [Bill] is serious about redundancy, too – there’s an ESP8266 to back up the wired Ethernet, and a DS3231 RTC to keep the time just in case NTP goes down. The case is a bit crowded, but when closed up it’s nicely presentable, and the functionality can’t be beat.

Rehabilitating old alarm systems is a popular project that we’ve covered plenty of times, like this Arduino upgrade for a DSC 1550 panel. But we like the way [Bill] really went the extra mile to build add value to his system.