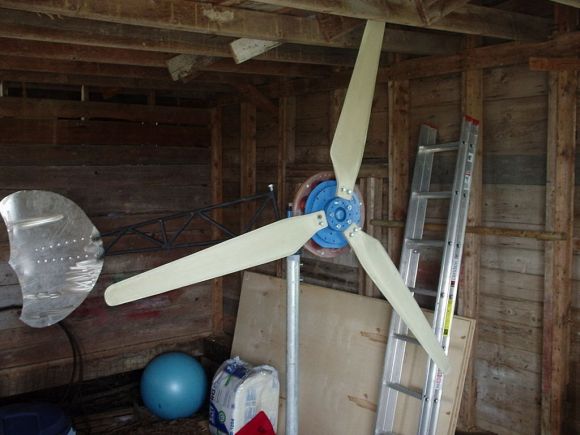
Stealth Camper Van

Sometimes you need to sleep where you’re not supposed to. In this case, [MisterE] wanted to cut the costs associated with his climbing trips. He took a 2001 GMC Savana cargo van and turned it into a stealthy mobile living space. The project is from back in 2008 and we almost waved off from featuring it. But when you start to look at all of the creative space-saving solutions in the hack we think you’ll agree it’s worth a look.

Since he’s a climber that means time in the mountains, which can be quite cold. The sides and floor of the van were insulated to about R19 before the build work itself started and there’s a small wall-mounted heater. For comfort, a fouton was a must for sleeping but also for its double use as a sofa. For style the only choice here was bead-board to cover all of the walls. There is a small kitchenette that is mainly just a sink (we’ve seen running water in vehicles before). A couple of extra batteries power all of the electronics: audio, laptop, etc. When asked, [MisterE] confirms that he added hidden storage areas for his more pricey gear. Total cost on the project came it at $11,500. About nine for the van and the rest for improvements.

He mentions he blew an inverter because of grounding issues while starting the van. As long as he turns it off before start-up he’s fine. Shouldn’t there be a better way to build protection into this? Please leave a comment after the break and let us know what you’d do differently.

[Thanks Mac]

CFL + Bugzapper = Battery Operated Camping Light

CFLBugzapper_01_20

Knowing different ways of generating light is a great skill to have, so go ahead and add this one to your arsenal by combining a Bugzapper with a CFL Light Bulb.

Sure a CFL(Compact Fluorescent Lamp) works just fine on its own if you have AC mains, but what we’re talking about here is getting the light bulb to work off of a single D battery. We featured a similar hack a few months back by using a Joule-Thief to get the high voltage for the fluorescent tube, but if you can’t get your hands on discrete components, [Jan] shows us another way by gutting a tennis racket bugzapper for its booster board. Knowing that the bugzapper steps up the 3V to about 2000V, he decided to see if that same circuit would run off a single 1.5V D battery and achieve the voltage required to drive a CFL tube. After carefully removing the electronics from the CFL housing, [Jan] was able to directly connect the booster board to the electrode wires of the fluorescent tube, and voila; he now has a D-Battery operated camp light that has a run time of over 200 hours.

It would be interesting to see how this hack compares to the Joule-Thief method in terms of brightness and run-time. Before you go and scrap the parts out of the CFL light bulb, make sure you check out this detailed breakdown of popular CFL light bulbs.

DIY Pipe Freezing Kit

Have you ever needed to freeze a water pipe to do a quick plumbing job without shutting off all the water? It’s actually a fairly common practice for contractors, except they use a rather expensive tool to do it. As it turns out, there’s actually a fairly cheap and easy DIY solution you can do with minimal supplies or experience.

[Go Repairs] shows us that all you need is some pipe insulation (or a large sponge), a plastic bag, two zip-ties, and a air duster can. Wrap the insulation and plastic bag around the pipe, and zip-tie it in place. Holding the air duster can upside down, release the majority of the contents into the insulation. Congratulations, you’ve just frozen your pipe. Continue reading “DIY Pipe Freezing Kit”

Move Over, Google Nest: Open Source Thermostat Is Heating Up The Internet Of Things

In the wake of Google’s purchase of connected devices interest Nest, the gents at [Spark] set about to making one in roughly a day and for a fraction of the cost it took Nest to build their initial offering. [Spark]’s aim is to put connected devices within reach of the average consumer, and The Next Big Thing within the reach of the average entrepreneur.

The brain is, of course, [Spark]’s own Spark Core wi-fi dev board. The display is made of three adafruit 8×8 LED matrices driven over I²C. Also on the bus is a combination temperature and humidity sensor, the Honeywell HumidIcon. They added some status LEDs for the furnace and the fan, and a Panasonic PIR motion detector to judge whether you are home. The attractive enclosure is made of two CNC-milled wood rings. The face plate, mounting plate, and connection from the twistable wood ring to the potentiometer is laser-cut acrylic.

[Spark]’s intent is for this, like the Nest, to be a learning thermostat for the purpose of increasing energy efficiency over time, so they’ve built a web interface with a very simple UI. The interface also displays historical data, which is always nice. This project is entirely open source and totally awesome.

If you have an old Android phone lying around, you could make this open source Android thermostat.

Continue reading “Move Over, Google Nest: Open Source Thermostat Is Heating Up The Internet Of Things”

Sucking PIC Firmware Out Of An Old APC Battery Backup

reverse-engineering-pic-firmware-of-APC-power-supply

Looking at this huge Uninterruptible Power Supply we are a little envious. It’s meant to hang on the wall of a utility room and power your critical devices. [Radek Hvizdos] has had it in service for quite some time, and when he started thinking of replacing the internal battery he decided to see if he could also extend the functionality. To do so he needed to get at the firmware of the chip controlling the device. And so began his adventure of dumping the firmware from the read-protected PIC 18F452.

The challenge of dumping code from a write-protected chip is in itself a fun project. But [Radek] was actually interested in fixing bugs and adding features. The wishlist feature we’d be most interested in is a kind of triage for shutting down devices as the internal battery starts to run low. Nice! But starting from scratch with the firmware is a no-go. You can see the two places where he connected to the PCB. The upper is for using a PIC programmer. The lower is an I2C connection used to dump the EEPROM with an improvised Bus Pirate.

In the end it was improper lock bit settings that opened the door to grabbing the firmware. The bootloader section of the PIC is not locked, and neither is the ability to read from FLASH at run-time. These two combined allowed him to write his own code which, when flashed to the bootloader section, dumps the rest of the firmware so that it may be combined into a complete file afterward. Since posting this fascinating article he has made a follow-up about disassembling the code.

Sniffing Wired Garage Door Opener Signals

sniffing-garage-door-signals

In addition to being something fun to do with an oscilloscope, this could be a valuable time-saver for anyone looking to tap into the wired communications on a garage door opener. If you own an older model you might be scratching your head. But newer units have more than just one button operation, usually extending to at least two extra buttons that control the lights on the motor unit and lock out wireless control. A quick probing turned up the communication scheme used by the button unit mounted next to the door into the house.

We’ve patched into our own garage door using a simple relay to interface with a microcontroller which will still work for opening and closing the door But if you’re looking for extended control you need to spoof one of the timing signals detailed in this post. We like the stated examples for future hacks: building a better wired button unit, or adding some type of RFID integration. We could see this approach for hacking in motion light control for door openers that don’t have it.

[Thanks Victor]

Built-in Coffee Table Lightbox

diydollarstorelightbox

[Flyingpuppy] sent us this tip about her cleverly-concealed pull-out lightbox drawer. Her resolution for the new year was to make more art, so she filled this coffee table with art supplies and decided she’d draw while relaxing in front of the television. She also wanted a lightbox nearby, which originally involved hacking the entire tabletop with some acrylic, but she eventually opted for a simpler build: and it’s portable, too! The drawer’s lights are battery-powered, so you can pull the entire thing out of the table and drag it onto your lap, if that makes drawing more comfortable.

[Flyingpuppy] sourced seven inexpensive LED units from her local dollar store, which she mounted to the back of the drawer with some screws. The rest of the drawer was lined with white foam board, the bottom section angled to bounce light up onto the acrylic drawing surface. Because she needs to open the case to manually flip on the lights, she secured the acrylic top magnetically, gluing a magnet to the underside of the foam board and affixing a small piece of steel to the acrylic. A simple tug on the steel bit frees the surface, providing access underneath. Stick around for a video below.

Continue reading “Built-in Coffee Table Lightbox”