Today you can buy flashing LEDs; a simple two-lead component that requires only a power supply to produce even flashes of light. They look for all the world like any other LED, though embedded in the plastic dome is an integrated circuit to do all that flashing work.
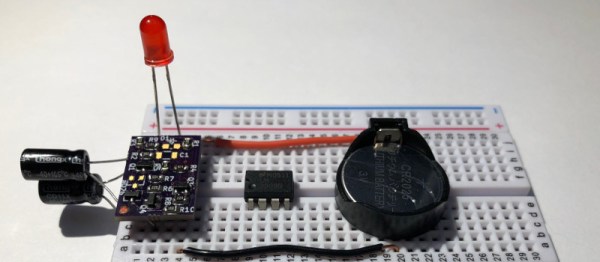
There was a time though when a flashing LED was something of a big deal, so much so that National Semiconductor produced a dedicated chip for the task. The LM3909 boasted the ability to flash an LED for over a year using a single C battery. That part is now long out of production, so [Dillon] has implemented the LM3909 circuit using discrete components on a small PCB designed to take pins and fit the footprint of the original.
Why on earth might a reborn LM3909 be of interest to him, you ask? Well, he wasn’t able to make a 555 flash the LED from a coin cell, and a friend mentioned this chip which piqued his interest. The internal schematic is in the data sheet (found in the files section of his project), so he was able to implement it relatively easily using common parts. It still requires an external capacitor just like the original, but there is space on-board should you wish to put it there.
He’s produced a video we’ve placed below the break showing the device in action, proving it to be a drop-in replacement for an original. Recreations of classic chips using discretes are nothing new, we recently brought you a reborn PSU regulator chip made in 2014. An while you’re playing around with coin cell batteries, may we direct your attention to the Coin Cell Challenge.
Continue reading “There Once Was An IC Dedicated To Blinking An LED”