LEDs are a wonderful technology. You put in a little bit of power, and you get out a wonderful amount of light. They’re efficient, cheap, and plentiful. We use them for so much!
What you might not have known is that these humble components have a secret feature, one largely undocumented in the datasheets. You can use an LED as a light source, sure, but did you know you can use one as a sensor?
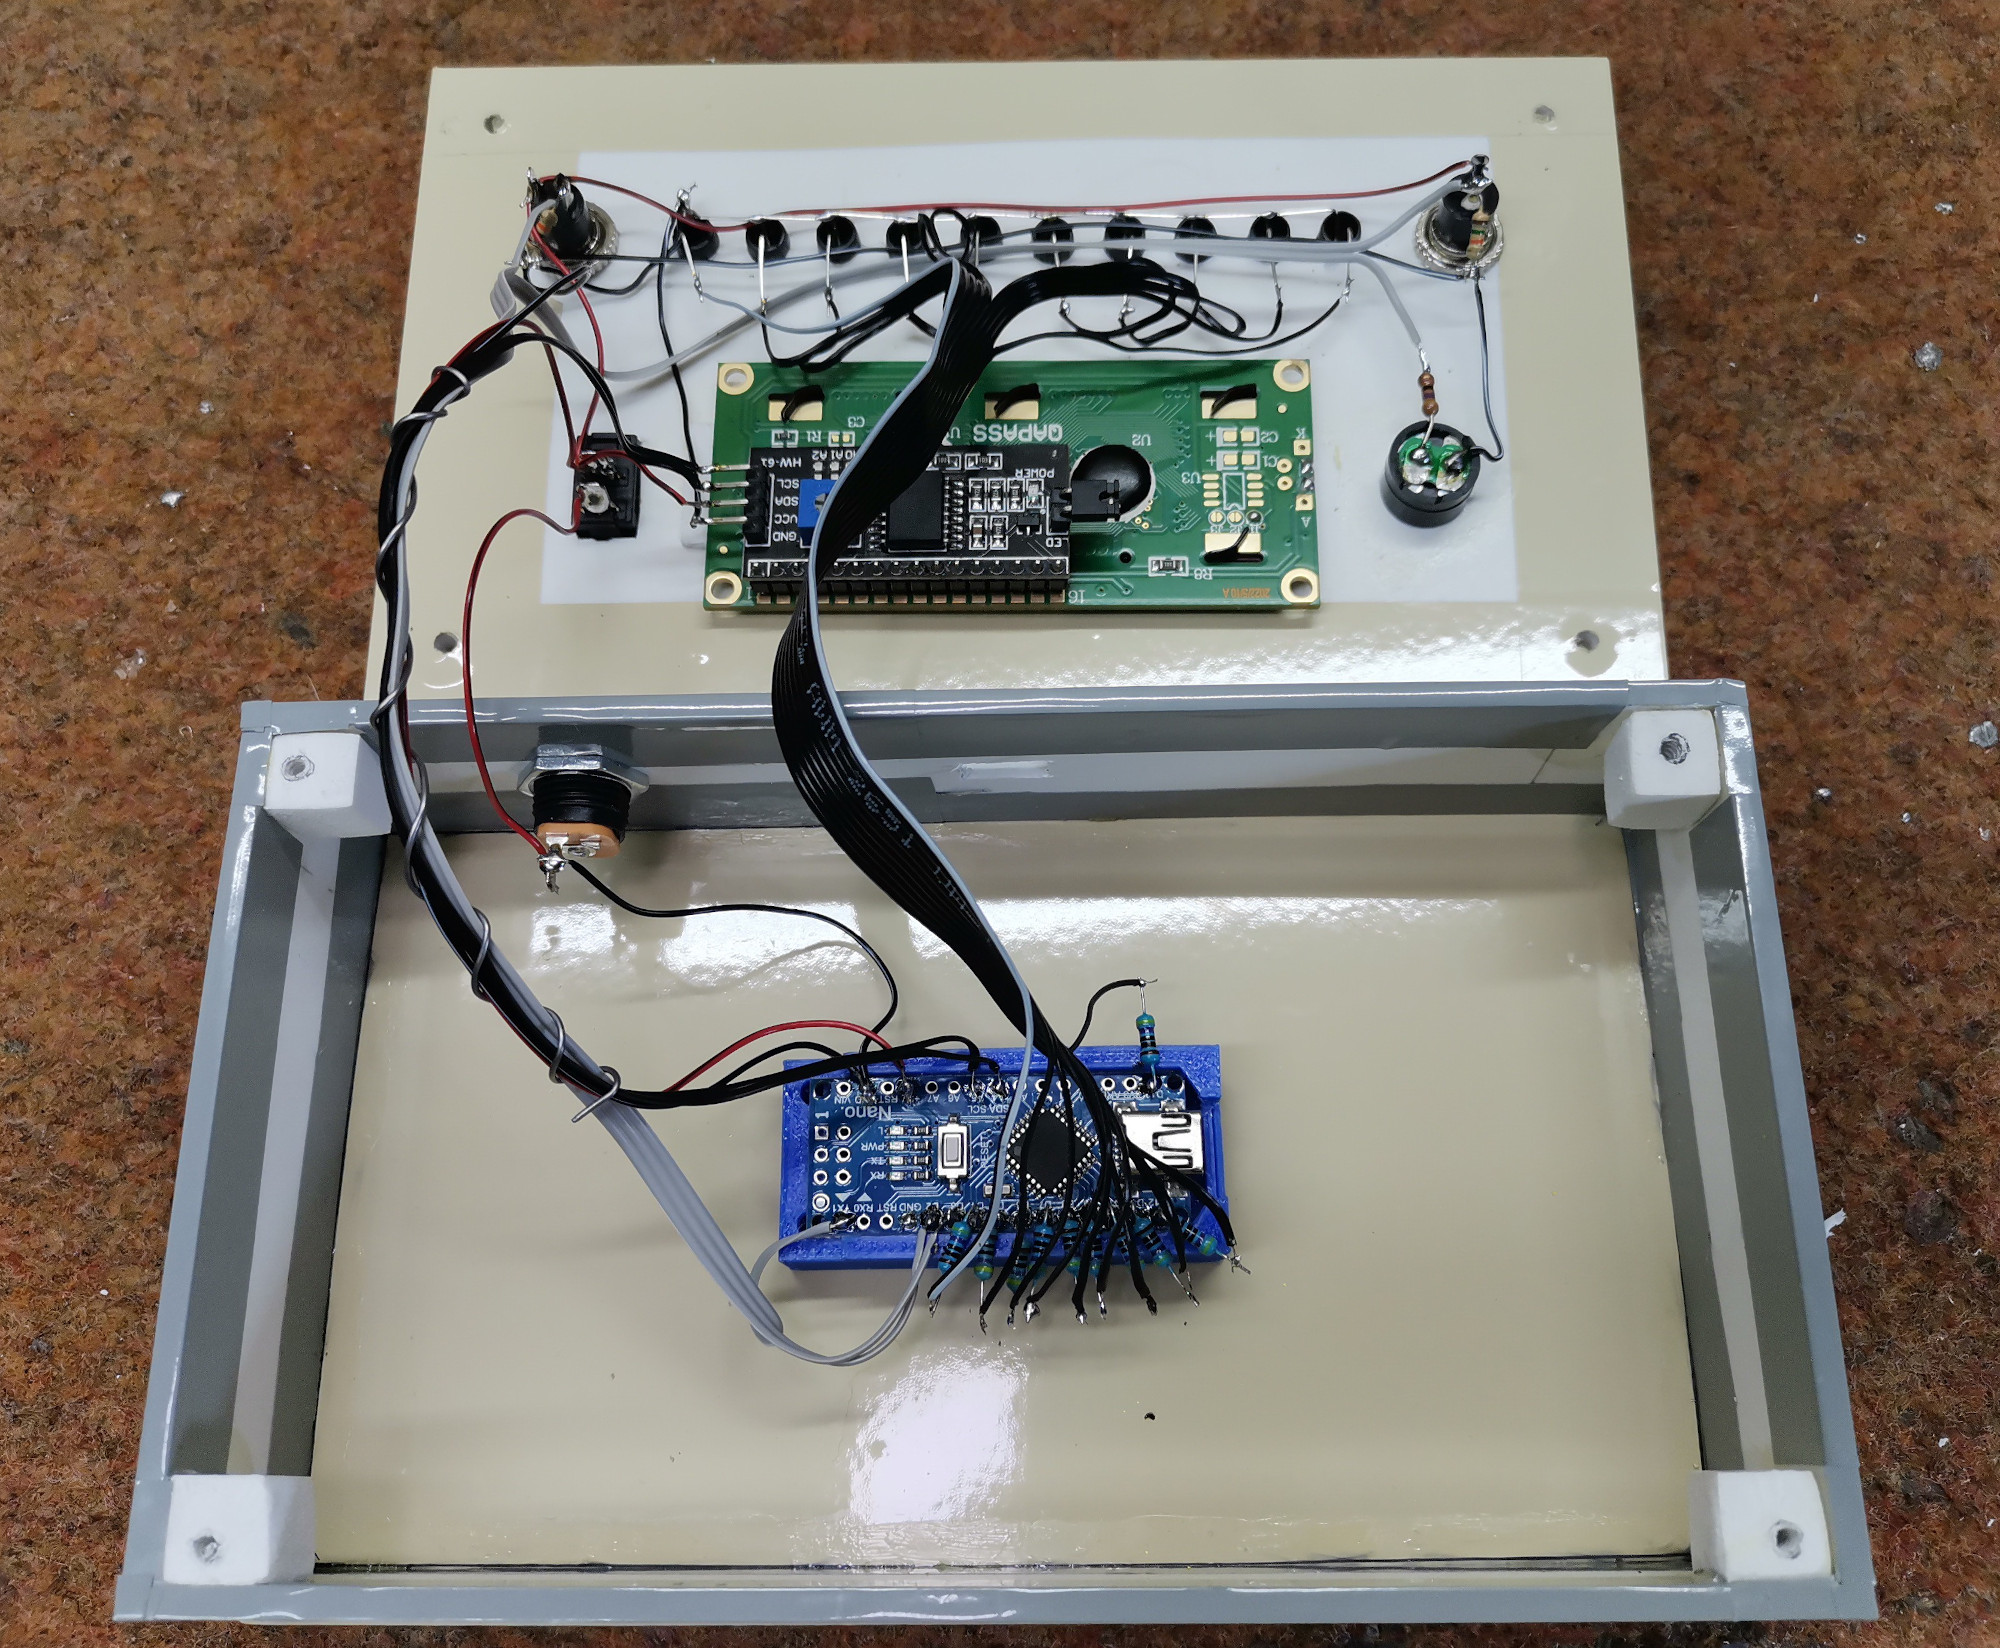
As far as video games go, Pong is already about as simple as it gets. But if even two dimensions is a bit more than you’re looking to tackle, [mircemk] shows how you can distill the core gameplay of this iconic title to its absolute minimum using an Arduino and a row of LEDs.
While [mircemk] brings their usual design aesthetic and flash to the project, this one could truly be done as a parts bin build. All you really need is a microcontroller with enough I/O pins (here, an Arduino Nano is used), a couple of buttons, and the aforementioned LEDs. A 16×2 LCD and a buzzer have been added to improve on the user interface a bit, but even that isn’t strictly required.
To play, each user holds their button and gets ready to hit it as soon as the LED closest to them lights up. Again, [mircemk] spruces this build up by offering both integrated buttons on the front panel of the game, as well as a pair of external “controllers” so you don’t have to crowd around the main unit. In this incarnation the score is shown on the LCD, but swapping that out for a pair of seven-segment LEDs could give the whole thing a bit more of a retro flair.
[Gilles Messier] at the Our Own Devices YouTube channel recently took a look at an interesting device — an electric lantern powered by a candle. At first glance, this sounds completely absurd. Why use a candle to power LEDs when you can use the light from the candle itself? This gadget has a trick up its sleeve, though. It lets candle light out and uses the heat from the candle flame to generate power for the LEDs.
The small Peltier “solid-state heat pump” module in the lantern acts as a thermoelectric generator, converting heat from the candle into electricity for the LEDs. The genius of the device is how it handles the candle “exhaust”. A bimetallic disk in the chimney of the lantern closes when the air inside the device is hot. The Peltier device converts the heat differential to electricity, causing the air inside the lantern to cool. Meanwhile, the candle is beginning to starve for oxygen. Once the air cools down a bit, the disk bends, allowing stale smoke out, and fresh air in, allowing the candle to burn brightly again. Then the cycle repeats.
[Gilles] does a deep dive into the efficiency of the lantern, which is worth the price of admission alone. These lanterns are pretty expensive — but Peltier modules are well-known by hackers. We’re sure it won’t be too hard to knock together a cheap version at home.
We think it’s OK to admit that when someone puts a binary display on a project, it’s just a thinly veiled excuse to get more blinkenlights into the world. That and it’s a way to flex a little on the normies; you’ve gone pretty far down the tech rabbit hole to quickly decipher something like this binary-display thermometer, after all.
Don’t get us wrong, we think those are both perfectly valid reasons for going binary. And all things considered, a binary display for a thermometer like [Clovis Fritzen]’s is much simpler to decode than, say, a clock. Plus, it seems a bit that this build was undertaken at least partially as an exercise in Charlieplexing, which [Clovis] uses to drive the six-bit LED display using only three lines of GPIO from the Digispark ATtiny85 board running the show.
The temperature sensor is a DHT11, whose output is read by the microcontroller before being converted to binary and sent to the six-bit display. The 64-degree range is perfect for displaying the full range of temperatures most of us would consider normal, although we’d find 63°C a touch torrid so maybe there’s a little too much resolution on the upper end of the scale. Then again, switching to Fahrenheit would shift it toward the hypothermia end of the scale, which isn’t helpful. And you can just forget about Kelvin.
If there’s one thing we like better around here than old, obscure displays, it’s old, obscure displays with no documentation that need a healthy dose of reverse engineering before they can be put to use. These Plessey dot-matrix displays are a perfect example of that.
We’re not sure where [Michael] scored these displays, but they look fantastic. Each 8-pin DIP has two 5×7-matrix, high-visibility LED displays. They bear date codes from the late 80s under the part number, GPD340, but sadly, precious little data about them could be dredged up from the Interwebz. With 70 pixels and only six pins after accounting for power and ground, [Michael] figured there would be a serial protocol involved, but which pins?
He decided to brute-force the process of locating them, using a Pico to sequentially drive every combination while monitoring the current used with a current sensor. This paid off after only a few minutes, revealing that each character of the display has its own clock and data pins. The protocol is simple: pull the clock and data pins high then send 35 bits, which the display sorts out and lights the corresponding pixels. The video below shows a 12-character scrolling display in action.
Plessey made a lot of displays for military hardware, and these chunky little modules certainly have a martial air about them. Given that and the date code, these might have come from a Cold War-era bit of military hardware, like this Howitzer data display which sports another Plessey-made display.
[Carl Bugeja] finds the engineering behind the Las Vegas Sphere fascinating, and made a video all about the experience of designing and building a micro-sized desktop version. [Carl]’s version is about the size of a baseball and crams nearly a thousand RGB pixels across the surface.
A four-layer flexible PCB is the key to routing data and power to so many LEDs.
Putting that many addressable LEDs — even tiny 1 mm x 1 mm ones — across a rounded surface isn’t exactly trivial. [Carl]’s favored approach ended up relying on a flexible four-layer PCB and using clever design and math to lay out an unusual panel shape which covers a small 3D printed geodesic dome.
Much easier said that done, by the way. All kinds of things can and do go wrong, from an un-fixable short in the first version to adhesive and durability issues in later prototypes. In the end, however, it’s a success. Powered over USB-C, his mini “sphere” can display a variety of patterns and reactive emojis.
As elegant and impressive as the engineering is in this dense little display, [Carl] has some mixed feelings about the results. 945 individual pixels on such a small object is a lot, but it also ends up being fairly low-resolution in the end. It isn’t very good at displaying sharp lines or borders, so any familiar shapes (like circles or eyes) come out kind of ragged. It’s also expensive. The tiny LEDs may be only about 5 cents each, but when one needs nearly a thousand of them for one prototype that adds up quickly. The whole bill of materials comes out to roughly $250 USD after adding up the components, PCB, controller, and mechanical parts. It’s certainly a wildly different build than its distant cousin, the RGB cube.
Still, it’s an awfully slick little build. [Carl] doubts there’s much value in pursuing the idea further, but there are plenty of great images and clips from the build. Check out the video, embedded below.
Never underestimate how far some flight simulator aficionados will go with their builds. No detail is too small, and every aspect of the look and feel has to accurately reflect the real cockpit. As a case in point, check out these very realistic Korry buttons that [Santi Luib III] built for an Airbus A320 simulator.
Now, you might never have heard of a “Korry button” before, but chances are you’ve seen them, at least in photos of commercial or military aircraft cockpits. Korry is a manufacturer of switches and annunciators for the avionics industry, and the name has become shorthand for similar switches. They’ve got a very particular look and feel and are built to extremely high standards, as one hopes that anything going into a plane would be. That makes the real switches very expensive, far more so than even the most dedicated homebrew sim builder would be comfortable with.
That’s where [Santi] comes in. His replica Korry buttons are built from off-the-shelf parts like LEDs and switches mounted to custom PCBs. The PCB was designed for either momentary or latching switches, and can support multiple LEDs in different colors. The assembled PCBs snap into 3D printed enclosures with dividers to keep light from bleeding through from one legend to the other.
The lenses are laser-cut translucent acrylic painted with urethane paint before the legends are engraved with a laser. The attention to detail on the labels is impressive. [Santi]’s process, which includes multiple coats of sealers, gets them looking just right. Even the LEDs are carefully selected: blue LEDs are too bright and aren’t quite the proper shade, so [Santi] uses white LEDs that are dimmed down with a bigger resistor and a light blue photographic gel to get the tint just right.
These buttons are just beautiful, and seeing a panel full of them with the proper back-lighting must be pretty thrilling. If civil aviation isn’t your thing, check out this A-10 “Warthog” cockpit sim, and the cool switches needed to make it just right.