Two Dice, One 8-pin UC

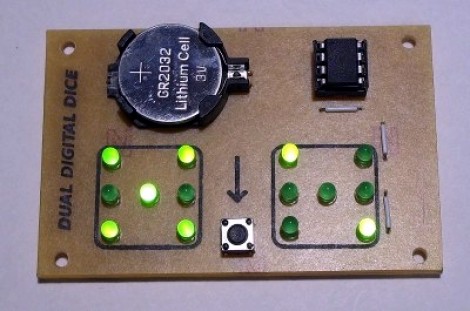
[Mike Shegedin] makes full use of an 8-pin microcontroller with this ATtiny13-based dice project. With a maximum of six I/O pins (that includes using the reset pin as I/O) he needed a couple of tricks in order to drive 14 LEDs and use a momentary push button for user input. We’re certainly familiar with the concepts here, but it still took quite a while to figure out what is going on with the schematic that [Mike] posted.

You’ve probably already guessed that he’s using Charlieplexing to drive more LEDs than he has pins. But when we started looking at the layout we thought he had drawn the schematic wrong, because there are six pairs of LEDs where the two diodes in each pair a not reverse biased, but hooked up in parallel. That, plus the fact that his battery is hooked up backwards. After several minutes of study the light bulb finally clicked on. Dice add pips (the dots on each side of a die) in pairs with the exception of the center pip. That means that you only need to control four total lines for each die (three pairs plus the center pip). There’s two ways to handle this, you could use four rows and two columns with traditional multiplexing, or you can reverse bias the two sets of LEDs for each die and use Charlieplexing. The former is a bit easier to program, the latter saves you one I/O pin and meant that [Mike] didn’t need to use the reset pin as I/O.

This is a clever addition to the collection of dice projects we’ve seen like the battery-less die, and the ATtiny2313 powered dice.

Building A Battery-powered Motion Alarm

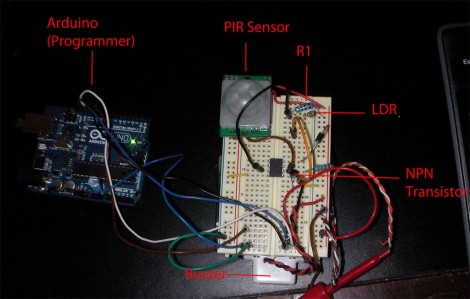
[Brad] was asked by his Sister to design a motion-based alarm that would help her catch her son sneaking out of the house at night. Obviously this didn’t need to be a long-term installation so he decided to throw something together that is only active at night and can be battery-powered. What he came up with is a light-sensitive motion sensor that uses very little power.

He knew that an Arduino would be overkill, and decided to try his hand at using the Arduino to develop code for an ATtiny85. It has an external interrupt pin connected to the output of the PIR module, which triggers action when motion is detected. The first thing it does is to check the photoresistor via the ADC. If light levels are low enough, the buzzer will be sounded. [Brad] measured the current consumption of his circuit and was not happy to find it draws about 2.5 mA at idle. He spent some time teaching himself about the sleep functions of the AVR chips and was able reduce that to about 500-600 uA when in sleep mode. Now all he has to do is find a nice place behind the house to mount the alarm and there’ll be no more sneaking around at night.

If you’re trying to keep a tight leash on your own kids you could always make them punch the time clock.

Python On A Microcontroller

The team at LeafLabs was looking for something cool to do with their new ARM development board. [AJ] asked if anyone had ever played around with Python, so [Dave] cooked up an implementation of PyMite and put it on a Maple board. While the writeup is only about blinking a LED with a microcontroller, they’re doing it with Python, interactively, and at runtime.

The build uses the Maple Native board the team is developing. The board has a 32-bit ARM chip with 1 Meg of RAM – more than enough horsepower to run PyMite. The tutorial for putting PyMite on a Maple is up on the LeafLabs wiki.

PyMite is theoretically able to control every pin on the Maple Native and do just about everything a regular Python distro can do. The LeafLabs team is still working on the necessary libraries for their board (although we don’t see anything on the Google code page), so right now only blinking the LED is supported. Still, it’s pretty cool to have Python in your pocket.

Barebones PIC RFID Tag

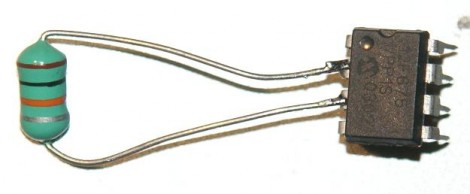
An inductor and 8-pin microcontroller are all that make up this barebones RFID tag. You might have done a double-take when first seeing the image above. After all, there’s nothing hooked up to the power and ground pins on the chip. As [Ramiro Pareja] explains in his post, the power is actually supplied via the I/O pins to which the inductor is soldered. It seems that each I/O pin has a parasite capacitor and a pair of clamping diodes inside the chip. When the AC current that is induced by the magnetic field of the RFID reader hits those pins, the capacitors charge and the clamping diodes form a bridge rectifier. This results in power being injected into the chip, which turns around and sends the RFID code back through the inductor.

This isn’t the first time that we’ve seen this concept. We featured a hack that is exactly the same except it used an AVR chip. This one uses a PIC 12F683 but should work with just about any 12F or 16F model. The code is written in Assembly and shouldn’t need any changes for different hardware. [Ramiro] does talk a bit about adding a decoupling capacitor to Vss and Vdd, as well as a tuning capacitor to the two I/O pins used above to help make the device a little more robust. But, as you can see in the video after the break, it works just fine without them.

Continue reading “Barebones PIC RFID Tag” →

ATtiny Hacks: ATtiny45/85 Servo Library

ATtiny Hacks Theme Banner

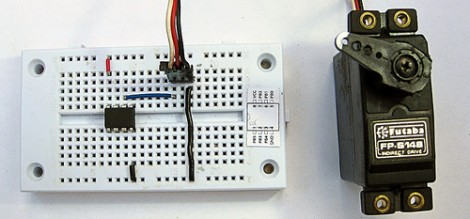
Servo8bit is a library for AVR microcontrollers that allows you to drive servo motors without the need for a 16-bit timer. Obviously, this is quite useful for smaller chips that only have 8-bit timers and it is specifically targeted at the ATtiny45 and ATtiny85 microcontrollers. The library offers 256 steps of resolution, and can drive up to five servos at one time. Servo control pulses can be generated between 512 and 2560 microseconds and if you don’t mind increasing the time between these pulses [Liya] says it would be possible to increase the 5-servo limit.

The library is quite easy to use, but in its current state it would take just a bit of work to port to another device. It’s been written for an 8 Mhz clock signal with PortB used to drive the motors. Using find-and-replace to change the PORTB keywords to use a DEFINE variable should be easy enough, but we don’t know how hard it would be to change the clock frequency.

We wonder if it’s possible to make this a slave device, perhaps implementing a 1-wire protocol?

ATtiny Hacks: ATtiny10 Game – Doing More With Less

ATtiny Hacks Theme Banner

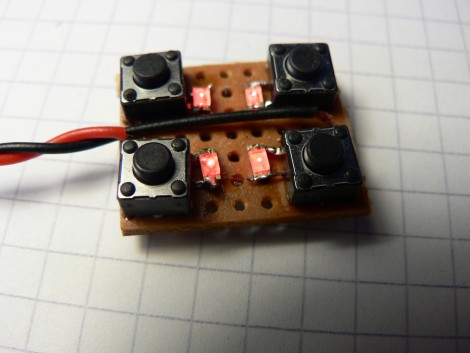
Okay, you’ve got a six-pin microcontroller with 1k of program memory, 32 bytes of SRAM, and it can’t be programmed using an In-System-Programmer. Do you think you can use it to develop a game? [Wrtlprnft] managed to build a Simon Says game based on the diminutive device that has four buttons and four LEDs. Judging from the video after the break, we’d say he nailed it!

There are so many design challenges here. First off, with only six pins total getting eight devices connected and working means doubling up on each I/O pin and using the reset pin as a doubled-up I/O. We’ve seen momentary push buttons on the same pins as LEDs before, so that’s not too hard to get working.

But if you’re using the reset pin how do you flash the thing? It doesn’t use the same ISP programming protocol that it’s bigger cousins do, so [Wrtlprnft] used an ATmega1284P to program it, hooking up to the three I/O pins and using a transistor to push 12V on the reset pin. But there’s still the matter of writing the code. It has half of the 32 registers you’d expect to find. He ended up ditching C and went straight to writing Assembly because of the diminished instruction set. It’s the first thing he’s written in Assembly, and a great way to learn the ropes.

It may not be as polished, but we do like it just as much as the Karate Chop Simon Says game which has a lot of other bells and whistles.

Continue reading “ATtiny Hacks: ATtiny10 Game – Doing More With Less” →

USB Stick Propeller Development Board

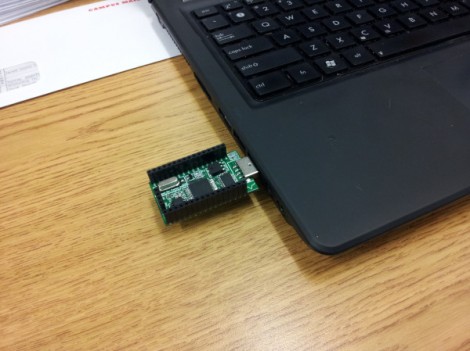
[Parker Dillmann] is nearing the end of the prototyping process for his Propeller development board. He wanted a tool that let him work on projects without the need for a bunch of equipment, while still maintaining the ability to extend the hardware when necessary. His last dev board used a large piece of protoboard to host through hole components including the Propeller chip, 3.3V and 5V regultors, an SD card reader, and female pin headers. This version migrates to a PCB from a fab house and mostly surface mount components.

He decided to use a USB-stick design having been happy with some of TI’s prototyping tools. The Parallax branded development boards use an FTDI 232RL chip for easy programming and that’s what he’s gone with as well. A P8X32A chip in the QFP package was chosen for easier soldering than the smaller QFN option. There’s also a 64kb EEPROM on board to give you plenty of room for your SPIN programs. All the pins are broken out to DIL female headers and there’s a power header on the end opposite the USB plug. [Parker] plans to do a bit of testing to make sure there’s no problems with signal routing below the 5Mhz crystal footprint. This run of prototypes came from the Seeed Studios Fusion PCB servcie–he got more than 10 boards for a total of $13… that’s almost unbelievable.