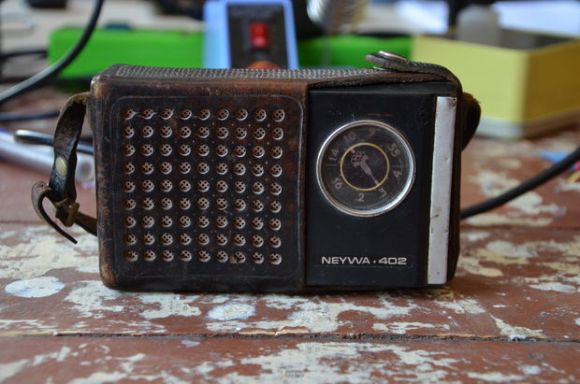
Iowa Forensics Opts For A CSI Style Hack To Save Their Budget

Stungun

There’s a very effective way of lifting dusty fingerprints from the field, or in a lab. It’s called an Electrostatic Dust Print Lifter — but as you can imagine, it is rather expensive from a forensic supply store. [Bradley VanZee] — from the Iowa Division for International Association for Identification — realized how simple a tool it was, and made his own for just over $50.

But first, how does it work? Electrostatic print lifting is a non-destructive process where you develop an electrostatic field on a sheet of “lifting film” which attracts the dust particles to stick to the film. It’s capable of recovering impressions from both porous and non-porous surfaces — even ones not visible to the naked eye.

Commercial versions of the tool cost upwards of $600-$800 + lift film. The first hack they realized is that instead of using proprietary lift film, it is just as effective to use car window tint instead! The second hack is even more clever — using a 80,000V tazor, some electrical leads, and some tinfoil you can create your own version of the tool. The aluminum foil acts as a ground, and the object you are inspecting is sandwiched between it and the lifting film. Holding the tazor with one electrode to the foil, you can trace the film using the other electrode at a distance, which induces an electrostatic charge in the film, attracting and capturing the dusty fingerprints. Allow the static to discharge, and store the film in a safe place to be digitized later!

Now obviously this is only really effective for flat objects, but it’s still a brilliant hack — especially to save your budget!

[Thanks John!]

Heatsink Tester Shows Thermal Resistance Isn’t Futile

[Bogdan] knows that it’s hard to model the cooling needs of any given project. It’s important to know how much heat a system can dissipate given the housing material, airflow opportunity, and the proximity of neighboring components. Inspired by an aluminium-walled enclosure that allows for mounted transistors, he devised and built a heatsink tester.

He’s using an ATXMEGA32A4U, a temperature sensor, and a IRF540 MOSFET. A specific power is dissipated across the transistor, and the temperature sensor measures the heatsink as close as possible to the transistor. Through the serial connection, he gets back the supply voltage, current, calculated power, DAC set, temperature, and calculated thermal resistance in the terminal.

[Bogdan]’s tester assumes that it is reading the ambient temperature, so the circuit needs to warm up first. He found that an hour is generally long enough to reach this point. He also found that the system exhibits high thermal inertia, so it regulates the DAC output based on the dissipated power.

Tesla Coil Auto-Winder

tesla winder

Tesla coils are awesome. But if you’ve ever built one, you know how tedious winding the secondary coil is. So [Krux] decided to build a machine to do it for him.

He’s currently working on his first Tesla coil — code-named Project Icarus — he doesn’t have all the logistics ironed out quite yet, but he’s been slowly collecting the components. What he does know is that he wants to use a 4.5″ secondary coil, using 22AWG magnet wire, meaning that’s a lot of turns! Since he’s also a member of a local hackerspace, he decided to make it a modular machine that can wind different sized coils for different sized projects.

Essentially, he’s built his own CNC lathe to accomplish this, well, missing one axis. There’s the main rotary axis, and a wire-guide that moves along it ensuring the coils are wrapped tightly without gaps. It’s an impressive build and you can tell he’s put a lot of thought into the design — He’s even got a semi-flexible 3D printed motor coupler on the wire-guide axis, to help mitigate quick acceleration! The main rotary axis is also driven by a 3D printed herringbone style gear — similar to the style used on Printrbot extruders. The rest of the build is made of plywood and pegboard — allowing for even larger coils to be wound by shuffling around the components. He’s even got a full featured command console with manual/automatic controls and an LCD giving feedback on the coil being wound!

Stick around after the break to see [Krux] explain the fascinating build, and to see a fun time-lapse of an 814-turn Tesla coil winding!

Continue reading “Tesla Coil Auto-Winder”

12V Ammo Power Box Keeps It Retro

IMG_5260

[Brandon Fiquett] does a lot of amateur radio communications and needed a rugged portable power supply that he could take with him on the road. He decided to make a 12V power supply out of an antique ammo can he found at an army surplus store.

The .50 cal ammo box wasn’t in the greatest condition when he picked it up, so he completely sanded it, re-painted it, and lubricated the rubber seal. Inside, he loaded it with four 7.1Ah sealed lead acid batteries, complete with 12V cigarette fused sockets, banana plug jacks, a 5V USB charger and an integrated 12V lead-acid battery charger. The lid also features an LED strip light, and everything is laid out very nicely inside of the box. It looks great, but [Brandon] has a long list of improvements to add, including a solar charge controller, volt and amp meters, and an LED power switch.

Ammo cans make solid project boxes. We’ve seen countless ammo can speaker setups, and even a more intricate ammo can PSU — though we prefer [Brandon’s] method since all the connections are under the lid, keeping it completely weather proof.

Bringing WiFi Into A Mobile Hackerspace

2013-11-23-00.04.14

[Philipp Protschka] has a pretty awesome mobile hackerspace (MHS) trailer. The only problem? How do you get WiFi when you’re inside what is basically a Faraday’s cage?

He didn’t think he’d have a problem, since he has a fairly powerful router (Netgear R7000 Nighthawk), not more than 20m from the trailer. But as soon as he shuts the door, he loses all connectivity — he can’t even see his SSID. Leaving the door open a crack results in a signal with a speed of about 54Mbits — not bad, but when it’s cold outside this really isn’t an option.

The solution? Install a WiFi repeater with an external antenna. He’s using a TP link station with two antennas — he’s removed one and hooked it up to a rugged outdoor antenna that gives the MHS a bit of an FBI van look — awesome. With the repeater in place he’s suddenly got access to over 24 SSID’s in the neighborhood from inside! It’ll also be extra handy when travelling because with the extra range it means he’ll be able to hook into local WiFi networks with ease.

Continue reading “Bringing WiFi Into A Mobile Hackerspace”

Apex Electronics, Your Souce For Oscilloscopes And Drop Tanks

While some of the Hackaday crew is in LA for The Gathering, we decided to make a trip out to Apex Electronics, easily the oldest and largest electronics surplus store on the west coast.

Inside Apex, everything is stacked to the 20-foot ceiling with any electronic component you can imagine. Want a shopping cart full of huge capacitors? Awesome. Tube sockets? Done. Any kind of wire imaginable? That takes up two aisles. Test equipment abounds as well with oscilloscopes, signal analyzers and function generators, multimeters, and even a pair of cockpit voice recorders.

There’s also an outside yard at Apex containing at least two airplanes (one is a Cessna 150 that’s crying out to be made into a flight simulator), yet more test equipment, tons of video equipment, a few aircraft drop tanks, and enough aluminum extrusion to build anything.

If you’re wondering how fair the prices are at Apex, I picked up a grab bag assortment of wire wrap sockets (including a few 64-pin DIPs) that would cost $100 through the usual eBay/Chinese retailers for only $5. [Mike] picked up some stepper motors, proto boards, a pound of standoffs, and a dozen some vintage 7-segment displays for $20. No clue how much the test equipment costs, but from what we’ve seen the prices are low.

We’re not the first EE/Hacker Blog/Vlog to visit Apex. [Dave Jones] made the trek a few years ago and posted an awesome video. Below you’ll find a ton of pictures from our trip.

Continue reading “Apex Electronics, Your Souce For Oscilloscopes And Drop Tanks”

$1 Coin Cell Charger

Sure, coin cells usually last a long time — but do you really want to buy new ones and throw the old ones out? The LiR2032 coin cell is a rechargeable lithium battery, for which you can build a charger at around $1.

The 5 minute hack starts with a TP4056 lithium charging circuit, which is a great DIY board designed to charge high-capacity cells at about 1A. Luckily, it is pretty easy to modify the board to charge lower capacity batteries. It’s just a matter of replacing resistor R4, and a little bit of soldering! Continue reading “$1 Coin Cell Charger”