Pneumatic Actuator Made Out Of Lasercut Plastic

Pneumatics are a great solution for all kinds of actuators, and can even be used for logic operations if you’re so inclined. Typically, such actuators rely on nicely machined metal components with airtight rubber seals. But what if you did away with all that? [Richard Sewell] decided to investigate.

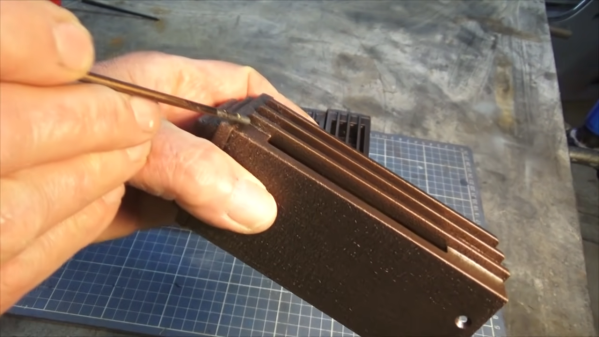
The result is a pneumatic actuator built out of lasercut acetal parts. The mechanism consists of of two outer layers of plastic acting as the enclosure, and a cut-out middle layer which creates the air chamber and houses the actuating arm itself. It’s a single-acting design, meaning the air can push the actuator one way, with a spring for return to the neutral position. The action is quite fast and snappy, too.

[Richard] aims to tweak the design further by improving the registration between the features of each layer and reduce the rubbing of the actuator’s rotor on the surrounding parts. If you’ve got the know-how, sound off in the comments. Alternatively, consider looking into soft pneumatics as well. Video after the break.

Continue reading “Pneumatic Actuator Made Out Of Lasercut Plastic”

Should Have Used A Vacuum Tube 555

“You should have used a 555” has become a bit of a meme around these parts lately, and for good reason. There seems to be little that these ubiquitous chips can’t be used for, and in a world where code often substitutes for hardware, it’s easy to point to instances where one could have just used a simple timer chip instead.

Definitely not in the meme category, though, is this overkill vacuum tube 555 timer. It comes to us via [David Lovett], aka [Usagi Electric], who has lately caught the “hollow state” electronics bug and has been experimenting with all sorts of vacuum tube recreations of circuits we’re far more used to seeing rendered in silicon than glass. The urge to replicate the venerable 555 in nothing but vacuum tubes is understandable, as it uses little more than a pair of comparators and a flip-flop, circuits [David] has already built vacuum tube versions of. The only part left was the discharge transistor; a pentode was enlisted to stand in for that vital function, making the circuit complete.

To physically implement the design, [David] built a large PCB to hold the 18 vacuum tubes and the handful of resistors and capacitors needed. Mounted on eight outsized leads made from sheet steel, the circuit pays homage to the original 8-pin DIP form of the 555. The video below shows the design and build process as well as testing of all the common modes of operation for the timer chip.

You can check out more of our coverage of [David]’s vacuum tube adventures, which started with his reverse-engineering of an old IBM logic module. And while he did a great job explaining the inner workings of the 555, you might want to take a deeper dive into how the venerable chip came to be.

Continue reading “Should Have Used A Vacuum Tube 555”

Archery Release Becomes Reusable Balloon Cutdown Mechanism

A cutdown in high-altitude balloon (HAB) parlance refers to detaching a payload, and can refer to the act of severing a line or to the mechanism itself. How is this done? The most common way is the “hot wire” method: a segment of wire is heated rapidly with a high current, causing it to melt through something like a nylon line.

But there’s more than one way to solve a problem, and while documenting different cutdown methods, [KI4MCW] found that a caliper-style archery release plus hobby servo could be used as a high strength cutdown mechanism. An archery release (or bow release) is a tool to assist in holding the string of a bow in the drawn position, and cleanly release it at the touch of a lever or button. It occurred to [KI4MCW] that these features might be made to serve as a payload release as well, and you can see here the crude but successful prototype for a reusable cutdown.

The archery release [KI4MCW] obtained opens its jaws when a trigger-style lever on the side is pulled. The force required to trigger this is remarkably low, and a low-torque economical hobby servo easily does the job. In fact, the force needed to trip the release is so low that [KI4MCW] added a short rubber band to provide some opposing tension on the lever, just to be sure no spontaneous triggers occurred. The device hasn’t flown yet, but the prototype looks promising. Maybe a mechanism like this would be appropriate for a payload like dropping a high-altitude RC glider from a balloon.

Nixie Shot Timer Adds Useful Elegance To Espresso Machine

Once you’ve ground the beans and tamped the grounds just so, pulling the perfect shot of espresso comes down to timing. Ideally, the extraction should last 20-30 seconds, from the first dark drips to the tan and tiger-striped crema on top that gives the espresso a full aftertaste.

[Marco] has a beautiful espresso machine that was only missing one thing: an equally beautiful shot timer with a Nixie tube display. Instead of messing with the wiring, [Marco] took the non-invasive approach and is using a DIY coil to detect the magnetic field of the espresso machine’s pump and start a shot timer.

An LM358-based op-amp magnifies the current induced by the machine and feeds it to an Arduino Nano, which does FFT calculations. [Marco] found a high-voltage interface driver to switch 170 V to the Nixies instead of using two handfuls of transistors. Grab yourself a flat white and check it out after the break.

The last Nixies may have been mass-produced in the 1980s, but never fear — Dalibor Farny is out there keeping the dream alive and making new Nixies.

Continue reading “Nixie Shot Timer Adds Useful Elegance To Espresso Machine”

A Milky Way Photo Twelve Years In The Making

Starting projects is easy. It’s the finishing part that many of us have trouble with. We can hardly imagine completing a project after more than a decade, but seeing the breathtaking results of [J-P Metsavainio]’s gigapixel composite image of our galaxy might just make us reconsider. The photograph, which we highly suggest you go check out in its full glory, has been in progress since 2009, features 1250 total hours of exposure time, and spans across 125 degrees of sky. It is simply spectacular.

Of course, it wasn’t an absolutely continuous effort to make this one image over those twelve years. Part of the reason for the extended time span is many frames of the mosaic were shot, processed, and released as their own individual pieces; each of the many astronomical features impressive in its own right. But, over the years, he’s filled in the gaps between and has been able to release a more and more complete picture of our galactic home.

A project this long, somewhat predictably, eventually outlives the technology used to create it. Up until 2014, [Metsavainio]’s setup included a Meade 12-inch telescope and some modified Canon optics. Since then, he’s used a dedicated equatorial mount, astrocamera, and a Tokina lens (again, modified) with an 11-inch Celestron for longer focal lengths. He processes the frames in Photoshop, accounting for small exposure and color differences and aligning the images based on background stars. He’s had plenty of time to get his process down, though, so the necessary tweaking is relatively minor.

Amateur astronomy is an awesome hobby, and the barrier to entry is lower than it might seem. You can get started on a budget with the ubiquitous Raspberry Pi or with the slightly less practical Game Boy Camera. And if you’re just interested in viewing the cosmos, there are options forĀ building your own telescope as well.

[via PetaPixel]

Interfacing The Dreamcast Controller With Just An Arduino

The Dreamcast is a somewhat forgotten console today, but for a shining minute in the late 1990s, it was possible to believe Sega were still in the fight. Regardless, their hardware lives on, lovingly preserved by collectors and enthusiasts. [Nicholas FitzRoy-Dale] is one such enthusiast, and set about interfacing the old console’s controllers to an Arduino.

Initial work involved getting the Arduino (presumably a basic 16 Mhz Uno) to read the controller’s buttons, and spitting the data out over serial. The Dreamcast’s Maple bus is fast, which presented some challenges, but it was simple enough. [Nicholas] then moved on to interfacing the VMU, the Dreamcast’s fancy controller-mounted memory card. After initial attempts were shaky and unstable, he redoubled his efforts. Research indicated that the VMU can vary the speed of the bus when it’s in control, so he updated his code to suit. It’s full of great hacks, like connecting the Dreamcast’s two data pins to four input pins on the Arduino, to save a handful of cycles by not having to shift incoming data.

The work is a great read for anyone into assembly-level optimisation of interfaces, as well as proper use of limited resources. Obviously, it’s easy to just throw a faster, more expensive microcontroller at the problem, but then nobody would have learned anything. We’ve featured a great many Dreamcast hacks over the years; [Nicholas]’s work here builds upon [Dmitry]’s work in 2017. We can’t wait to see what comes next out of the underground Sega hacking scene!

High Speed Flight In A Homebrew FPV Cockpit

First-person view, or FPV, has become hugely popular in RC flying circles. A pair of video goggles lets the pilot fly with vision from the plane itself. To make things even more realistic, the team at [FliteTest] built a replica cockpit with working controls and took it down to the field for testing. (Video, embedded below.)

Since the pilot is wearing video goggles, aesthetics aren’t the key here. A RC transmitter was gutted for its gimbal and potentiometers. The former fitted with a long stick for aileron and elevator control, and the latter hooked up to pedals for the rudder. There’s even a proper throttle handle. It’s a low-budget build, with PVC pipe and bungee straps doing much of the work, but that doesn’t detract from the fun factor one bit. The team later upped the stakes, flying a faster model with the rig at speeds up to 120 mph.

Interesting to note is the somewhat visceral reaction by the pilot when crashing, as the combination of first-person view video and realistic controls gives a powerful sense that one is actually in a real plane. FPV flying actually has a longer history than you might expect, with roots as far back as the 1980s. Continue reading “High Speed Flight In A Homebrew FPV Cockpit”