12-Foot Guitar Takes The Stage

Musical festivals are fun and exciting. They are an opportunity for people to perform and show-off their art. The Boulevardia event held this June in Kansas City was one such event, where one of the interactive exhibits was a 12-foot guitar that could be played. [Chris Riebschlager] shares his experience making this instrument which was intended to welcome the visitors at the event.

The heart of this beautiful installation is a Bare Conductive board which is used to detect a touch on the strings. This information is sent over serial communication to a Raspberry Pi which then selects corresponding WAV files to be played. Additional arcade buttons enable the selection of playable chords from A through G, both major and minor and also give the option to put the guitar in either clean or dirty mode.

The simplicity of construction is amazing. The capacitive touch board is programmed using the Arduino IDE and the code is available as a Gist. The Raspberry Pi runs a Python script which makes the system behave like an actual guitar i.e. touching and holding the strings silences it while releasing the strings produces the relevant sound. The notes being played were exported guitar notes from Garage Band for better consistency.

The physical construction is composed of MDF and steel with the body and neck of the guitar milled on a CNC machine. Paint, finishing and custom decals give the finished project a rocking appearance. Check out the videos below for the fabrication process along with photos of the finished design.

This project is a great example of art enabled by technology and if you love guitars, then go ahead and check out Brian May’s Handmade Guitar. Continue reading “12-Foot Guitar Takes The Stage”


FabricKeyboard

FabricKeyboard Is Piano, Theremin And More

Two researchers of Responsive Environments, MIT Media Lab, have put to together a device that is an amazing array of musical instruments squeezed into one flexible package. Made using seven layers of fabrics with different electrical properties, the result can be played using touch, proximity, pressure, stretch, or with combinations of them. Using a fabric-based keyboard, ribbon-controller, and trackpad, it can be played as a one-octave keyboard, a theremin, and in ways that have no words, such as stretching while pressing keys. It can also be folded up and stuffed into a case along with your laptop, and care has even been taken to make it washable.

The FabricKeyboard layers

Layer one, the top layer, is a conductive fabric for detecting proximity and touch. The twelve keys can work independently with a MPR121 proximity touch controller or the controller can treat them all as one, extending the distance the hand can be and have it still work. Layer two is just a knit fabric but layers three to six detect pressure, consisting to two conductive layers with a mesh fabric and a piezo-resistive fabric in between. The piezo-resistive fabric is LTT-SPLA from eeonyx, a knit fabric coated with the conductive polymer, polypyrrole (PPy). Layer seven consists of two strips of knitted spandex fabric, also coated with PPy, and detects stretching. Two strips of this are sewn on the bottom, one horizontal and one vertical. You can see and hear the amazing sound this all produces in the video below.

Continue reading “FabricKeyboard Is Piano, Theremin And More”

Music-Loving BeagleBone

Robotic control can get very complicated when multiple actuators need to work in coordination with each other. A simple robotic arm will require each joint to be controlled in sequence to attain a particular position. The BeagleBone Blue comes armed with motor drivers, sensor inputs, and wireless and is built for robotics.

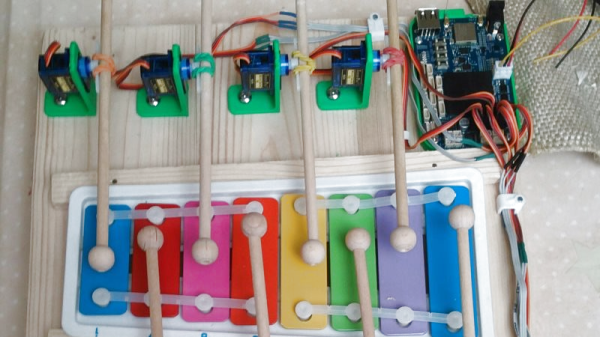
[Andy] has prepared a musical robot called the BeagleBone Blue Electro-Mechanical Glockenspiel using the single board computer. The hardware consists of eight servo motors each with a mallet stick attached to them. The motors themselves are mounted on 3D-printed brackets allowing them to be mounted at the correct height. The servos connect to the main board for position control, however, an external supply had to be used to supply the necessary current to all the motors.

The software side has programs to translate notes into servo positions as well as connect to a web brower via MQTT and websockets. The basic user interface is simple and has buttons to connect to and send the keystrokes. The code, as well as the OpenSCAD designs, can be downloaded from GitHub. Check out the video below for a demo.

This project could be extended to an autonomous robot that plays tunes from the Internet. We are reminded of the rock throwing glockenspiel which was pretty cool and hope there are some permutations to come from both. Continue reading “Music-Loving BeagleBone”

The Red Special: Brian May’s Handmade Guitar

Guitarists are a special breed, and many of them have a close connection with the instruments they play. It might be a specific brand of guitar, or a certain setup required to achieve the sound they’re looking for. No one has a closer bond with an instrument than Brian May to his Red Special. The guitar he toured with and played through his career with Queen and beyond had very humble beginnings. It was built from scratch by Brian and his father Harold May.

A young Brian May playing the brand new Red Special. Note the disk magnets of the original handmade pickups

It was the early 1960’s and a young teenaged Brian May wanted an electric guitar. The problem was that the relatively new instruments were still quite expensive — into the hundreds of dollars. Well beyond the means of the modest family’s budget. All was not lost though. Brian’s father Harold was an electrical engineer and a hacker of sorts. He built the family’s radio, TV, and even furniture around the house. Harold proposed the two build a new electric guitar from scratch as a father-son project. This was the beginning of a two-year odyssey that resulted in the creation of one of the world’s most famous musical instruments.

Brian was already an accomplished guitarist, learning first on his dad’s George Formby Banjo-ukulele, and graduating to an Egmond acoustic guitar. Brian’s first forays into electric guitars came from experimenting with that Egmond. If you look close, you can even see the influence it had on the final design of the Red Special.

Continue reading “The Red Special: Brian May’s Handmade Guitar”

Multifunction Raspberry Pi Chiptune Player

General Instrument’s AY-3-8910 is a chip associated with video game music and is popular with arcade games and pinball machines. The chip tunes produced by this IC are iconic and are reminiscent of a great era for electronics. [Deater] has done an amazing job at creating a harmony between the old and new with his Raspberry Pi AY-3-8910 project.

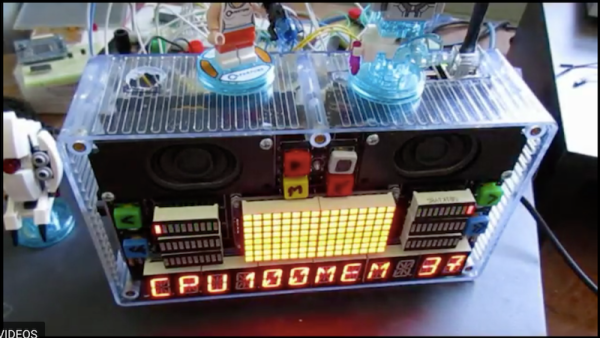
[Deater] already showed us an earlier version of the project on a breadboard however after having made some PCBs and an enclosure the result is even more impressive. The system consists of not one but two AY-3-8910 for stereo sound that feed a MAX98306 breakout for amplification. A Raspberry Pi 2 sends six channels worth of data via 74HC595 shift registers driven by SPI. There is a surplus of displays ranging from a matrix to bar graph and even 14-segment displays. The entire PCB is recognized as a hat courtesy an EEPROM which sits alongside a DS1307 RTC breakout board. The enclosure is simple but very effective at showing the internals as well as the PCB art.

The software that [Deater] provides, extends the functionality of the project beyond the chiptunes player. There is a program to use the devices as an alarm clock, CPU meter, electronic organ and even a playable version of Tetris as seen in the demo video below. The blog post is very informative and shows progress in a chronological fashion with pictures of the design at various stages of development. [Deater] provides a full set of instructions as well as the schematic along with code posted on GitHub.

If you have a soft spot for the Arduino you may want to check out the 8-bit version of a chip tune player and if you are craving some old hardware peripheral information, do check out the computer curiosities from the Iron Curtain periodContinue reading “Multifunction Raspberry Pi Chiptune Player”

The Monolith Brings The Boom To Maker Faire

[Ross Fish], [Darcy Neal], [Ben Davis], and [Paul Stoffregen] created “the Monolith”, an interactive synth sculpture designed to showcase capabilities of the Teensy 3.6 microcontroller.

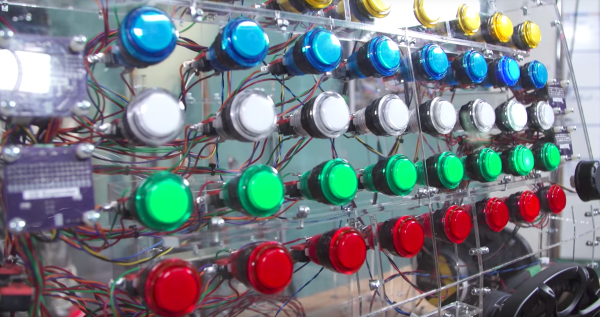
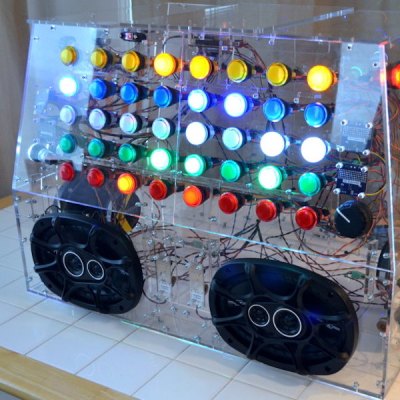
The Monolith consists of a clear acrylic box covered in LED-lit arcade buttons. The forty buttons in front serve as an 8-step sequencer with five different voices, while touch sensors on the left and right panels serve as a polyphonic arpeggiator and preset controller, respectively.

In order to control all of those buttons, the team designed breakout boards equipped with a port expander, 16-channel PWM driver chip, and N-channel MOSFETs allowing the entire synth to be controlled from a single Teensy 3.6.
In terms of software, [Paul] made improvements to the Teensy Audio Library to accommodate the hardware, improving the way signal-controlled PWM waveforms are handled and enhancing the way envelopes work. Ultimately they combined three Arduino sketches into one to get the finished code.

After showing off the project on Tested, the team set up the Monolith in the Kickstarter booth at Maker Faire Bay Area. The project was a hit at the Faire, earning a coveted red ribbon and inspiring countless adults and kids to check it out. We love a project that inspires so much interaction. Not only can three people play with the Monolith at once, but they can see through the clear case and get an idea of what’s going on.

If you want to learn more you can download project files from [Paul]’s GitHub. In the meantime, check out some other synth projects we’ve published on Hackaday: we’ve grooved on a synth-violin, a 3D-printed synth, and a single-PCB synth, among many others.

Continue reading “The Monolith Brings The Boom To Maker Faire”

Controlling A Moog Werkstatt With A Capacitive Touch Jankó Keyboard

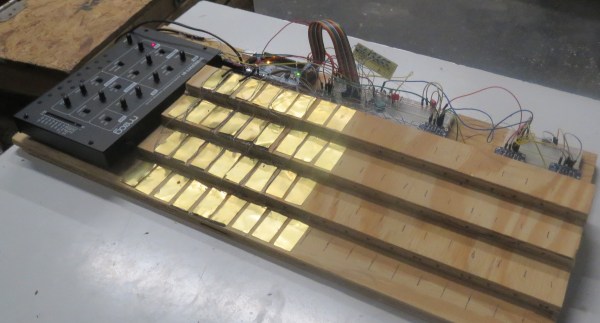
[Ben Bradley], a member of Freeside Atlanta, built a capacitive touch Jankó keyboard for the Georgia Tech Moog Hackathon. Jankó Keyboards are a 19th-Century attempt to add a more compact piano keyboard. There are three times as many keys as a traditional piano but arranged vertically for (supposedly) greater convenience while playing–an entire octave can be covered with one hand. But yeah, it never caught on.

[Ben]’s project consists of a series of brass plates wired to capacitive touch breakout boards from Adafruit, one for each of the Arduino Mega clone’s four I2C addresses. When a key is touched, the Arduino sends a key down signal to the Werkstatt while using a R-2R ladder to generate voltage for the VCO exponential input.

The most recent Moog Hackathon was the third.  Twenty-five teams competed from Georgia Tech alone, plus more from other schools, working for 48 hours to build interfaces with Moog Werkstatt-Ø1 analog synths, competing for $5,000 in cash prizes as well as Werkstatts for the top three teams.

We’re synth-fiends here on Hackaday: we cover everything from analog synths to voltage controlled filters.

Via Freeside Atlanta, photo by [Nathan Burnham].

Continue reading “Controlling A Moog Werkstatt With A Capacitive Touch Jankó Keyboard”