In the old days, it wasn’t uncommon to put an AM radio near a computer or a monitor and deliberately cause interference to have a crude form of sound generation. Did you miss out on that? No! Thanks to [luambfb] you can now do the same trick with a common LCD monitor. You’ll need the horizontal refresh rate of the monitor in question.
Of course, doing it is somewhat less interesting than learning how it works. The effect relies on the fact that the LCDs emit signals as it refreshes a row. A black row emits relatively low energy while a white row emits more. Grayscale… well, you get the idea. Continue reading “LCD Monitor Plays The Hits”→
Thanks to a feature by Prusament because it uses their filament, we’ve been interested to read about the SongBird turntable from the British outfit Frame Theory (Note: at time of writing, they have an expired certificate). It’s a commercial product with an interesting twist for the Hi-Fi business: buy the completed turntable or buy a kit of parts and print the rest yourself.
We’re always interested to see new things here at Hackaday but we’re not in the business of promoting commercial products without a tech angle. This turntable has us interested then not because it happens to be 3D printed but because it’s instantly raised our curiosity over how suitable 3D printing is as a medium for a high quality audio component. Without descending into audiophile silliness we cannot overstate the effect that rigidity and mass of turntable components has on its audio quality. Take a look at this one we featured in the past for an extreme example.
So looking more closely at the design, we find that the chassis is aluminium, which makes sense given its visibly thin construction. Close examination of the photos on their site also reveals the tonearm to be made of carbon fibre tube, so it’s clear that they’ve put some effort into making a better turntable rather than a novelty one. This does raise the question though: manufacturing practicalities aside could you 3D print the whole thing? We think that a 3D printed chassis could replace the aluminium one at the cost of much more bulk and loss of the svelte looks, but what about the tonearm? Would one of the carbon-fibre-infused filaments deliver enough stiffness? It would be particularly interesting we think, were someone to try.
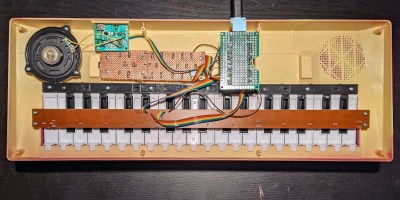
As mentioned, the keyboard was missing a 9 VDC power supply (rated 800 mA) with a center-negative barrel connector. Slightly oddball, but nothing an enterprising hacker can’t deal with. After supplying power with a bench supply, not only did the keyboard not come to life, but the power supply clamped the current draw at 1.5 A! Something was definitely not right.
Inside, there was no visible (or olfactory) sign of damage, but looking closer revealed that a little SMT capacitor by the power connector was cracked in two. Fixing that didn’t bring the keyboard to life, so it was time to break out the thermal imager. Something was soaking up all that current, and it’s a fair bet that something is getting hot in the process.
The culprit? The reverse polarity protection diode was shorted, probably as a result of damage by an inappropriate power supply or a surge of some kind. Replacing it resulted in a working keyboard! Not bad at all for $5, a diode, an SMT cap, and a little workbench time. The finishing touch was replacing a missing slider knob, which took some work in OpenSCAD and a 3D printer. Overall, not bad!
You can pursue your dreams of rock superstardom with any guitar, be it from an expensive luthier, a pawn shop, or a mail order catalog. But to join the ranks of rock greats there’s one way to have a truly special instrument, which is to build it yourself. [Bensoncraft] may not be [Bryan May]’s dad or indeed [Eddie van Halen], but he has at least joined the exclusive ranks of home made guitar builders with his video “Guitar from scratch: hard mode“.
It’s a fairly long video and we’ve placed it below the break, but a compelling one as we learn just how many operations go into making an electric guitar. When he says hard mode he’s not joking, there are no pre-made parts save for the strings and he’s not following a set of plans. Everything including the tuners and pickups are made from scratch, but for a non-guitar-player it’s she sheer number of different pieces of wood that go into making the solid body and neck of the instrument that’s so interesting. Even if you’ll never make a guitar you should watch it.
Guitar amplifiers have a hard life, and as anyone who’s run a venue can tell you, they often have significant electrical issues after a life on the road. [Dsagman] had a Vox amplifier with fried internals, and rather than repair the original he rebuilt it with a Raspberry Pi inside to provide a fully-loaded array of effects.
Though the subject is the Vox, it’s best to see this as more a tale of how to create a guitar effect array in a Pi than specifically put it in an amplifier. The Pi has an audio board and an MCP3008 ADC added to it, and using those two it takes its inputs from a series of potentiometers and process the audio passing through the audio board. In addition there are a series of LED indicators and an LED bar graph to keep the user in touch with what’s going on.
The whole lot is nicely integrated in the VOX case with all the potentiometers on an aluminium panel. He discusses amplifier choice, but as you might expect the final choice is a Class D module. All in all an amp many readers would probably go for.
The Big Mouth Billy Bass and other singing fish were a scourge first delivered to us in the late 90s. [Kevin Heckart] has been teaching them to sing new songs without the tinny sound quality and hokey folk tunes. For this, he must be applauded.
A Teensy 4.1 or Teensy 3.2 is used to power [Kevin]’s various singing fish builds. There are two motors inside a singing fish, typically — one motor to pivot the fish’s body, and one to open and close the mouth. Hook these up to a motor driver, and command that with the Teensy, and you’re up and running. To sync the fish with the music, MIDI data is sent to the Teensy over USB. The Teensy takes in note data and uses this to command the motors to make the fish appear to sing along.
The tutorial linked above is a great way to learn how the hack was achieved. However, the real money is in the performance. A video of [Kevin]’s fishy chorus performing the famous Wellerman sea shanty has over 50 million views on YouTube and he’s collected over 26 million likes on Tiktok.
Sometimes the simple hacks are the ones that bring the most joy. Video after the break.
Drums are an exciting instrument to learn to play, but often prohibitive if there are housemates or close neighbors involved. For that problem there are still electronic drums which can be played much more quietly, but then the problem becomes one of price. To solve at least part of that one, [Jeremy] turned to using an Arduino to build a drum module on his own, but he still had to solve yet a third problem: how to make the Arduino fast enough for the drums to sound natural.
Playing music in real life requires precise timing, so the choice of C++ as a language poses some problems as it’s not typically as fast as lower-level languages. It is much easier to work with though, and [Jeremy] explains this in great detail over a series of blog posts detailing his drum kit’s design. Some of the solutions to the software timing are made up for with the hardware on the specific Arduino he chose to use, including an even system, a speedy EEPROM, hardware timers, and an ADC that can sample at 150k samples per second.
With that being said, the hardware isn’t the only thing standing out on this build. [Jeremy] has released the source code on his GitHub page for those curious about the build, and is planning on releasing several more blog posts about the drum kit build in the near future as well. This isn’t the only path to electronic drums, though, as we’ve seen with this build which converts an analog drumset into a digital one.