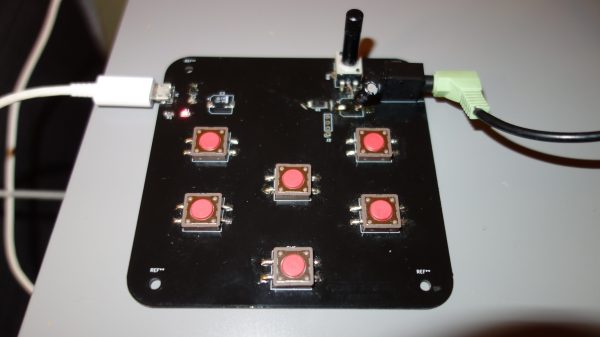
Arduino Plays The Glasses

Have you ever been on a city street and seen a busker playing music on glasses? Each glass has a different amount of water and produces a different note when tapped. [Cyberlab] must have seen them and created an Arduino robot to play tunes on glasses. You can see the result in the video below.

If we had done this, we might have had a solenoid per glass or used some linear component like a 3D printer axis to pick different glasses. [Cyberlab] did something smarter. The glasses go in a circle and a stepper motor points at the correct glass and activates a solenoid. The result is pretty good and it is a lot simpler than any of our ideas.

If you aren’t musically inclined, you might wonder how you’d program the songs. There’s an example of taking a music box score from a website — apparently, there are lots of these — and removing any polyphony from it. The site mentioned even has an editor where you can import MIDI files and work with them to produce a music box strip that you could then convert. Then you encode each note as a number from 0 to 6.

Of course, you also have to fill your glasses with the right amount of water. A piano tuning phone app should be useful. We’ve seen this done in a linear fashion before. You can even use a single glass for many notes with a little ingenuity.

Continue reading “Arduino Plays The Glasses”

Wooden sticks sound good if you clamp them down at one end.

Popsicle-Stick Piano Sounds Sweet

Technically, this is a kalimbaphone, and not a piano or even a chordophone since there are no strings. But this handcrafted instrument doesn’t just sound sweet, it’s also mellow, and it’s much nicer than you’re probably imagining. Go check out the short build video, which starts with a demo.

[Mash] started by drilling a bunch of holes into a rectangular piece of wood, and then twisted in wood screws far enough to stay in. Then [Mash] laid Popsicle sticks between each set of screws and tuned them one at a time, starting with middle C. The Popsicle stick version didn’t sound so great, so [Mash] upgraded to tongue depressors and moved the black keys up to their own layer. Unfortunately, the owner has turned off embeds for the video, so you’ll have to watch it on YouTube.

We’d love to see [Mash] figure out a way to make the sticks resonate. In the meantime, check out this 3D-printed grand piano mechanism. And if this build has you in the mood to listen to Popcorn on a homemade instrument, well, we’ve got you covered there.

Thanks to [Keith] for the tip!

3D Printed Marble Music Machine Looking Good Already

Inspired by the enormous marble music machines from the staggeringly talented [Wintergatan] and the marble run builds by [Daniel de Bruin], [Ivan Miranda] has been busy again building a largely 3D printed contraption to test his ideas around building his own marble music machine from scratch. (Video, embedded below.)

Leveraging his recent experiences with resin printing and his own giant 3D printer, he had no difficulty in producing everything he needed from his workshop, even if the design work apparently took ages.

The build shows how early in development this project is, as there are clearly quite a few issues to be dealt with, but progress looks encouraging so far. To be clear, plans are to ‘go big’ and this little eight-channel testbed is just to explore this issues around ball guiding, transport and ball release onto the first audio test device, a Korg Nano Pad 2.

Some significant teething problems were identified, such as when [Ivan] designed the ball lifter, he intended the balls to load from the rear, but then needed to switch it to load from the front. No big deal, simply reverse the motor direction to load balls on the opposite side of the mechanism. Sadly, that also meant the directly coupled note drum was now also rotating the wrong way to release the balls. Oops. A quick hack later and [Ivan] was back in business. Various parts needed shimming up with plates, but with 3D printers on the bench, knocking those out took little time or effort. This just shows how darn useful 3D printers can be, allowing you to iterate in a short time and feed your hacks back into the final version.

[Ivan] is clearly going to have a lot of ‘fun’ with this one, as [Wintergatan] will surely testify, these big musical marble machine builds are quite some undertaking. We shall definitely be tuning in later on to see where this one goes!

While we’re on the subject of the [Wintergatan] marble machines, here’s a mini homage to the latest Marble Machine X, and if you’re in the need for a 3D printed marble clock, then try this one for starters.

Continue reading “3D Printed Marble Music Machine Looking Good Already”

This is a MIDI harp that is played by waving your hands in the air over the infrared distance sensors.

Teensy MIDI Air Harp Sounds Huge

Some of the coolest sounds come from wild instruments like orchestra strings, fretless basses, and theremins — instruments that aren’t tied down by the constraints of frets and other kinds of note boundaries. [XenonJohn]’s air harp is definitely among this class of music makers, all of which require a certain level of manual finesse to play well.

Although inspired by Jean-Michel Jarre’s laser harp, there are no lasers here. This is a MIDI aetherharp, aka an air harp, and it is played by interrupting the signals from a set of eight infrared distance sensors. These sensors can be played at three different heights for a total of 24 notes, plus there’s a little joystick for doing pitch bends.

Inside the wooden enclosure of this aetherharp is a Teensy 3.5 and eight infrared distance sensors with particularly long ranges. On top is a layer of red acrylic that doesn’t affect the playability, except in bright sunlight. Although you could use most any MIDI software to produce the actual sounds, [XenonJohn] chose VMPK (Virtual MIDI Piano Keyboard). Be sure to check it out in action after the break.

Not dangerous enough for you? Here’s a laser harp that involves a Tesla coil.

Continue reading “Teensy MIDI Air Harp Sounds Huge”

Arduino Piano Tuner Is Pitch Perfect

[JanHerman] knows that tuning musical instruments is all about precision and that precision is measured in a logarithmic unit called a cent. A cheap tuner unit might be accurate to 1.5 cents which sounds good until you look at one for ten times the price and find it is accurate to 0.1 cents. So you can spend $800 for precision or $60 for something less. [Jan] decided to build something better and cheaper using a 32-bit Arduino and a DDS frequency generator chip on a breakout board.

Oddly enough, the device doesn’t have a display. Instead, it generates a precise frequency and couples it to the piano using a transducer. You tune the string to the corresponding note. The post has a lot of detail about how piano tuning works.

Continue reading “Arduino Piano Tuner Is Pitch Perfect”

Cheap DIY Mic Sounds (And Looks) Damn Good

As any musician, podcaster, or youtuber will be quick to tell you, there’s no substitute for a good microphone. They’ll also be quick to tell you all about their favorite microphone, why it’s better than all the others, and how much it cost (oh, and how round it sounds, whatever that means). But what if you could build your own that sounds as good, if not better, and do it for only $30?

That’s what [Matt] from DIY Perks set out to discover when he built his DIY USB-C Microphone. He was able to source the same microphone capsule that can be found in his high-end, $600 CAD E100S, and built a simple pre-amplifier that bumps its quiet output up to line-level. He even connected it to the mic module with some custom cable made from two tiny enameled wires that won’t transmit bumps and vibrations, wrapped inside desoldering braiding which acts as a shield. He fed the output from the pre-amp into a cheap USB audio interface and voilà! — top-notch sound for next to nothing. Make sure you check out the video below to hear a comparison between the mic and its professional counterparts.

Of course, sounding good isn’t quite enough. [Matt] wasn’t satisfied until the piece looked the part as well, which is why he encased the mic module in custom-bent brass mesh shielding and tubing (which also helps to reduce electrical interference). The brass cage sits suspended via rubber o-rings on a beautiful bent brass mount, which sits atop an articulated brass arm of [Matt]’s own design. Finally, the arm is mounted to a wood and brass enclosure that also serves to house the electronics.

And, in true open-source fashion, the video description is full of links to parts, schematics, and templates in case you want to build one of these beauties for yourself. Between this fantastic build and this other, super-overkill scratch-built USB microphone we featured earlier in the year, there has never been a better time to make yourself a mic you won’t have to trade your car for.

Thanks to [RichV] and [BaldPower] for the tip!

Continue reading “Cheap DIY Mic Sounds (And Looks) Damn Good”

A one-string bass violin made from two washtubs, some plywood, a Louisville Slugger, and some weed whacker line.

Louisville Slugger Puts This Bass On Base

One of the most recognizable instruments in both jug band and American folk music has got to be the washtub bass. Also known as gutbuckets, these instruments tend to use an old broom for a neck and usually have a single string.

A nifty DIY wooden tool for turning a wingnut with ease.We would argue that the design of [goaly]’s single-string double gutbucket owes something to the double bass of the violin family as well, with its figure eight shape. On top of those tubs is a plywood soundboard, which is screwed into a series of wood blocks around the lip of the tubs.

For the combination neck and fretboard, [goaly] called up a vintage Louisville Slugger, which is way more interesting than some old broom handle. [goaly] extended the backbone through the body with scrap lengths of 2″x2″, and this spine runs through both tubs and acts as a peg on the bottom. In lieu of a tailpiece, the string is tied to a board that the player secures with their foot.

Although [goaly] experimented with steel cable, clothesline rope, nylon rope, and paracord first, the string is made from weed whacker trimmer line. At the top, the string is attached through the neck — it’s held down with a couple of bent fender washers and pulled taut with a wingnut. We love that [goaly] even fashioned a wooden tool to make it easy to turn the wingnut. And we also love the DIY bridge, which looks like a little person.

There are a couple of ways to make sounds with this thing. Fretting and plucking work, of course, but so does bending the whole thing backward to change the pitch. For a good time, do both. We think it sounds nice and thump-y, and it even makes great percussive sounds on the front and back. Check it out in action after the break.

Don’t have a washtub? A wheelbarrow works too, and it comes with its own stand.

Continue reading “Louisville Slugger Puts This Bass On Base”