How often does this happen to you? You find yourself describing something that happened in a game to someone, and they’re not sure they know what part of the map you’re talking about, or they’ve never gotten that far. Wouldn’t it be cool to make a bookmark in a video game so you can jump right to the beginning of the action and show your friend what you mean using the actual game?
That’s the idea behind [Joël Franusic] and [Adam Smith]’s fantastic Playable Quotes for Game Boy — clip-making that creates a 4-D nugget of gameplay that can either be viewed as a video, or played live within the bounds of the clip. The system is built on a modified version of the PyBoy emulator.
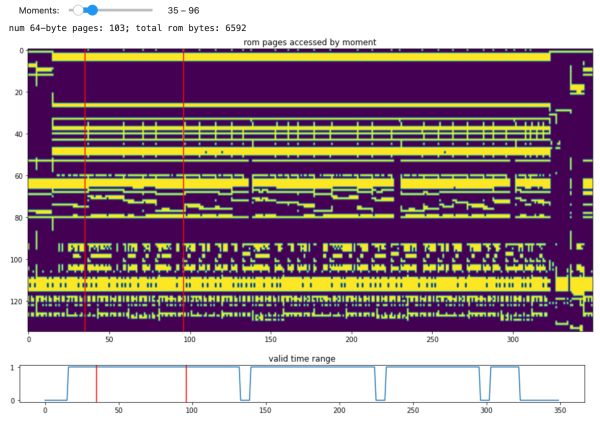
Left: the full game ROM. Right: a bookmarked slice of the game ROM with the rest set to zero.
Basically, a Playable Quote is made up of a save state and all that entails, plus a slice of the game’s ROM that includes just enough game data to recreate an interactive clip. Everything is zipped up and steganographically encoded into a PNG file. Here’s a Tetris quote you can play (or watch) right now — you might recognize it from the post thumbnail. You’ll find the others on the games site, which allows people to create and share and build on each other’s work.
There’s so much more that can be done with this type of immersive and interactive tool outside the realm of games, and we’re excited to see where this leads and what people do with it.
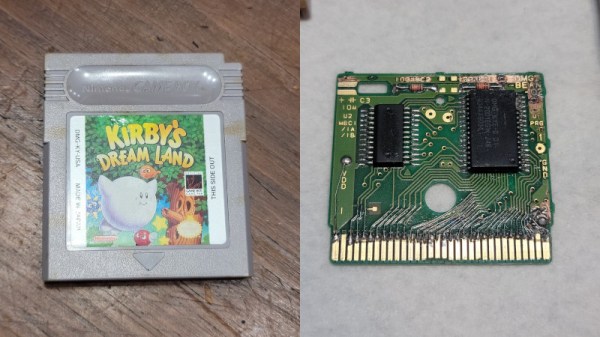
Retro consoles and handhelds are full of nostalgia and happy memories for many. However, keeping these machines and their media going can be a difficult job at times. [Taylor] was challenged to rescue a copy of Kirby’s Dream Land for the original Game Boy, and set about the task.
The cartridge was badly corroded, with many of the traces eaten through, rendering the game inoperable. First, all the components were removed, and the board was cleaned. This allowed easy access to the traces across the whole board. Then, the job was to delicately remove some solder mask from the parts of the traces still remaining, and bridge the gaps with fine copper wire. Even worse, several vias were damaged, which [Taylor] tackled by feeding jumper wires through the board and executing a repair on each side.
It’s a simple enough repair for the experienced hand, but virtually magic to a retro gaming fan that doesn’t know how to solder. [Taylor] has given us a great example of how to deal with corroded carts properly, with enough detail to be quite educational to the beginner.
Back in August we covered a unique modification for the Nintendo Game Boy Advance SP which replaced the handheld’s rear panel with an expanded version that had enough internal volume for an upgraded battery, a Bluetooth audio transmitter, and support for both Qi wireless and USB-C charging. The downside was that getting the 10 mm 3D printed “backpack” installed wasn’t exactly the most user-friendly operation.
But today we’re happy to report that the dream team behind the so-called THICC BOI SPhave not only made some huge improvements to the mod, but that they intend to release it as a commercial kit in the next few months. The trick to making this considerable upgrade a bit more forgiving is the use of a bespoke flat flex cable that easily allows the user to solder up all the necessary test points and connections, as well as a custom PCB that pulls together all the hardware required.
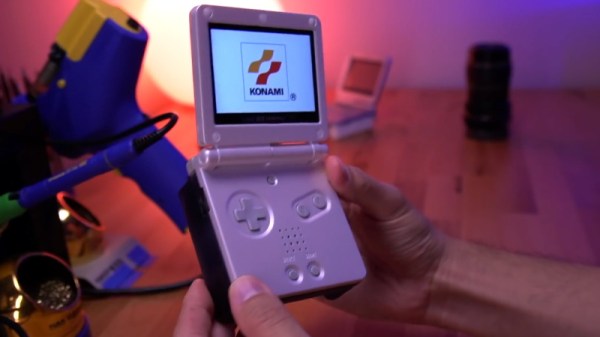
In the video below, [Tito] of Macho Nacho Productions goes over the latest version of the mod he’s been working on with [Kyle] and [Helder], and provides a complete step-by-step installation tutorial to give viewers an idea of what they’ll be in for once the kit goes on sale. While it’s still a fairly involved modification, the new design is surprisingly approachable. As we’ve seen with previous console modifications, the use of flat flex technology means the installation shouldn’t pose much of a challenge for anyone with soldering experience.
The flat flex cable allows for an exceptionally clean install.
Some may be put off by the fact that the replacement rear panel is even thicker this time around, but hopefully the unprecedented runtime made possible by the monstrous 4,500 mAh LiPo battery pack hiding inside the retrofit unit will help ease any discomfort (physical or otherwise) you may have from carrying around the chunkier case. Even with power-hungry accouterments like an aftermarket IPS display and a flash cart, the new battery can keep your SP running for nearly 20 hours. If you still haven’t beaten Metroid: Zero Mission by then, it’s time to take a break and reflect on your life anyway.
According to [Tito], the logistical challenges and considerable upfront costs involved in getting the new rear panels injection molded in ABS is the major roadblock holding the release of the kit back right now. The current prototypes, which appear to have been 3D printed in resin, simply don’t match the look and feel of the GBA SP’s original case well enough to be a viable option. A crowd funding campaign should get them over that initial hump, and we’ll be keeping an eye out for more updates as things move along towards production.
The previous version of this mod was impressive enough as a one-off project, but we’re excited to see the team taking the next steps towards making this compelling evolution of the GBA more widely available. It’s a fantastic example of what’s possible for small teams, or even individuals, when you leverage all the tools in the modern hardware hacking arsenal.
Old game systems are typically the most popular targets for emulation. With huge communities of fans wanting to recreate the good times of yesteryear, most old systems have all been brought back to life in this manner. However, some simply dive into emulation for the technical challenge, and [Austin Appleby] has done just that with GateBoy.
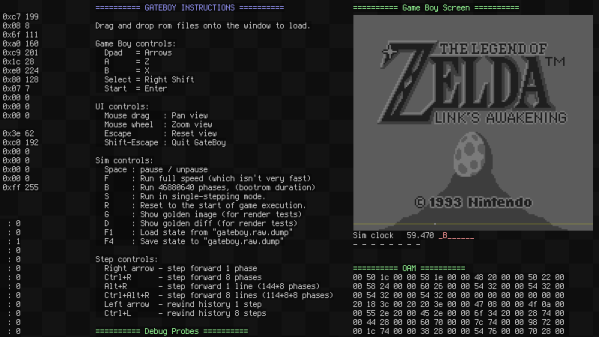
GateBoy is a project to emulate the Game Boy logic gate by logic gate. It’s a lower level approach that builds upon earlier work [Austin] did on a project called MetroBoy, which we featured previously.
The emulator was created by painstakingly reverse-engineering the logic of the Game Boy. This was done by poring over die shots of the actual DMG-01 CPU silicon. GateBoy emulates most of the chip, though avoids the audio hardware at this stage.
Presently, GateBoy runs at roughly 6-8 frames per second on a modern 4GHz CPU. As it turns out, emulating all those gates and the various clock phases at play in the DMG-01 takes plenty of processing power. However, compilation optimizations do a lot of heavy lifting, so in some regards, GateBoy runs impressively quickly for what it is.
[Austin] still has plenty of work to do before GateBoy is completely operational, and there are some strange quirks of the Game Boy hardware that still need to be figured out. Regardless, it’s a fantastic academic exercise and a noble effort indeed. Meanwhile, you might like to check out the Game Boy emulator that runs just one single game.
Since 1996 the Pokemon series of games has moved through eight distinct generations, which roughly parallel the lineage of Nintendo’s handheld gaming systems. While the roster of “pocket monsters” has been updated steadily, players have had the option of bringing captured Pokemon from the older games into the newer releases. But there’s always been a gap in this capability. Due to hardware differences, the Game Boy and Game Boy Color generations of games were physically unable to communicate with the titles released for the Game Boy Advance.
But soon, that may no longer be the case. [Selim] is hard at work on Lanette’s Poke Transporter, a hardware and software solution for bringing Pokemon from the first and second generation games onto the third generation GBA games. Once they’ve been loaded there, players can move the creatures all the way up into the contemporary Pokemon games via official means.
The first Pokemon to make the generational leap.
The project was started in July of 2020, with [Selim] first focusing on the logistical challenges of bringing such early Pokemon into the newer games. Because so much changed between the different generations, there are many sanity checks that need to be made during the transfer. For example, the moves and techniques that the creatures are able to learn isn’t necessarily consistent between these early entries into the series. But after about a year of effort, the software side worked reliably on emulated games, and it was time to start thinking about the hardware.
Ultimately, [Selim] wants to create a physical device into which players can insert their Pokemon cartridges and trigger an automatic transfer. The code is already able to read and write to the cartridges, and has been ported over to Arduino so it doesn’t need a computer to run. A few prototype PCBs have been created, and beyond the inevitable bodges, it seems like they’re functional. There’s still breadboards and jumpers for as far as the eye can see, but this is the first step towards producing a dedicated Pokemon “time machine” that can transport them from the late 1990s to the present day.
While there’s nothing quite like running retro games on their original hardware, using older consoles in today’s day and age can be a hassle due to incompatibilities with modern chargers and headphones. [tito] and [kyle] worked together to update Nintendo’s Game Boy Advance SP with a whole bunch of new features, tightly packed inside a 3D-printed replacement backshell. (Video, embedded below.)
The original 600 mAh battery has been replaced with a 1600 mAh pack for several hours of additional screen time. A Qi standard wireless power module as well as a USB-C connector allows charging the battery without carrying the original mains adapter. A Bluetooth module enables the use of wireless headphones, and a 3.5 mm jack enables classic earbuds as well, a feature lost when the SP replaced the original GBA.
The new backshell fits exactly on the original console, making it about 10 mm thicker. Although this makes it slightly less portable, it is apparently more comfortable to hold for those with big hands. The new functionality is implemented using off-the-shelf circuit boards, connected together with flying wires that are soldered to the required points on the GBA’s circuit board. The original connectors and switches remain in place and functional, and the entire operation can be undone if you want to return the device to its original state.
Others have added USB charging to the original GBA, or even stretched that handheld to become twice as wide. But adding significant new functionality previously required replacing the handheld’s entire contents.
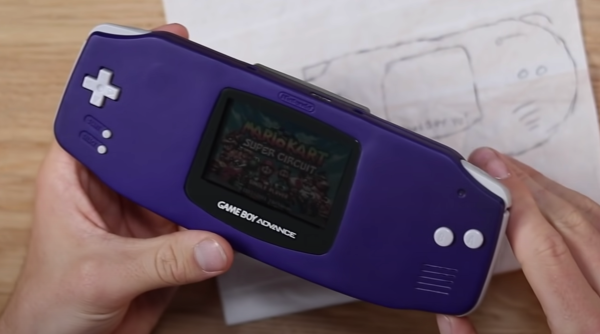
Here at Hackaday, we see all sorts of projects, some born out of a deep necessity or itch that couldn’t be scratched. Others are born out of a world of “why not” and it is perhaps these projects that put the biggest smile on our faces. The WideBoy Advance by [Elliot] of Retro Future is one such project.
Starting with a working Game Boy Advance and a donor one with a busted motherboard, the frankenstein-ification could start. A Dremel split one case in half and removed the sides on another, while trusty old car body filler helps fill and smooth the gaps. A particularly clever trick is to use the Dremel to create channels for the filler to adhere easier. Several areas had to be built up with filler and glued in bits of plastic as a base. As you can see in the video below, the countless hours of sanding, priming, sanding, and more priming led to a beautifully smooth finish. The choice of purple paint really sells the impression of a factory-fresh Game Boy Advance.
The working circuit board was desoldered and the donor board was cut into pieces to fit in the extended sides. Using some magnet wire, connections were bridged over to the original motherboard via the test points on the PCB. [Elliot] didn’t opt to swap the screen to an IPS display or add a backlight. These quality of life improvements are nice, but a dead giveaway that Nintendo didn’t make it. The goal is to get the user to wonder, even if just for a second, what if Nintendo just happened to make this wide one-off handheld console.
[Elliot] made it simply because he found it interesting and enjoyed the form of the thing he made. Is it a hack? Is it art? Probably a little bit of both. This isn’t his first modified Nintendo handheld either. He previously made a long Nintendo Gameboy DMG-01. We love seeing all the wild hacks and tweaks made to Game Boy line, such as this Game Boy Color inside the DMG-01.