DIY Forth On Arduino

On a recent rainy afternoon, [Thanassis Tsiodras] decided to build his own Forth for the Arduino to relieve the boredom. One week of intense hacking later, he called it done and released his project as MiniForth on GitHub. [Thanassis] says he was inspired by our series of Forth articles from a few years back, and his goal was to build a Forth interpreter / compiler from scratch, put it into a Blue Pill microcontroller. That accomplished, he naturally decides to squeeze it into an Arduino Uno with only 2K of RAM.

Even if you are ambivalent about the Forth language, [Thanissis]’s project has some great ideas to check out. For example, he’s a big proponent of Makefile automation for repetitive tasks, and the project’s Makefile targets implements almost every task needed for development, building and testing his code.

Some development and testing tasks are easier to perform on the host computer. To that end, [Thanassis] tests his programs locally using the simavr simulator. The code is also portable, and he can compile it locally on the host and debug it using GDB along with Valgrind and AddressSanitizer to check for memory issues. He chose to write the program in C++ using only zero-cost abstractions, but found that compiling with the ArduinoSTL was too slow and used too much memory. No problem, [Thanassis] writes his own minimalist STL and implements several memory-saving hacks. As a final test, the Makefile can also execute a test suite of Forth commands, including a FizzBuzz algorithm, to check the resulting implementation.

Here’s a short video of MiniForth in action, blinking an LED on an UNO, and the video below the break shows each of the various Makefile tasks in operation. If you want to learn more, check out Elliot Williams’s Forth series which inspired [Thanassis] and this 2017 article discussing several different Forth implementations. Have you ever built your own compiler? Let us know in the comments below.


Continue reading “DIY Forth On Arduino”

The Nuclear Powered Car From Ford

We think of electric cars as a new invention, but even Thomas Edison had one. It isn’t so much that the idea is new, but the practical realization for normal consumer vehicles is pretty recent. Even in 1958, Ford wanted an electric car. But not just a regular electric car. The Ford Nucleon would carry a small nuclear reactor and get 5,000 miles without a fillup.

Of course, the car was never actually built. Making a reactor small and safe enough to power a passenger car is something we can’t do even today. The real problem, according to experts, is not building a reactor small enough but in dealing with all the heat produced.

Continue reading “The Nuclear Powered Car From Ford”

Reverse Engineering A Very Cheap Fitness Band

With the rise of big-name smartwatches in the marketplace, there are also a smattering of lower-end offerings. The M6 fitness band is one of them, and [Raphael] set about hacking the cheap device with a custom firmware of his own creation.

The M6 band, which sells for around $6, appears to trade on name similarity to the more expensive (~$50) Xiaomi Mi Smart Band 6 fitness tracker. Upon disassembly, [Raphael] found that the system-on-chip running the show is a Telink TLSR8232. It’s paired with a 160×80 display, a small LiPo battery for power, and a vibration motor and what appears to be a fake heart rate sensor.

[Raphael] wanted to flash the SOC with a new firmware, and learned a lot from code for a similar part created by [atc1441]. It took some time to figure out how to program the chip using the somewhat oddball SWire interface, but [Raphael] persevered and eventually got things going after much research and experimentation.

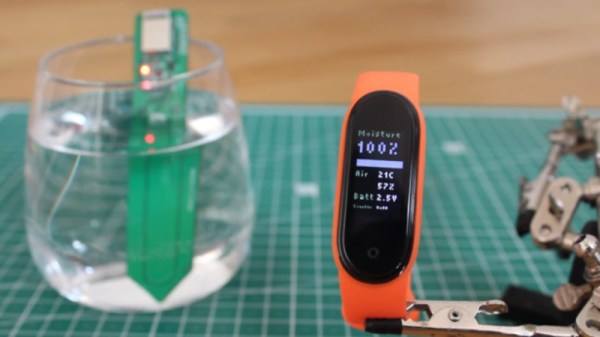
From there, it was yet further work to figure out how to read the capacitive button input as well as how to drive the screen, but [Raphael] succeeded in the end. The final result was whipping up a firmware that allowed him to read Bluetooth Low Energy soil moisture sensors he has installed in his plants at home.

It’s not [Raphael], aka [rbaron]’s first bite at the cherry; we’ve featured his efforts in hacking similar fitness bands before! Video after the break.

Continue reading “Reverse Engineering A Very Cheap Fitness Band”

Hacked On SO-DIMM Slot Was Worth A Shot

Finding unpopulated pads on a circuit board is often a sign that the device in question has some untapped potential. These blank spots on the board could be left over from features or capabilities that were deleted from the design, or perhaps even represent an optional upgrade that wasn’t installed on this particular specimen. So we certainly understand why [d0rk] was fascinated by the empty SO-DIMM footprint he recently found on a laptop’s motherboard.

The budget Celeron machine shipped with 4 GB of RAM installed in its single socket, a situation [d0rk] hoped he could improve upon with the addition of a second module. But could it really be as simple as pulling the socket from a dead motherboard and soldering it into place? Would other components need to be added to the board? Could the BIOS cope with the unexpected upgrade? There was only one way to find out…

Room to grow

At first, it seemed like the patient didn’t survive the operation. But a close look uncovered that the power button had actually gotten damaged somewhere along the line. Once [d0rk] fixed that the machine started up, but unfortunately the operating system didn’t see the extra RAM module. Even after upgrading the BIOS, the computer remained oblivious to the additional memory.

When he went back in to inspect his solder work for shorts or bad joints, disaster struck. For reasons that aren’t immediately clear, the computer no longer starts. Even after pulling the transplanted SO-DIMM slot off the board entirely, [d0rk] says it won’t make it through the self-test. Obviously a disappointing conclusion, but we respect the effort he put into the attempt.

While this memory upgrade didn’t go according to plan, we’ve seen enough success stories over the years to balance it out. From old wireless routers to cutting-edge video cards, plenty of gadgets have received a memory boost courtesy of a soldering iron and a steady hand.

[Thanks to Timothy for the tip.]

Laser Augmented Reality Glasses Show You The Way

Tech companies like Google and Microsoft have been working on augmented reality (AR) wearables that can superimpose images over your field of view, blurring the line between the real and virtual. Unfortunately for those looking to experiment with this technology, the devices released so far have been prohibitively expensive.

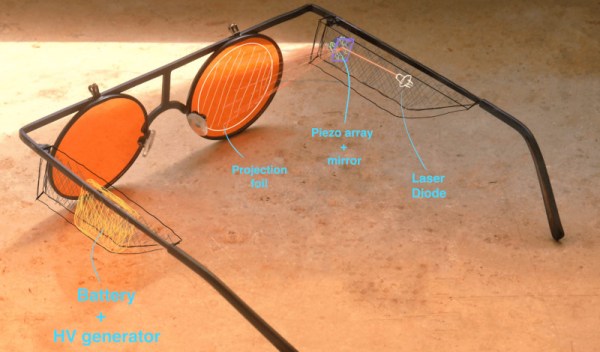
While they might not be able to compete with the latest Microsoft HoloLens, these laser AR classes from [Joel] promise to be far cheaper and much more approachable for hackers. By bouncing a low-power laser off of a piezo-actuated mirror, the hope is that the glasses will be able to project simple vector graphics onto a piece of reflective film usually used for aftermarket automotive heads-up displays (HUDs).

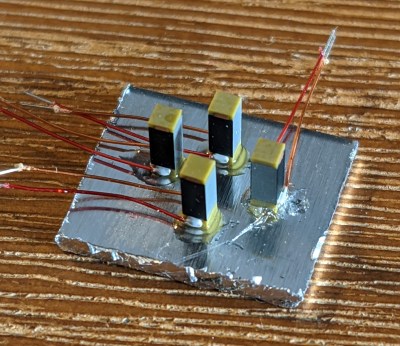
Piezo actuators are used to steer the mirror.

[Joel] has put together a prototype of what the mirror system might look like, but says driving the high-voltage piezo actuators poses some unique challenges. The tentative plan is to generate the vector data with a smartphone application, send it to an ESP32 microcontroller within the glasses, and then push the resulting analog signals through a 100 V DC-DC boost converter to get the mirror moving.

We’ve seen the ESP32 drive a laser galvanometer to play a game of Asteroids, but recreating such a setup in a small enough package to fit onto a pair of glasses would certainly be an impressive accomplishment. Early tests look promising, but clearly [Joel] has quite a bit of work ahead of him. As a finalist for the Rethink Displays challenge of the 2021 Hackaday Prize, we’re looking forward to seeing the project develop over the coming months.

Tech Hidden In Plain Sight: Cruise Control

The advent of the microcontroller changed just about everything. Modern gadgets often have a screen-based interface that may hide dozens or hundreds of functions that would have been impractical and confusing to do with separate buttons and controls. It also colors our thinking of what is possible. Imagine if cars didn’t have cruise control and someone asked you if it were possible. Of course. Monitor the speed and control the gas using a PID algorithm. Piece of cake, right? Except cruise control has been around since at least 1948. So how did pre-microcontroller cruise control work? Sure, in your modern car it might work just like you think. But how have we had seventy-plus years of driving automation?

A Little History

A flyball governor from a US Navy training film.

Controlling the speed of an engine is actually not a very new idea. In the early 1900s, flyball governors originally designed for steam engines could maintain a set speed. The idea was that faster rotation caused the balls would spread out, closing the fuel or air valve while slower speeds would let the balls get closer together and send more fuel or air into the engine.

The inventor of the modern cruise control was Ralph Teetor, a prolific inventor who lost his sight as a child. Legend has it that he was a passenger in a car with his lawyer driving and grew annoyed that the car would slow down when the driver was talking and speed up when he was listening. That was invented in 1948 and improved upon over the next few years.

Continue reading “Tech Hidden In Plain Sight: Cruise Control”

Bringing The Game Boy Camera Into The 21st Century

The Game Boy Camera is probably one of the most limited-specification digital cameras to have been mass-marketed, yet it occupies a special position in the hearts of many because despite being a toy with a paltry 128×128 monochrome sensor it was for many the first camera they owned. [Matt Grey] was among those people, and was always frustrated by the device’s inability to export pictures except to the Game Boy printer. So after having bodged together an interface a decade ago but not being happy with it, he returned to the project and made a wireless carrier for the camera that allows easy transfer through WiFi to his mobile phone.

Inside the slab-like 3D-printed enclosure lies a GBxCart RW Game Boy cartridge reader, whose USB port is wired to a Raspberry Pi Zero on which are a set of scripts to read the camera and make its photos available for download via a web browser. At last the camera is a stand-alone unit, allowing the easy snapping and retrieval of as many tiny black and white images as he likes. There’s a video showing the device in action, which we’ve placed for your enjoyment below the break.

This camera has appeared in so many projects on these pages over the years, but we’re guessing that the work on whose shoulders this one stands would be the moment its workings were reverse engineered.

Continue reading “Bringing The Game Boy Camera Into The 21st Century”