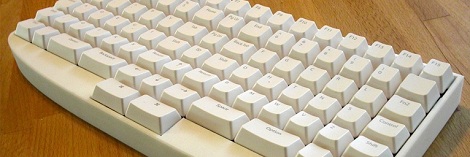
Simple Low Toner Workaround Squeezes Out A Few Extra Pages When Your Printer Refuses

low-ink-hacking

[Andrew] was getting ready to print out an assignment when his Samsung printer suddenly started blinking a red error light at him. Unable to find any documentation explaining the issue, he called Samsung directly and found that it was indicating the toner cartridge was nearly empty.

He held down the button that prints a test page, which came out just fine despite the printer’s insistence that there was not enough toner left. Annoyed at the fact that he felt Samsung was trying to strong arm him into buying another pricey toner cartridge, he looked for a way around the restriction.

He discovered that his printer’s software allowed him to specify a custom test page document, though it required that the document be in PostScript format. After a few shell commands, he had his document converted and was on to bigger and better things.

While a bit time consuming, his workaround should let him get by on this toner cartridge at least for a little while longer. We imagine that since he’s using Linux, the process could probably be scripted to save time, though we’re not sure if the same can be said for Windows-based PCs.

ColorHug: A Reasonably-priced, Completely Open Color Calibration Tool

colorhug-opensource-color-calibrator

[Richard] wanted to create a color profile for his computer monitor, but he wasn’t thrilled with the existing color calibration offerings he found for sale. Color calibration tools can be somewhat costly, but even more troubling to [Richard] was the fact that they are all closed source. Closed hardware and closed software can be a drag, especially when manufacturers drop support for a product, so he set off to design his own open-source monitor calibration tool.

Once his ColorHug sensor is placed against a monitor, it begins sampling colors from the screen, creating an ICC color profile from the data it gathers. The sensor is a Linux-only tool at the moment, but he has created a live CD from which a color profile can be created, then subsequently used in Windows or OSX.

While ColorHug doesn’t sport all the features of its commercial competitors, its color sampling rate is second to none, and since the software is open, anyone is free to implement any sort of functionality they wish.

[Richard] is currently selling finished ColorHug modules to anyone interested in giving them a test drive, but you can always build your own from the plans found at ColorHug’s Github repository.

[via Adafruit blog]

NES Controller Is A Slick Way To Carry Around Your Portable OS

nes-controller-linux-drive

[Oliver] had an old NES controller laying around, and without any other use for it, he decided to repurpose it as a portable storage device.

He gutted most of the controller, removing the plastic standoffs, leaving the D-pad and remaining buttons intact. He crammed a 32 GB flash drive inside, along with the guts from an SD card reader. Using a Dremel he cut several openings into the controller, one for the flash drive and SD card reader’s USB ports, as well as for the SD card itself. When the physical modifications were finished, he installed a small Linux distro on the flash drive, which can be run by any PC that supports booting from USB.

While some might argue, we think it’s a neat way to reuse an old gaming peripheral that he might have otherwise thrown out. The portable OS is something that would certainly come in handy, though we can’t wait until the Raspberry Pi is finished – it would be awesome to have a complete computer packed in there too.

Using Your Existing Hardware To Automate Scanning And Filing

This one must have been fun to come up with because it’s got it all. There’s hardware, firmware, networking, and server scripts all working together to create a filing, scanning document center for your business. The best part is that [Janis Jakaitis] was tasked to do this as part of his job (we’re sure there’s a bunch of IT guys shaking their heads at this statement, but it sounds like fun to us!).

The goal was to use an existing document scanner to create PDFs which are then stored in a filing system on the network. Of course it needed to be automatic. The first big issue was that the scanner was USB only, and when connected to a USB-to-LAN bridge the buttons on the device no longer functioned. [Janis] put together an Arduino circuit that added that button, as well as a display to show the status of your scan job.

The next issue is getting the filing system to recognize the document as a unique file. The solution here is to generate a unique barcode label that can be affixed to the page before scanning. Since this is a standalone setup, it was tricky to get the label printer to spit out a unique label. He already had the Arduino working with the scanner, so [Janis] decided to use it to drive this barcode job as well. It calls to a Lua script running on the server, which then pushes the next unique code to the printer.

Tie it all together and you get the demo video after the break.

Continue reading “Using Your Existing Hardware To Automate Scanning And Filing”

Two DJ Hero Controllers Turned Into A Giant Etch A Sketch

[Ryan] sent in a little project he’s been working on. After he got his hands on a pair of DJ Hero controllers, he figured he needed to pull controller data off them.

After plugging in his two DJ Hero controllers to a breakout board, [Ryan] discovered the turntables communicate on an I2C bus. A Teensy was thrown into the mix, and work began on decoding the turntable output. [Ryan] figured out that by pulling 23 bytes from the turn table, he was left with the necessary data. Byte 20 is the state of the green, red, and blue buttons, byte 21 is the distance traveled, and byte 23 indicates clockwise or counter-clockwise. After [Ryan] figured out how to pull data off his DJ Hero controllers, the only thing left to do was build a giant Etch A Sketch on a 55 inch TV.

By the time the Etch A Sketch was completed, [Ryan] figured out that he had a gigantic rotary encoder – perfect for some classic MAME action. He started up MAME and loaded up Cameltry and Off The Wall. The DJ Hero controllers seem to work just fine, even if the hunched-over [Ryan] can’t beat the levels.

Building Optical Flex Sensors

[Joel] dug up this hack that he pulled off over ten years ago. It’s inspired by the Nintendo PowerGlove, and uses flex sensors to react to movements of your fingers. The interesting thing is, he built these optical flex sensors himself.

He likes to say that this is a ghetto fiber-optic setup. The inlaid diagram above gives you an idea of how the sensors work. An IR LED and infrared diode are positioned at either end of a piece of clear aquarium tubing. When the tube is flexed, the amount of light that makes it to the diode is diminished, a change that can be measured by a microcontroller. [Joel] found that he could increase the resolution of the sensor by adding something to the center of the tube, blocking the light when not straight. In this case he used pieces of scrap wire. The outside of the sensor was also wrapped in shrink tubing to keep ambient light from interfering with measurements.

He uses a trimpot to tune the sensors but we wonder how hard it would be to add a calibration algorithm to the firmware?

A Wooden Computer Case, Monitor Stand, And Keyboard

Wood and electronics don’t generally mix nowadays, but if you yearn back to a time when radios and the like had a nice wooden finish, this wooden computer case may be for you. Combine that with a Wooden keyboard enclosure, and maybe even a LCD monitor stand and you’ll have a setup that should fit in with any wood-themed decor!

The wooden computer case is actually more of a cover in that it uses most of the stock case to house all of the components.  It would definitely be a pain, and possibly a fire-hazard, to make a back mounting plate for all the components out of wood. To go along with this, the LCD monitor stand was engineered for a 21″ monitor when the owner of it wasn’t satisfied with the stability of the stock stand.  In the end, he ended up building something quite sturdy and nice looking to replace it.

The highlight for many for the keyboard would be that it was made, in part at least, out of a desire for a Commodore-64 keyboard.  It appears to function well andlooks great, so be sure to check out the other pictures after the break! Continue reading “A Wooden Computer Case, Monitor Stand, And Keyboard”