Bartop Arcade Honors Aspect With 4:3 IPad Screen

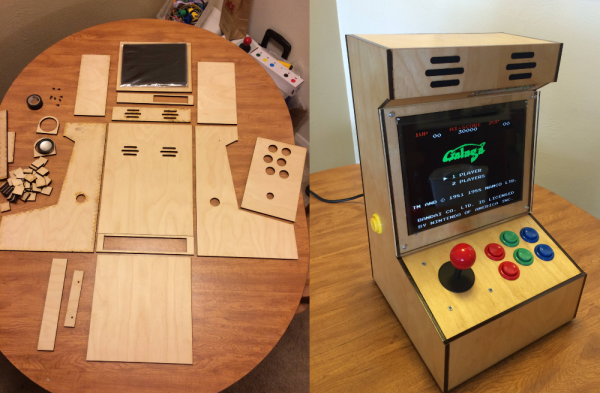
Let’s face it, we all love arcades, but not all of us can fit a full size stand-up in our homes. [Bentika] knew the solution was a bartop style cabinet, but it had to be designed and built to his specifications. You see, he’s a bit of an aspect ratio nerd. Only a proper 4:3 screen would do for emulating games designed for just such a display. Modern 4:3 displays are hard to come by, unless of course you have an iPad handy. The 1024 x 768 screens used on the early model iPads are perfect for the task.

Driving these screens used to be a chore, but thanks to hacker reverse engineering and overseas manufacturing, these days, controllers are only a few clicks away. [Bentika] ordered a controller for the iPad 1 screen from eBay. What he got was a controller that only worked with the iPad 2 screen. Thankfully he had a pile of old iPads to play with, so it wasn’t an issue.

[Bentika] designed his cabinet using AutoDesk 123D based upon a basic outline provided by [Joshendy]. His final cut patters were created with Adobe Illustrator. He was able to get the entire cabinet laser cut for around $160, including materials. Cabinet assembly was easy, thanks to plenty of square gussets used to align the various pieces.

The controller for this arcade is of course a Raspberry Pi 2 running RetroPie. [Bentika] used a control block to interface the joystick and buttons to the Pi itself. RetroPie lends itself to “keyboardless” operation, he didn’t have to bring any of the Pi’s USB ports outside the case.

We have to say the final results are very nice. This system has all the portability of a CRT based bartop setup without the weight. You can check out more discussion of this hack over on Reddit, or click past the break for the video.

Continue reading “Bartop Arcade Honors Aspect With 4:3 IPad Screen”

3 Nerds + 2 Days = Little Big Pixel

Two days at a company sponsored hackathon? Sounds like fun to us! And productive too – the end result for [GuuzG] and two of his workmates from their company’s annual “w00tcamp” was this festive and versatile 16×16 pixel mega display.

From the sound of it, [GuuzG] and his mates at q42.com are not exactly hardware types, but they came up with a nice build nonetheless. Their design was based on 16 WS2812 LED strips for a 256 pixel display. An MDF frame was whipped up with cross-lap joints to form a square cell for each pixel. Painted white and topped with a frosted Plexiglass sheet, each RGB pixel has a soft, diffuse glow yet sharply defined borders. Powered by a pair of 5A DIN rail DC supplies and controlled by a Raspberry Pi, the finished display is very versatile – users can draw random pixel art, play the Game of Life, or just upload an image. [GuuzG] and company are planning to add Tetris, naturally, and maybe a webcam for fun.

We’ve seen lots of uses for the ubiquitous WS2812 LEDs, from clocks to Ambilight clones to ground-effect lighting for an electric skateboard. But if you’re in the mood for a display that doesn’t use LEDs, there’s always this multithreading display.

[via Reddit]

4 Port USB, Raspberry Pi Zero Piggy-Back Hack

[Frederick] decided his new Zero needed a USB hub. He noticed a small, on hand, USB hub was the same size as the Zero. As any good hacker would, he stripped it from its case to piggy-back it onto the Zero. What’s with the piggy-backing since we just saw that with another Zero hack that added a WiFi dongle? Is it something in the water? Nah, probably just a natural fit with the mini-sized Zero.

It certainly helps that the USB and power pads on the back of the Zero are available and of a good size to accept direct, soldered wire connections. The USB connections on the hub were a little more tricky. The wires were soldered to the surface mount pins of the mini-B connector. But [Frederick] managed to get that done, also.

A nice advantage of this hack is that a couple of soldered jumper wires let the Zero draw power from the hub’s wall-wart, eliminating one cable from those needed to work with the Pi. Using hot glue for strain relief on the wiring is a nice touch. To keep the boards from shorting he put a piece of foam between them and help them together with elastic bands. Simple and easy.

Shoving A Raspberry Pi Zero Into An Xbox Controller

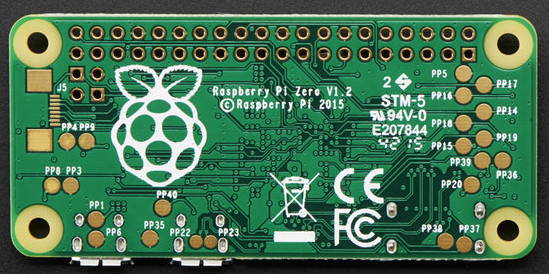
With the release of the Raspberry Pi Zero last month, we’ve been waiting in excitement to see the first creative hacks to come out, making use of its tiny size; which if you didn’t know, is smaller than a business card. [Terence Eden] hopped to it and made what might be the first Raspberry Pi Zero emulator: inside an Xbox controller.

10-Pi-Cardboard-insulatorThanks to its small size it’s actually a fairly straight forward hack with minimal modification to the controller in order to make it fit. In fact, you only need to remove the memory card holder from the controller and snip one bit of plastic in order to make it fit right in the middle — awesome.

Now it does stick out a bit as you can see in the pictures, but we’re sure it won’t take someone long to make a 3D printed part that snaps into the controller giving it a more stock appearance. Unfortunately since HDMI can’t carry a power source to the Pi, [Terence] is using a micro-USB to power it — but there is enough space inside the controller for a battery pack if you wanted to make it truly portable.

Continue reading “Shoving A Raspberry Pi Zero Into An Xbox Controller”

Pi Zero HackChat With Lady Ada

This Thursday, December 3rd, join us for a Live HackChat about the Raspberry Pi Zero with special guest [Limor Fried]. You may know [Limor] as [Lady Ada], the founder of Adafruit Industries. Adafruit has been on the forefront of the Pi Zero release. The $5 single board computer was announced one week ago by the Raspberry Pi Foundation.

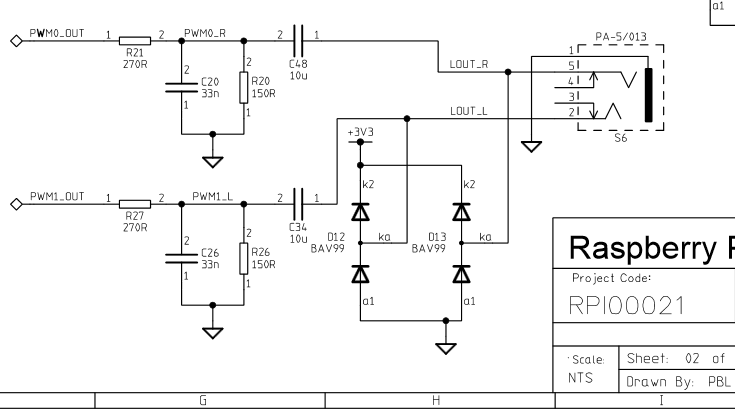
Join in the chat to discuss the Raspberry Pi Zero. Limor has done a lot of work with the board already, including hacking analog audio back into the form factor. This is a great opportunity to ask questions, talk about your own plans for the hardware, and to find collaborators for future projects.

Pi Zero HackChat starts Thursday at 5pm PST (here’s a timezone cheat sheet if you need it). Participating in this live chat is very simple. Those who are already part of the Hacker Channel can simply click on the Team Messaging button. If you’re not part of the channel, just go to the hacker Channel page, scroll to the bottom of the “TEAM” list in the left sidebar and click “Request to join this project”.

HackChat takes place in the Hacker Channel every few weeks and is a friendly place to talk about engineering and the projects you’re working on.

Raspberry Pi Zero, Or Minus One?

The Wall Street Journal reported that [Eric Schmidt] of Google and now Alphabet Inc, promoted the idea of an inexpensive version of the Raspberry Pi to the Raspberry Pi foundation’s [Eben Upton]. Apparently [Upton] accepted this recommendation despite existing plans to make a more expensive, more powerful version of the Pi. The outcome is the Raspberry Pi Zero that sells, in some places, for $5.00 and was given away for free on the cover of the MagPi magazine.

From the WSJ article:

“He [Schmidt] said it was very hard to compete with cheap. He made a very compelling case. It was a life-changing conversation,” Mr. Upton said, adding that he went back to the lab and scrapped all the engineering plans for more expensive versions of future Pi computers. “The idea was to make a more powerful thing at the same price, and then make a cheaper thing with the same power.”

Plans were scrapped. The more powerful Pi 2 was released at the price point of existing Pis, and now we have the Zero.

Pi’s Purpose

Foundation Mission

The Raspberry Pi Foundation is a registered educational charity in the UK. The purpose of this Foundation according to their About Us page is to, ‘advance the education of adults and children, particularly in the field of computers, computer science, and related subjects.’

Why is the Raspberry Pi Foundation so concerned about computer education? From the 1990s onward, fewer and fewer A Level students in the UK applying to study Computer Science had previous experience as hobbyist programmers. An applicant in the 2000s usually might have only done a little web design.

Why then does the Raspberry Pi Zero exist? [Upton] also told Cnet, “We really hope this is going to get those last few people in the door and involved in computer programming.”

Very good, but how well does the Zero support this goal or address their concerns?

Continue reading “Raspberry Pi Zero, Or Minus One?”

Listening To The Sounds Of The Earth

A geophone is a specially built microphone for listening to the Earth. [JTAdams] found them at a reasonable price so bought some to play with. A geophone is used to detect vibrations from earthquakes, explosions, rumbling trucks, and vibroseis vehicles. To be useful it needs an amplifier and a recording device to capture the signals.

24

[JTAdams] used a standard amplifier design for an LT1677 op-amp, fed the signal to an MCP3008 A/D converter, and read the output using a Raspberry Pi. A Python script records the data to a CSV file for processing. The Pi worked well because the entire setup needs to be portable to take into the field. Another Python script plots the data which is made available from a web page. A neat simple way of presenting the raw data. [JTAdams] promises more information in the future on post-processing the data. You don’t need a geophone to detect seismic waves if you build your own, but a real ‘phone will be more rugged.

Oh, what’s a vibroseis? It’s a truck with a big flat plate underneath it. The plate is hydraulically lowered to the ground until the weight of the truck is on it. The truck then causes the plate to vibrate, usually sweeping from around 10 hz to 100 hz. This infrasound pass through the ground until it is reflected back by underlying rock layers. A long string of geophones, think 1,000s of feet, detects the waves, which are recorded. In practice, many trucks are used to generate a synchronized signal of sufficient strength. Or, you can set off an explosion which is the technique used in water. Typically the information is used for oil and gas exploration.  A video of one of the trucks in action after the break.

Continue reading “Listening To The Sounds Of The Earth”