How An Old Automatic Stoker Was Hacked Onto A Modern Lancashire Boiler

Usage of an automatic stoker. (Source: Claymills Pumping Station, YouTube)

Hacks are of all ages, with the Victorian-era Claymills Pumping Station being no exception. When its old Lancashire boilers from the 19th century were  finally replaced with modern 1930s boilers, the 1920s-era automatic stokers were bodged onto the new boilers with a rather ill-fitting adapter plate, as there was no standard Lancashire boiler design. Nearly a hundred years later it was up to the volunteers at this Victorian-era pumping station to inspect and refurbish this solution, before fitting it back onto the boiler.

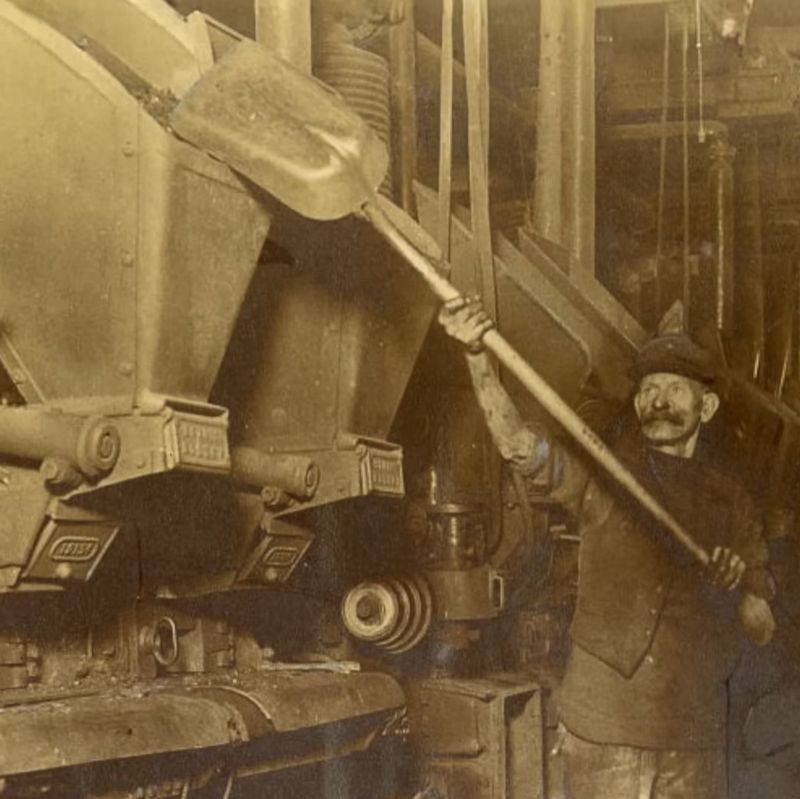
Lancashire boilers have two flue channels in which the coal is burned, which used to be done purely by hand. The automatic stokers are belt-driven devices that continuously add fresh fuel and massively lighten the workload. The 1920s stokers are still in place at this pumping station and a feature that they would love to retain.

Thus, after previously pressure-testing this #1 boiler to well beyond its operating pressure, the refurbished adapter plate was mounted back on with some percussive persuasion of the ‘very large beam’ variety.

Before the stokers could be mounted again, however, the boiler inspector had to give his OK to put the brickwork around the boiler back in place which helps to insulate it, among other functions. Once this is completed the boiler can finally see a fire again since it was last used in the 1970s. Whether these vintage stokers will work flawlessly will remain a surprise until then, but it’ll be a treat to see them operate.

Continue reading “How An Old Automatic Stoker Was Hacked Onto A Modern Lancashire Boiler”

Fixing The Damage Of A Botched SNES SuperCIC Mod

Not what you want to see when testing that 'repaired' SNES. (Credit: Skawo, YouTube)
Not what you want to see when testing that ‘repaired’ SNES. (Credit: Skawo, YouTube)

The good part about older game consoles like the Super Nintendo is that they have rather rudimentary region locks, but unfortunately this also gives some people the idea that installing something like the SuperCIC mod chip to make a SNES region-free is easy. The patient that arrived on [Skawo]’s surgery table was one such victim, with the patient requiring immediate surgery to remove the botched installation before assessing the damage.

Here the good news was that the patient features the revision B CPU, making it a good console to rescue. The bad news was that the pads of the old CIC chip had been ripped up, there was a solder bridge on S-PPU1 between two pins and both the installed wiring and soldering were atrocious, requiring plenty of touch-ups.

With the CIC pads already a loss, finishing the SuperCIC mod seemed like a good plan, also since this would make for a nice region-free console. This mod involves a PIC16F630 with special firmware that works with the corresponding CIC IC in each cartridge, while also switching between 50/60 Hz mode to fit the cartridge’s region. After an initial test with PAL and NTSC cartridges everything seemed all right. Then [Skawo] ran the SuperNES Burn-In test from its cartridge, which gave dire news.

Continue reading “Fixing The Damage Of A Botched SNES SuperCIC Mod”

Restoring A Yamaha DX7 Synthesizer

The Yamaha DX7 is one of the most iconic synthesizers that emerged in the early 1980s, and is still very popular today. That said, with even the newest of these having left the factory back in 1989, the average DX7 can use a bit of tender love and care. In particular the battered DX7 that [Drygol] recently got handed to ‘just fix the PSU voltage switch’. As it turned out, this poor DX7 had a few more issues than just a busted voltage selector.

Just a hint of cosmetic damage on this Yamaha DX7. (Credit: Drygol)
Just a hint of cosmetic damage on this Yamaha DX7.

In addition to missing slider caps and a vanished key, the paint of the case also had clearly lost a fight with various hard surfaces in addition to a thick coating of unidentifiable dust and grime inside the synthesizer. Feeling a pang of sympathy, [Drygol] thus decided to give the old girl a complete restoration.

After taking the synthesizer apart for a good scrub-down, the parts were assessed for further damage. This turned out to include the plastic stubs on some keys to hold a spring for which a replacement was modelled and 3D printed, along with replacements for the missing slider caps.

Next the case was painted, with a brand new Yamaha DX7 vinyl logo rather than trying to fix up the old paint and logo. With the outside fixed up, the broken and dodgy controls, audio jacks and potentiometers were addressed, followed by the busted onboard battery, leaving just the original voltage selector. This one got replaced by an IEC 60320 C13 jack, with the transformer hardwired for 230 VAC input, out of convenience grounds.

We’re always excited when [Drygol] sends in another restoration project — from a glowing Amiga 500 to vacuum-formed keycap covers, they’re always remarkable displays of ingenuity.

Fixing A Destroyed XBox 360 Development Kit

As common as the Xbox 360 was, the development kits (XDKs) for these consoles are significantly less so. This makes it even more tragic when someone performs a botched surgery on one of these rare machines, leaving it in dire straits. Fortunately [Josh Davidson] was able to repair the XDK in question for a customer, although it entailed replacing the GPU, CPU and fixing many traces.

The Xbox 360 Development Kit is effectively a special version of the consumer console — with extra RAM and features that make debugging software on the unit much easier, such as through direct access to RAM contents. They come in a variety of hardware specifications that developed along with the game console during its lifecycle, with this particular XDK getting an upgrade to being a Super Devkit with fewer hardware restrictions.

Replacing the dead GPU was a new old stock Kronos 1 chip. Fortunately the pads were fine underneath the old GPU, making it easy to replace. After that various ripped-off pads and traces were discovered underneath the PCB, all of which had to be painstakingly repaired. Following this the CPU had apparently suffered heat damage and was replaced with a better CPU, putting this XDK back into service.

Continue reading “Fixing A Destroyed XBox 360 Development Kit”

The Dismal Repairability Of Milwaukee Tools

Despite the best efforts of the manufacturers, there are folks out there that try to repair power tools, with [Dean Doherty] being one of them. Recently he got a Milwaukee M18 cordless planer in for repairs, which started off with just replacing some dodgy bearings, but ended up with diagnosing a faulty controller. Consequently the total repair costs went up from reasonable to absolutely unreasonable, leading to a rant on why Milwaukee tools are terrible to repair.

Among the symptoms was the deep-discharged battery, which had just a hair over 7 V while unloaded. Question was what had drained the battery so severely. What was clear was that the tool was completely seized after inserting a working battery with just a sad high-pitched whine from a stalled motor.

After replacing both bearings and grumbling about cheap bearings, the tool had a lot of drywall dust cleaned out and was reassembled for a test run. This sadly showed that the controller board had been destroyed due to the seized rotor bearing, explaining the drained battery. Replacing the controller would have cost €60-70 as it comes with the entire handle assembly, rendering the repair non-viable and a waste.

Perhaps the one lesson from this story is that you may as well preventively swap the cheap bearings in your Milwaukee tools, to prevent seizing and taking out the controller board. That said, we’d love to see an autopsy on this controller board fault.

Continue reading “The Dismal Repairability Of Milwaukee Tools”

Can A Scan Tool Kill A Car?

It’s no real secret that modern-day cars are basically a collection of computers on wheels, which also means that we get all the joys of debugging complex computer systems and software with cars these days. Rather than a quick poke under the hood to rebuild a carburetor and adjust the engine timing by hand, you’ll be pulling out a scan tool to gain access to the computer and figure out why the darn thing won’t start after someone else used a scan tool on it, as happened to [DiagnoseDan].

The question was whether the third-party scan tool that was used by the owner had done something to the software settings that would prevent the engine of this 2012 Renault Megane RS from starting, such as erasing keys, or if it was something more subtle. With no stored fault codes and the engine having healthy fuel, spark, and cam sensor readings, the conclusion was that the ECU was not doing its fuel injector things for some reason.

Ultimately, the root cause was that the ECU had been modded, with a re-mapping performed in 2020, meaning that the scan tool that [Dan] was using couldn’t properly interact with the ECU. Reflashing the ECU with the original manufacturer’s firmware was thus the next step, which is pretty involved in itself.

Reinstalling the OS on the car proved to be the solution. Likely, the modded firmware had stored some fault codes, as the ECU normally doesn’t start the engine if there are active codes stored. The third-party scan tool was thus likely blameless, but the inability to just clear fault codes was the real issue.

Continue reading “Can A Scan Tool Kill A Car?”

A Failed SwitchBot Plug Mini And Cooking Electrolytics

Poorly designed PCBs and enclosures that slowly cook the electrolytic capacitors within are a common failure scenario in general, but they seem especially prevalent in so-called Internet-of-Things devices. The SwitchBot Plug Mini that [Denki Otaku] took a look at after many reports of them failing is one such example.

The location of the failed electrolytic cap in the SwitchBot Plug Mini. (Credit: Denki Otaku, YouTube)

These Mini Plugs are ‘smart’ plugs that fit into a regular outlet and then allow you to control them remotely, albeit not integrated into a wall or such like the Shelly 2.5 smart relay that also began dying in droves. Yet whereas with the Shelly relays this always seemed to take a few years to show up, generally in the form of WiFi connectivity issues, these SwitchBot plugs sometimes failed within weeks or start constantly switching the relay on and off.

After SwitchBot started an exchange program for these plugs, [Denki Otaku] decided to examine these failed devices from affected users. Inside a dead unit the secondary side’s 680 µF capacitor was clearly bulging and had cooked off its electrolyte as a teardown of a dead capacitor confirmed. After replacing this one capacitor a formerly unresponsive plug sprung back to life.

Continue reading “A Failed SwitchBot Plug Mini And Cooking Electrolytics”