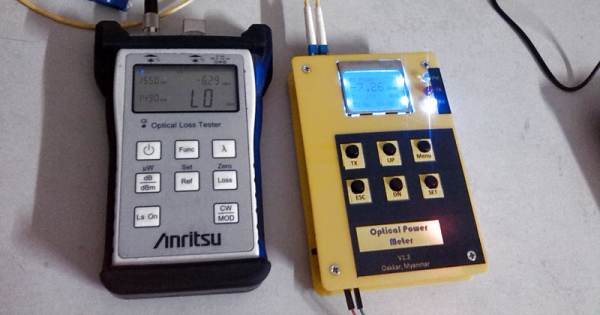
Hackaday Prize Entry: Room-Tracking Red Vines Flinger

[Vije Miller]’s Arduino Licorice Launcher is based on the simple and logical premise that one must always have a voice-activated Red Vines catapult in the workshop. When he calls out to the robot, it turns to aim at him and flings a piece of licorice at his head.

The chassis is CNCed out of quarter-inch MDF and the spring-loaded catapult arm is managed by two servos, one to tension the arm and one to secure it until it’s triggered.  Third and fourth servos aim the catapult and dispense another piece of licorice from the magazine. His robot adapts a radio homing technique [Vije] learned about from RoboWarner, which allows a robot to track a moving RF signal.

[Vije]’s first prototype uses an Arduino Uno connected to a serial port on a PC, but he hopes to acquire an MKR1000 WiFi module, which combines a Arduino Zero with WiFi. Already, this Red Vines launcher is a complete success; the marketing team at Red Vines sent him a huge pile of swag and free licorice for his efforts. You can check out [Vije]’s promo video of the project below.

Continue reading “Hackaday Prize Entry: Room-Tracking Red Vines Flinger”

Hackaday Prize Entry: Retrofit A Nokia

The Nokia 3210 is the greatest cell phone ever made. The battery lasted for days, custom color covers were available at every mall kiosk, it had the Snake game, and the chassis for this phone was finely crafted out of the crust of neutron stars. It was indestructible; it is the reason we now appreciate technology over more impermanent concepts like relationships and love.

For his Hackaday Prize entry, [Bastian] is bringing the Nokia 3210 into this century. He’s designing a circuit board with the same footprint, the same button layout, and a better screen that drops right into the lovely plastic enclosure of the 3210.

Also known as, ‘a fun time’

The current BOM for the upgraded 3210 includes an STM32 F7 microcontroller, which is more or less the current top of the line ARM micro you can get. For wireless, [Bastian] is using an A7 GSM/GPRS module and an ESP8266 for a little bit of WiFi. For a dumbphone, this is ludicrously overpowered. Provided [Bastian] gets a prototype up and running, there will be some interesting applications for a device this powerful in a package this indestructible.

One of the things [Bastian] has been butting his head against with this project is KiCad. Microvias don’t work like they should in KiCad — they’re restricted to the outer layers only. This is a problem for routing a complex board like this, so [Bastian] wrote a patch that gives KiCad an ‘I know what I’m doing mode’ for microvias everywhere.

This is truly the spirit of The Hackaday Prize: not only is [Bastian] building something ridiculous, he’s also creating the tools to do it.

These Twenty Assistive Technologies Projects Won $1000 In The Hackaday Prize

Today, we’re excited to announce the winners of the Assistive Technologies portion of The Hackaday Prize. In this round, we’re looking for projects that will help ensure a better quality of life for the disabled. Whether this is something that enhances learning, working, or daily living. These are the projects that turn ‘disability’ into ‘this ability’.

Hackaday is currently hosting the greatest hardware competition on Earth. We’re giving away hundreds of thousands of dollars to hardware creators to build the next great thing. Last week, we wrapped up the fourth of five challenges. It was all about showing a design to Build Something That Matters. Hundreds entered and began their quest to build a device to change the world.

There’s still one entry challenge remaining in The Hackaday Prize. Anything Goes is on right now and open to every idea imaginable. If you’re building a computer made of sand, awesome. Quadcopter hammock? Neat. This is the portion of the Hackaday Prize that’s open to the best ideas out there. It’s up to you to explain how your creation makes the world a little bit better place.

The winners of the Assistive Technologies challenge are, in no particular order:

Assistive Technologies Hackaday Prize Finalists:

Continue reading “These Twenty Assistive Technologies Projects Won $1000 In The Hackaday Prize”

Hackaday Prize Entry: IO, The Cardboard Computer

[Dr. Cockroach]’s goal was to build a four-bit computer out of recycled and repurposed junk. The resulting computer, called IO, consists of a single 555, around 230 PNP and NPN transistors, 230 diodes, and 460 resistors. It employs RISC architecture and operates at a speed of around 3 Hz.

He built IO out of cardboard for a good reason: he didn’t have a big budget for the project and he could get the material for free from his workplace. And because it was built so cheaply, he could also build it really big, allowing him to be able to really see each circuit close up and repair it if it wasn’t working right. You can really see the architecture very well when it’s this big—no tangle of wires for [Dr. Cockroach]. He uses over sixty blue LEDs to help monitor the system, and it doesn’t hurt that they look cool too. One of our favorite parts of the project is how he used copper fasteners to both manage the cardboard and serve as wiring points.

Continue reading “Hackaday Prize Entry: IO, The Cardboard Computer”

Hackaday Prize Entry: Smart Electric Bike Controller

One of the more interesting yet underrated technological advances of the last decade or so is big brushless motors and high-capacity batteries. This has brought us everything from quadcopters to good electric cars, usable cordless power tools, and of course electric bicycles. For his Hackaday Prize project, [marcus] is working on a very powerful electric bicycle controller. It can deliver 1000 Watts, it’s got Bluetooth, and there’s even an Android app for some neat diagnostics.

The specs for this eBike controller are pretty much what you would expect. It’s able to deliver a whole Kilowatt, can use 48 V batteries, has regenerative braking, Hall sensors, and has a nifty Android app for settings, displaying speed, voltage and power consumption, diagnostics, and GPS integration.

How is the project progressing? [marcus] has successfully failed a doping test. He lives on the French Riviera, and the Col de la Madonne is a famous road cycling road and favorite test drive of [Lance Armstrong]. The trip from Nice to Italy was beautiful and ended up being a great test of the eBike controller.

Hackaday Prize Entry: Touch Sensitive Power Supplies For EL Panels

[fool]’s entry in the Hackaday Prize competition is a modular and configurable lighting system the purpose of which is to assist seniors and others with limited mobility navigate safely at home. For [fool], this means the quiet steady hum of electroluminescent panels and wire. EL stuff is notoriously tricky to power, as it only operates on AC. The MoonLITE project is the answer to the problem of an easy to use EL power supply. The goal is to create a 5 watt, quiet, wearable EL power supply that outputs 100V at 100Hz.

One of the reasons why [fool] is interested in EL materials is that it can also turned into a touch sensor. This has obvious applications in lighting, and especially in assistive technologies. The MoonLITE project is based around [fool]’s Whoa Board that turns EL wires and panels into not only touch-sensitive lights, but also analog switches that can control basically anything. This unique capability of lighting doubling as a sensor offers the opportunity to make light-up EL grab bars for a senior’s bedside, for instance. He or she is going to be touching it anyway when getting up—why not add light as well as stability?

This is an especially cool project that brings something to the table we don’t really see much of. You can check out a video of the project below, complete with example of EL panels being used as buttons.

Continue reading “Hackaday Prize Entry: Touch Sensitive Power Supplies For EL Panels”

Hackaday Prize Entry: Mini DRO For A Lathe

A manual lathe has dial wheels to control the feed of the main carriage and the cross slide to help take cuts on the workpiece. These feed wheels always have some backlash and require frequent resetting of the “zero”. The usual process would be to take measurements on the workpiece with either a vernier caliper or a micrometer at intervals which requires stopping the machine, adding up to increased machine time. The addition of a digital readout not only simplifies the process, but also reduces machining time substantially. Since the DRO magnetic strips are directly attached to the cross slide, the effects of backlash are mitigated.

[Igor] has just such a manual lathe and built his own mini DRO unit from scratch a couple of years back. Most DRO’s have encoder strips and sensors attached to the cross slide with a larger display unit attached separately on a stalk, with wires running between the two. [Igor] kept things simple by building a unit that fit within the space constraints he had. His unit consists of just two sensor modules – each attached directly to the slide. The main unit houses a linear hall sensor, electronics, buttons, a small LCD and batteries. The second axis unit houses just the sensor with a cable connecting it to the main unit for data and power. At the heart of the system is a pair of NSE-5310 linear hall sensor encoder chips. These work in conjunction with multipole magnetic strips. The encoder provides a 12-bit output, and the magnetic strips have poles spaced 2 mm apart. This translates to a theoretical resolution of almost 0.5 microns, but of course, the machine mechanics limit the actual results. The encoder chips talk to an ATtiny2313 over the I2C bus. Three buttons and the power supply round-up the hardware. To run it off a single 1.5 V rechargeable battery, [Igor] used a boost converter to get 3.3 V. The 5 V needed for the LCD is obtained by a voltage doubler connected to a PWM output from the microcontroller and regulated by a Zener diode. The second sensor unit connects via a TRRS 3.5 mm socket.

He added a Bluetooth module as an after thought, but ran out of GPIO pins as well as program space and had to get creative to make it work. The plan was to transmit the data to an Android tablet which would work as a large, remote, wireless display. He never did use that feature though, being satisfied with the small LCD display. There’s several things that went wrong in the build, and if he were to replicate the project again, several changes and improvements would help. So if anyone plans on doing something similar, do check up [Igor]’s project logs first.