Vastly Improving The Battery Life On Cheap Action Cams

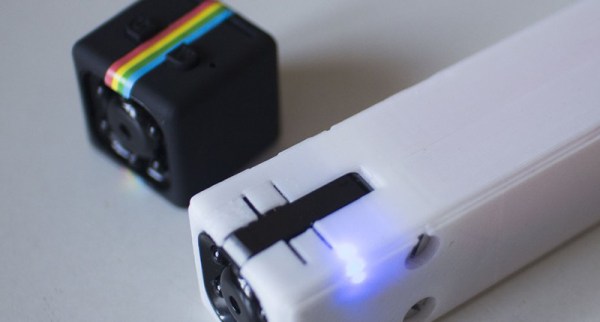
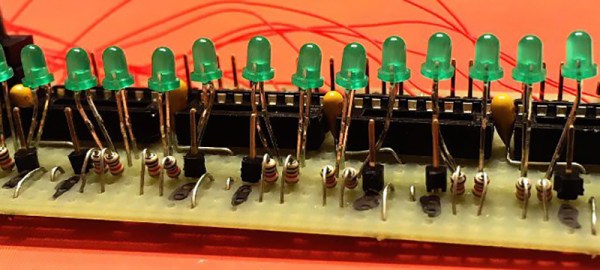
At one time, GoPro was valued at over eleven Billion dollars. It’s now on the verge of being a penny stock, because if surfers can make action cams and video editing software, anyone can. Action cams are everywhere, and one of the cheapest is the SQ11. It’s a rip-off of the Polaroid Cube, has a non-standard USB socket, a tiny battery, and the video isn’t that great. It only costs eight dollars, though, so [pixelk] decided to vastly expand the abilities of this cheap camera for a Hackaday Prize entry.

The major shortcoming of the SQ11 action cam is the tiny battery. Reportedly, it’s a 200 mAh battery, but the stated 1-2 hours of runtime bears no resemblance to reality. The solution to this problem, as with most things in life, is to throw some lithium cells at the problem.

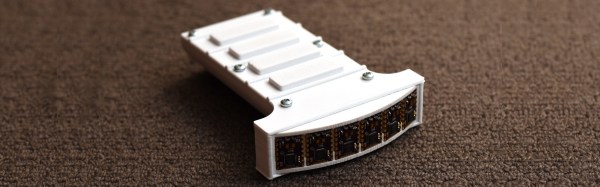
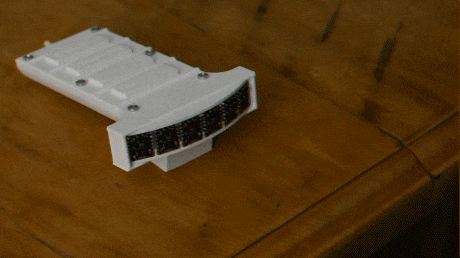
[pixelk] disassembled the SQ11 action cam and 3D printed a much longer enclosure meant to fit a single 18650 battery. There’s a protection circuit, so that’s fine, but there’s still a problem: the charging circuit in the camera is tailored for a 200 mAh battery — charging an 18650 cell would probably take a day. That’s no problem, because this enclosure leaves the battery removable, for easy recharging in an external device.

Does this make the SQ11 a good camera? Marginally, yes. If you need to record video for hours and hours, you won’t be able to do better than an eight dollar camera and four dollars in parts.

Checking The Weather Without A Window

Making a weather display is great because it’s a simple project that shows off some skills and has an obvious daily use. So [ACROBOTIC Industries] decided to make an easy kit for the Hackaday Prize to make weather displays even more accessible.

Calling it the ESPecter, [ACROBOTIC Industries] wanted to make this a simple project for anyone, regardless of skill with a soldering iron or Arduino toolkit. So they decided to base the guts on common components that can be put together easily, specifically a Wemos Mini D1 with an OLED shield as a bright display. They also designed a cool tiltable 3D-printed enclosure for this small device so that you can orient it to your eye level.

ESPecter breadboarded prototype.

While they already have a breadboarded prototype, and a 3D printed case, some software work remains to make the project really shine. They plan to add nice features like a web interface to configure location and network information, alerts, additional locations, and historical weather data. They also want to create a weather library to display well on a low-resolution screen and add battery operation.

We look forward to seeing the final version later in the Hackaday Prize!

This isn’t the first weather project we’ve seen around here. Other variants include mirror weather displays, an ESP8266-based weather monitoring station, a very low-power weather station, and this roundup of weather displays which might give you some inspiration.

A Mini-ITX PDP-11

The PDP-11 is perhaps the most important computer in history. This was the king of all minicomputers, and once you get past the amazing front panels of the 11/20, 11/40, and 11/70, you’ll find PDP-11s everywhere. Heathkit sold one. It was the smallest computer that could run Unix. There were desktop versions sold as DEC Professionals. I have been told Ticketmaster — the entire backend of all event ticket sales in the United States — still runs on PDP-11s.

One of the interesting bits of the PDP-11 is the miniaturization that happened over the course of its development. Over time, the Unibus processor cards of the earlier models were shrunk down into a single chip. This PDP-on-a-chip was then cloned by the Soviets, and like most vintage Eastern European electronics, they’re all readily available on eBay.

For his Hackaday Prize entry, [SHAOS] is taking one of these chips and turning it into a modern machine. The PDPii is a project to bring the PDP-11 back to life in the form of an Open Source motherboard with a Mini-ITX motherboard. Is it game-changing? No, not really; you could buy a desktop PDP-11 thirty years ago. This project, though, is taking new old stock chips you can buy for ten dollars and turning it into something resembling a modern system. Finally, Ticketmaster can upgrade.

The design of this project doesn’t quite meet the spec for the Mini-ITX form factor; it’s based off the RC2014 backplane Z80 computer, but desktop computer cases are cheap, as are power supplies, and I’m sure someone out there knows how to fit an eight inch floppy in a five and a quarter inch hole.

The key feature for this Mini-ITX backplane PDP-11 is a redesign of the Q-bus found in later PDPs to something that’s a bit smaller, a bit cheaper to manufacture, and still has all the relevant pins accessible. With some reconfiguring of the baroque DEC standards, [SHAOS] came up with the Bread-Board Friendly Q-bus Extended, or BBQ-Bus+. The next step for this project is gathering up a few PDP-11 compatible Russian КР1801ВМ2 CPUs and going to town on the architecture of what is probably the most replicated computer design ever.

Video Quick-Bit: Numitrons And Infinite Build Volumes

Majenta Strongheart takes a look at a couple of cool entries from the first round of the 2018 Hackaday Prize:

This is an infinite 3D printer. The Workhorse 3D is the way we’re going to democratize 3D printing. The Workhorse 3D printer does this by adding a conveyor belt to the bed of a 3D printer, allowing for rapid manufacturing, not just prototyping. [Swaleh Owais] created the Workhorse 3D printer to automatically start a print, manufacture an object, then remove that print from the print bed just to start the cycle all over again.

Check out this Numitron Hexadecimal Display Module from [Yann Guidon]. [Yann] is building an entire computer, from scratch, and he needs a way to display the status of various bits on a bus. The simplest way to do this is with a few buffer chips and some LEDs, but that’s far too easy for [Yann]. He decided to use Numitron tubes to count bits on a bus, from 0 to F. Instead of microcontrollers, he’s using relays and diode steering to turn those segments of the Numitron on and off.

Browse all of the entries here. Right now, we’re in the Robotics Module Challenge part of the Hackaday Prize, where twenty incredible projects will win one thousand dollars and move on to the final part of the Hackaday Prize where one lucky winner will win fifty thousand dollars for building awesome hardware. If that’s not incredible, I don’t know what is.

Litar: LiDAR air guitar

Litar: An Air Guitar Using LiDAR

This year, [Blecky’s] Hackaday Prize Entry is an air guitar which uses multiple LiDAR sensors to create the virtual strings. What’s also neat is that he’s using his own LiDAR sensor, the MappyDot Plus, an enhanced version of his 2017 Prize Entry, the MappyDot.

He uses a very clever arrangement of six sensors to get four virtual strings. Each sensor scans a 25-degree field of view. Three adjacent sensors are used to define a string, with the string being in the overlap of the outer two of those sensors. The middle sensor is used for the distance data.

For the chords, he started out using some commercially made joysticks but ran into some ergonomic issues. Also, the manufacturer was discontinuing the product, a no-no for an open source project. So he abandoned that approach and designed his own buttons. He came up with a PCB with a linear hall effect sensor and some springs on it. The button has a magnet attached to its underside and sits on the springs. That way he gets the press and can do vibrato as well.

He plans to use Bluetooth MIDI so that you can play the sound on a phone or laptop but for now he lights up an LED beside each sensor as you press the strings.

Friday Hack Chat: Control Schemes For Robotics

The Hackaday Prize is in full swing if you haven’t heard. It’s the Academy Awards of Open hardware, and the chance for you — yes, you — to create the next great piece of hardware and a better future for everyone. Right now, we’re in the Robotics Module Challenge portion of the prize. This is your chance to build a module that could be used in robotics projects across the world! Show off your mechatronic skills and build a robotics module that’s transferable to other builds!

Not coincidentally, for this week’s Hack Chat, we’re talking all about Robotics Modules. We’re taking a deep dive into actuation and control schemes for robotics, and you’re invited to take part. Everyone wants affordable robotics, and stepper and servo motors are no longer the domain of high-budget industrial robots. Everyone can build a robot, but how do you do that? That’s what we’re going to find out this Friday in the Hack Chat!

Our guest for this week’s Hack Chat is [Ryan Walker]. He holds a diploma in Mechatronics and Robotics from BCIT. He’s worked on everything from prosthetics to industrial automation, and his current hobbies include designing and building control algorithms that drive electronics and enable cheap hardware to excel! If you want to learn about robotics, this is the Hack Chat for you.

In this chat, we’ll be talking about:

  • Control schemes
  • How to actuate your projects
  • Wheels, tweels, and ways to make your project move
  • Automating robotics

You are, of course, encouraged to add your own questions to the discussion. You can do that by leaving a comment on the Hack Chat Event Page and we’ll put that in the queue for the Hack Chat discussion.join-hack-chat

Our Hack Chats are live community events on the Hackaday.io Hack Chat group messaging. This week is just like any other, and we’ll be gathering ’round our video terminals at noon, Pacific, on Friday, April 27th.  Here’s a clock counting down the time until the Hack Chat starts.

Click that speech bubble to the right, and you’ll be taken directly to the Hack Chat group on Hackaday.io.

You don’t have to wait until Friday; join whenever you want and you can see what the community is talking about.

Custom Chips As A Service

Ages ago, making a custom circuit board was hard. Either you had to go buy some traces at Radio Shack, or you spent a boatload of money talking to a board house. Now, PCBs are so cheap, I’m considering tiling my bathroom with them. Today, making a custom chip is horrifically expensive. You can theoretically make a transistor at home, but anything more demands quartz tube heaters and hydrofluoric acid. Custom ASICs are just out of reach for the home hacker, unless you’re siphoning money off of some crypto Ponzi scheme.

Now things may be changing. Costs are coming down, the software toolchain is getting there, and Onchip, the makers of an Open Source 32-bit microcontroller are now working on what can only be called a, ‘OSH Park for silicon’. They’re calling it Itsy-Chipsy, and it’s promising to bring you your own chip for as low as $100.

The inspiration for this business plan comes from services like MOSIS that allows university classes to design their own chips on multi-project wafers. This aggregates multiple chips onto one wafer, bringing the cost of a prototype down from tens of thousands of dollars to about five thousand dollars, or somewhere around a thousand dollars a chip.

Itsy-Chipsy is taking this batch processing one step further. This is a platform that combines multiple projects on one die. That thousand dollar chip is now sixteen different projects, tied together with regulators, current sources, clocks, and process monitors. Using a 2 mm by 2 mm chip size, Itsy-Chipsy gives chip designers 350 μm of silicon using a 180 nm CMOS process. That’s enough for a basic 32-bit RISC-V microprocessor in a QFN or DIP 40 for just one hundred dollars.

This project is a contender for The Hackaday Prize — the Prize ends in November and we’d be amazed to see results by then. The Onchip team is talking to foundries, though, and it looks like there’s interest for this model in the industry. We’d guess that the best case scenario is a crowdfunding campaign for an OSH Park-like chip fab sometime in 2019. Whenever it comes, this is something we’re eagerly awaiting.