Big Red Button Puts Toddler In Command Of Chromecast

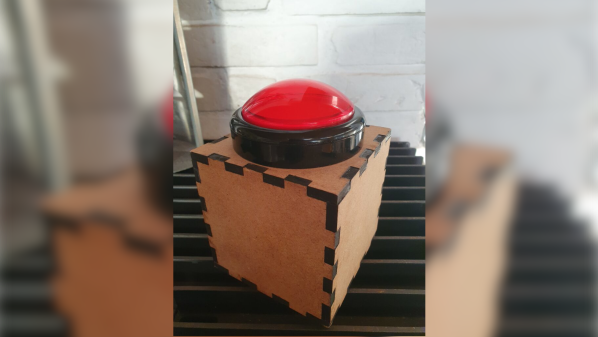
Controversial position: the world needs more buttons. We’ve gotten so far away from physical interfaces like buttons, knobs, and switches in favor of sleek but sterile touch-screen “controls” that when we see something like this big red button so toddlers can start a TV show, we just have to latch onto the story and see what it’s all about.

As it turns out, the big red button itself is probably the least interesting part of [Mads Chr. Olesen] build. The real meat of the project is the reverse engineering effort needed to get Chromecast to start the show. As [Mads] explains, once upon a time a simple GET request to a URL was all it took to do so, but no more; Google has repeatedly nerfed the Chromecast API over the years, enough that [Mads] had some digging to do.

Luckily, pyChromecast is a thing, but using it for DRTV, a streaming service of the Danish Broadcasting Corporation, required figuring out the AppID of the DRTV app. It looks like [Mads] used Wireshark to sniff traffic to and from the Chromecast, and netlog-viewer to analyze the capture. That and a little Developer Tools action in Chrome led to all the information needed to modify pyChromecast to support DRTV. The rest of the project consisted of building a box for the huge red arcade button and wiring it up to a Wemos D1. A Raspberry Pi actually talks to the Chromecast, and now the toddler is able to call up his favorite show and pause and restart it at will, no parent required.

We appreciate the reverse engineering heroics [Mads] displays here, which provide good general lessons for other purposes. It’s been a while since we’ve seen a Chromecast physical interface build, too, so we appreciate the refresher.

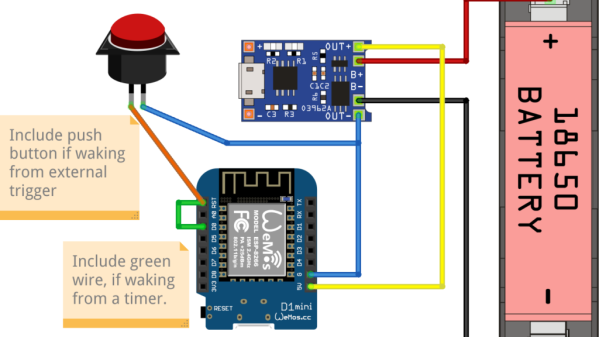
Fritzing diagram of connections between the Wemos D1 board, the TP4056 board, the pushbutton and the LiIon battery

Battery-Powered ESP8266 Sensor? Never Been Simpler

Say, you’re starting your electronics journey with a few projects in mind. You have an ESP8266 board like the Wemos D1, a Li-Ion battery, you want to build a small battery-powered sensor that wakes up every few minutes to do something, and you don’t want to delve into hardware too much for now. Well then, does [Mads Chr. Olesen] have a tutorial for you! Here, you’ll learn the quick and easy way to get your sensor up and running, learn a few tricks for doing sleep Arduino environment, and even calculate how long your specific battery could last. Continue reading “Battery-Powered ESP8266 Sensor? Never Been Simpler”

Front Door Keys Hidden In Plain Sight

If there’s one thing about managing a bunch of keys, whether they’re for RSA, SSH, or a car, it’s that large amounts of them can be a hassle. In fact, anything that makes life even a little bit simpler is a concept we often see projects built on to of, and keys are no different. This project, for example, eliminates the need to consciously carry a house key around by hiding it in a piece of jewelry.

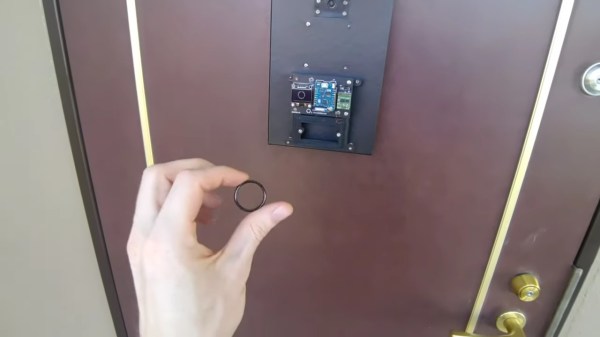
This project sprang from [Maxime]’s previous project, which allowed the front door to be unlocked with a smartphone or tablet. This isn’t much better than carrying a key, since the valuable piece of electronics must be toted along in place of one. Instead, this build eschews the smartphone for a ring which can be worn and used to unlock the door with the wave of a hand. The ring contains an RFID which is read by an antenna that’s monitored by a Wemos D1 Mini. When it sees the ring, a set of servos unlocks the door.

The entire device is mounted on the front of the door about where a peephole would normally be, with the mechanical actuators on the inside. It seems just as secure (if not more so) than carrying around a metal key, and we also appreciate the aesthetic of circuit boards shown off in this way, rather than hidden inside an enclosure. It’s an interesting build that reminds us of some other unique ways of unlocking a door.

Continue reading “Front Door Keys Hidden In Plain Sight”

Circuit-less PCB Featured As Faceplate For A Digital Clock

If there’s no circuitry on a printed circuit board, does it cease being a “PCB” and perhaps instead become just a “PB”?

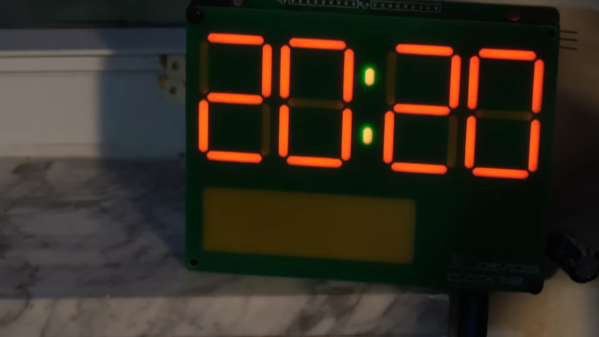
Call them what you will, the fact that PCBs have become so cheap and easy to design and fabricate lends them to more creative uses than just acting as the wiring for a project. In this case, [Jeremy Cook] put one to work as the faceplate for his “742 Clock,” a name that plays on the fact that his seven-segment display is 42 mm tall, plus it’s “24/7” backward.

In addition to the actual circuit board that holds the Wemos ESP32 module and the LEDs, a circuit-less board was designed with gaps in the solder mask to act as light pipes. Sandwiched between the boards is a 3D printed mask, to control the light and direct it only through the light pipes. [Jeremy] went through a couple of iterations of diffuser and mask designs, finally coming up with a combination that works well and looks good. He mentions a possible redesign of the faceplate board to include a copper backplane for better opacity, which we think is a good idea. We’d also like to see how different substrates work; would boards of different thickness or using FR-4 with different glass transition temperatures work better? Check out the video below and see what you think.

We’re seeing more and more PCBs turn up as structural elements, from enclosures to control panels and even tools, and we approve of this trend. But what we really approve of is what [Jeremy] did here by making this clock just a dumb display that gets network time over NTP. Would that all three digital clocks in our kitchen did the same thing — maybe then they wouldn’t each be an infuriating minute out of sync with the others.

Continue reading “Circuit-less PCB Featured As Faceplate For A Digital Clock”

The Swiss Army Knife Of Bench Tools

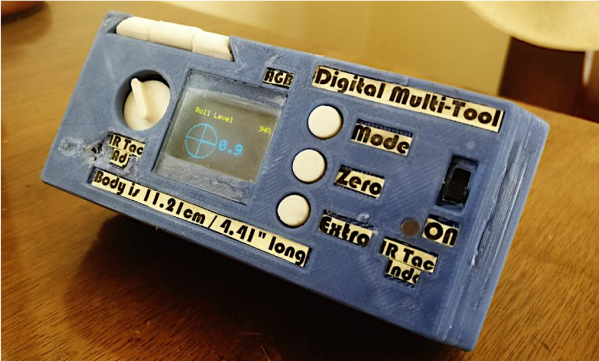
[splat238] had a ton of spare sensors laying around that he had either bought for a separate project or on an impulse buy, so he knew he had to do something with them. He decided to build his own digital multi-tool focusing on sensors that would be particularly useful in a workshop setting. Coincidentally, he was inspired by a previous hack that we covered a while back.

He’s equipped his device with a bubble level, tachometer, IR thermometer, protractor, laser pointer, and many, many more features that would make great additions to any hacker’s workspace. There’s a good summary of each sensor, making his Instructable somewhat of a quick guide to common sensing modalities for hardware designers. The tachometer, thermometer, laser pointer, and a few other capabilities are notable upgrades from the project we highlighted previously. We also appreciate the bigger display, allowing for more detailed user feedback particularly in using the compass and bullseye digital level among other features.

The number of components in [splat238’s] build is too extensive to detail one-by-one in this article, so please see his Instructable linked above for all the details. [splat238] made his own PCB for mounting each sensor and did a good job making the design modular so you wouldn’t need to add certain components if you don’t need them. Most of the components take some through-hole soldering with only a handful of 0805 resistors required otherwise. The housing was designed such that the user can handle the tool with one hand and can switch between each function with a push of a button.

Finally, the device is powered using a rechargeable lithium-polymer battery making it very reusable. And, if there weren’t enough features already, the battery can be charged via USB or through two solar panels mounted into the housing unit. Okay, solar charging might be a case of featuritis, but still a cool build either way.

Check out some other handy DIY tools on Hackaday.

Continue reading “The Swiss Army Knife Of Bench Tools”

Weather Station Gets Much-Needed Upgrades

Weather stations are a popular project, partly because it’s helpful (and interesting) to know about the weather at your exact location rather than a forecast that might be vaguely in your zip code. They’re also popular because they’re a good way to get experience with microcontrollers, sensors, I/O, and communications protocols. Your own build may also be easily upgradeable as the years go by, and [Tysonpower] shows us some of the upgrades he’s made to the popular Sparkfun weather station from a few years ago.

The Sparkfun station is a good basis for a build though, it just needs some updates. The first was that the sensor package isn’t readily available though, but some hunting on Aliexpress netted a similar set of sensors from China. A Wemos D1 Mini was used as a replacement controller, and with it all buttoned up and programmed it turns out to be slightly cheaper (and more up-to-date) than the original Sparkfun station.

All of the parts and code for this new station are available on [Tysonpower]’s Github page, and if you want to take a look at a similar station that we’ve featured here before, there’s one from three years ago that’s also solar-powered.

Continue reading “Weather Station Gets Much-Needed Upgrades”

Hackaday Links Column Banner

Hackaday Links: October 13, 2019

Trouble in the Golden State this week, as parts of California were subjected to planned blackouts. Intended to prevent a repeat of last year’s deadly wildfires, which were tied in part to defective electrical distribution equipment, the blackouts could plunge millions in the counties surrounding Sacramento into the dark for days. Schools have canceled classes, the few stores that are open are taking cash only, and hospitals are running on generators. It seems a drastic move for PG&E, the utility that promptly went into bankruptcy after being blamed for last year’s fires, but it has the support of the governor, so the plan is likely to continue as long as the winds do. One group is not likely to complain, though;  California amateur radio operators must be enjoying a greatly decreased noise floor in the blackout areas, thanks to the loss of millions of switch-mode power supplies and their RF noise.

Good news, bad news for Fusion 360 users. Autodesk, the company behind the popular and remarkably capable CAD/CAM/CAE package, has announced changes to its licensing scheme, which went into effect this week. Users no longer have to pay for the “Ultimate” license tier to get goodies like 5-axis machining and generative design tools, as all capabilities are now included in the single paid version of Fusion 360. That’s good because plenty of users were unwilling to bump their $310 annual “Standard” license fee up to $1535 to get those features, but it’s bad because now the annual rate goes to $495. In a nice nod to the current userbase, those currently on the Standard license, as well as early adopters, will get to keep the $310 annual rate as long as they renew, and The $495 pricing tier went into effect in November of 2018, while anyone still on the $310 annual price was grandfathered in (and will remain to be). At that time there was still a $1535 tier called Ultimate, whose price will now be going away but the features remain in the $495 tier which is now the only pricing option for Fusion 360. Ultimate users will see a $1040 price drop. As for the current base of freeloaders like yours truly, fear not: Fusion 360 is still free for personal, non-commercial use. No generative design or tech support for us, though. (Editor’s Note: This paragraph was updated on 10/14/2019 to clarify the tier changes after Autodesk reached out to Hackaday via email.)

You might have had a bad day at the bench, but was it as bad as Román’s? He tipped us off to his nightmare of running into defective Wemos D1 boards – a lot of them. The 50 boards were to satisfy an order of data loggers for a customer, but all the boards seemed caught in an endless reboot loop when plugged into a USB port for programming. He changed PCs, changed cables, but nothing worked to stop the cycle except for one thing: touching the metal case of the module. His write up goes through all the dead-ends he went down to fix the problem, which ended up being a capacitor between the antenna and ground. Was it supposed to be there? Who knows, because once that cap was removed, the boards worked fine. Hats off to Román for troubleshooting this and sharing the results with us.

Ever since giving up their “Don’t be evil” schtick, Google seems to have really embraced the alternative. Now they’re in trouble for targeting the homeless in their quest for facial recognition data. The “volunteer research studies” consisted of playing what Google contractors were trained to describe as a “mini-game” on a modified smartphone, which captured video of the player’s face. Participants were compensated with $5 Starbucks gift cards but were not told that video was being captured, and if asked, contractors were allegedly trained to lie about that. Contractors were also allegedly trained to seek out people with dark skin, ostensibly to improve facial recognition algorithms that notoriously have a hard time with darker complexions. To be fair, the homeless were not exclusively targeted; college students were also given gift cards in exchange for their facial data.

For most of us, 3D-printing is a hobby, or at least in service of other hobbies. Few of us make a living at it, but professionals who do are often a great source of tips and tricks. One such pro is industrial designer Eric Strebel, who recently posted a video of his 3D-printing pro-tips. A lot of it is concerned with post-processing prints, like using a cake decorator’s spatula to pry prints off the bed, or the use of card scrapers and dental chisels to clean up prints. But the money tip from this video is the rolling cart he made for his Ultimaker. With the printer on top and storage below, it’s a great way to free up some bench space.

And finally, have you ever wondered how we hackers will rebuild society once the apocalypse hits and mutant zombie biker gangs roam the Earth? If so, then you need to check out Collapse OS, the operating system for an uncertain future. Designed to be as self-contained as possible, Collapse OS is intended to run on “field expedient” computers, cobbled together from whatever e-waste can be scrounged, as long as it includes a Z80 microprocessor. The OS has been tested on an RC2014 and a Sega Master System so far, but keep an eye out for TRS-80s, Kaypros, and the odd TI-84 graphing calculator as you pick through the remains of civilization.