By virtue of its triple bond, acetylene burns hotter than any other common hydrocarbon when mixed with oxygen, but it isn’t the only flame hot enough for welding. With the assistance of a homemade oxygen concentrator, [Hyperspace Pirate] was able to make a natural gas torch that melts steel, even if welding with the torch remains difficult.
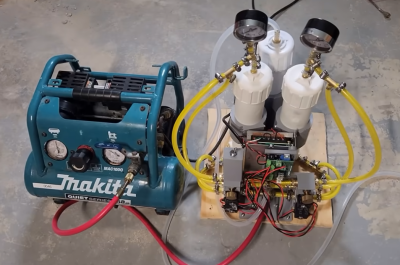
[Hyperspace Pirate] built his oxygen concentrator around a pressure-swing adsorption system, which uses two tanks of a molecular sieve to selectively adsorb and purge nitrogen, leaving behind mostly oxygen. [Hyperspace Pirate] used reverse-osmosis membrane casings as the tanks, solenoid valves to control gas flow, and an Arduino with some MOSFETs to control the timing. For fuel, he used a convenient source of natural gas, already installed in his garage: the water heater’s gas supply. Since the house’s meter regulates the gas down to a fairly low pressure, and the oxygen concentrator doesn’t produce high pressures, the torch didn’t need any inline regulators.
 Inline check valves, on the other hand, were very much necessary, a mixture of oxygen and natural gas propagating back along the lines being undesirable for obvious reasons, and flashback arrestors would have been a good addition. [Hyperspace Pirate] built the torch itself out of copper tubing and needle valves, with a 0.9 mm MIG welder tip as the nozzle. Adjusting the gas mixture was mostly a matter of trial and error. With an oxygen-rich flame, it could cut thin metal decently well, but it tended to melt thick pieces more than it cut. On the other hand, even with a neutral flame, the water vapor in the exhaust oxidized steel, which made welding quite difficult, but not impossible.
The oxygen supply by itself was an entertaining tool, turning smoldering pieces of charcoal or steel wool violently incandescent. With the assistance of some steel wool, [Hyperspace Pirate] set a steel tube on fire. With a bit more oxygen, it would probably make an effective thermic lance. If you still want to do your welding with acetylene, he’s also made that before.
Continue reading “Welding With Natural Gas And Oxygen” →