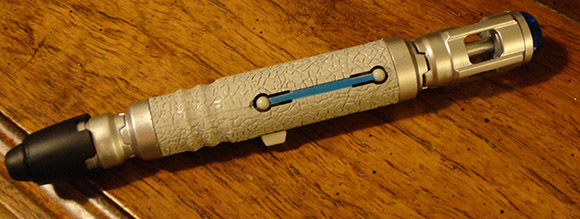
Turning The InnoTab Into A Linux Tablet

A few weeks ago we caught wind of [Mick] breaking out his screwdrivers and soldering iron to get a serial console on his son’s VTech InnoTab. [Mick] was able to get the touchscreen working and successfully ported SCUMMVM to the device, but there was still a long road ahead to get  the source for this pint-sized tablet.

[David Anders] from elinux.org wrote in to tell us VTech is now giving away their source for the InnoTab, something they’ve been holding back so far. [Dave] is now verifying the VTech release is 100% complete, so if you’d like to give him a hand, drop him a line.

If you’re thinking this is your ticket to an inexpensive and powerful Linux tablet, prepare to be disappointed. The InnoTab is an ARM 11 running at 180 MHz with a paltry 64 MB of RAM. That’s not exactly top-of-the-line hardware, but at the very least you’ll be able to play Doom on it.

Remote Control With An XBee And A Propeller

If you’ve been playing with electronics for long enough, eventually you’ll need a nice remote control transmitter to control your RC car, airplane, or any other robotics project you have lying around. With these robotics projects comes the problem remote control, and the XBee Handheld Controller may be just the ticket to remotely control any project that comes off your workbench.

This isn’t the first remote controller we’ve seen that does just about everything, but it is the first one to include an XBee wireless transceiver to easily interface to your robotics project. The controller comes in two models, the Q4, which uses four Playstation-like joysticks, and the Q2, which uses proper remote control gimbal joysticks. Both the controllers have a slew of buttons, toggle switches, four rotary pots and a 2×20 LCD display.

After the break you can check out [Paul]’s pitch explaining what these controllers can do and showing off a hexapod robot under the control of his Q4 controller. A very neat project, and we can’t wait to see this controller out in the field.

Continue reading “Remote Control With An XBee And A Propeller”

Roller Coaster Simulator For The Redbull Creation Contest

[Dave] and [Martin], otherwise known as Ballistic Locomotive, sent in their entry for the Redbull creation contest. It’s a roller coaster simulator that can emulate the twists, turns, and drops of a roller coaster in your living room.

The simulator is built around a plywood roller coaster car mounted on a 2 DOF table. With a few first-person roller coaster videos and the speed, roll, and tilt data provided. Ballistic Locomotive had a functioning roller coaster simulator.

Of course, watching a 1st-person shot of a roller coaster just isn’t the same experience without the wind blowing through your hair. To simulate this aspect of a roller coaster ride, so the Ballistic Locomotive team connected a relay to the bullduino and connected a carpet drying fan.

Not only did Ballistic Locomotive build something awesome with their bullduino, they also manage to make a great ride for one of the builder’s son’s birthday party this weekend. You can check out the demo and a few videos after the break.

Continue reading “Roller Coaster Simulator For The Redbull Creation Contest”

How About A Nice Game Of Nixie Chess?

[Tony] sent in a Nixie tube chess set he’s been working on, and we’re just floored with the quality of this build. The chess pieces glow without any visible wires, the board is extremely elegant with touches of gilding and brass, and extremely well designed using (mostly) materials and components contemporary to the old Russian Nixie tubes.

Instead of numeric Nixies, [Tony] chose IN-7 and IN-7A tubes originally made to display scientific symbols such as A, V, and ~. To power the these tubes, [Tony] used 64 air-core transformers underneath each square on the chess board, allowing these Nixie tubes to be powered just like an induction charger.

Even though his blog posts are a little thin on details, we’ve got to hand it to [Tony] for an amazing build. He says there will be a kit available that includes a gigantic PCB, but we wouldn’t hazard a guess as to how much that will cost.

You can check out a pair of videos of the Nixie chess set in action after the break.

Continue reading “How About A Nice Game Of Nixie Chess?”

Adding An OLED To A LEGO Set

Sure, as a very powerful and influential LEGO dictator you’re more than able to make the trains run on time, but how do you make your LEGO citizens realize the benefits of living under your regime? With an OLED LEGO train schedule, of course! [Dan] over at Adafruit put together a great guide to interfacing a very small OLED display to a LEGO setup, perfect for displaying which trains are on schedule and not displaying which trains are heading to a ‘camp.’

The build uses a 96×64 RGB OLED display that is just under an inch in size. After connecting the display to an Arduino, [Dan] crafted a bezel and mounted it inside a LEGO brick wall. Seems like just the thing for the Adafruit LEGO set.

Of course, the tiny Adafruit OLED display can be used for much more than showing the train schedule at a LEGO train station. We imagine this could be put to use in an awesome model train layout or even a small plastic security checkpoint.

Logging Temperatures With An Etch-a-Sketch

What do you do if you’re given a gigantic ancient printer? If you’re [IronJungle], you throw that printer on your workbench and salvage all the parts you can. After coming across a few stepper motors in an old Oki printer, [IronJungle] decided to automate an Etch-a-Sketch with the help of a PIC microcontroller and H-bridge chip to log the ambient temperature on an Etch-a-Sketch display.

After [IronJungle] was finished figuring out his stepper motor circuit, the only thing left to do was to add a thermometer. For this task, he chose a very cool one-wire digital thermometer that carries power and data over the same wire.

In the video after the break, you can check out [IronJungle] playing with his new Etch-a-Sketch temperature logger with a shot glass of hot water and a cold can of holy water. There’s no scale or graph lines drawn on this Etch-a-Sketch temperature logger, but [IronJungle] has a few more things planned for this rig. We can’t wait to see those plans come to fruition.

Continue reading “Logging Temperatures With An Etch-a-Sketch”

Crayolascope Turns Flat Displays Into Volumetric Coolness

[Blair] sent in a project he’s been working on for a while. It’s called the Crayolascope, and it allows for the creation of an extremely low-fi volumetric display using a Crayola Glow book.

The Crayola Glow Book is a pretty neat toy composed of four clear plastic panels. Each of these four panels are illuminated from the side to reveal the image drawn with fluorescent ‘glow pens’. [Blair] had the idea to take several of these Glow Books and draw a rudimentary 3D animation by sequentially lighting one of the 12 plastic panels.

After tracing single frames from a rotating cube animation, the Crayolascope pages through the plastic panel-based 3D display with the help of an Arduino Mega. For each frame of animation, the Arduino illuminates a single display with edge-mount LEDs. Of course there’s a control panel to regulate how fast the frames are shown, along with the ability to scrub a frame and apply a fade effect.

[Blair] admits there are a few problems; there’s a lot of internal reflections in the array of clear plastic sheets, and frames near the end of an animation are really only observable in a very dark room. [Blair] hopes the next version of the Crayolascope will use thinner plastic panels to increase the depth of the animations – a solution that may just solve the decreasing brightness of ‘deeper’ panels.