Rapidly Prototyping RF Filters

RF filters are really just a handful of strategically placed inductors and capacitors. Yes, you can make a 1 GHz filter out of through-hole components, but the leads on the parts turn into inductors at those frequencies, completely ruining the expected results in a design.

The solution to this is microstrip antennas, or carefully arranged tracks and pads on a PCB. Anyone can build one of these with Eagle or KiCad, but that means waiting for an order from a board house to verify your design. [VK2SEB] has a better idea for prototyping PCB filters: use copper tape on blank FR4 sheets.

The first, and simplest, filter demonstrated is a simple bandstop filter. This is really just a piece of fiberglass with copper laminated to one side. Two RF connectors are soldered to the edges and a strip of copper tape strung between them. Somewhere around the middle of this copper tape, [VK2SEB] put another strip of copper tape in a ‘T’ configuration. This is the simplest bandstop filter you can make, and the beauty of this construction is that it can be tuned with a razor blade.

Of course, a filter can only be built with copper tape if you can design them, and for that [SEB] is turning to software. The Qucs project is a software tool for designing and simulating these microstrip filters, and after inputting the correct parameters, [SEB] got a nice diagram of what the filter should look like. A bit of taping, razor blading, and soldering and [SEB] had a working filter connected to a spectrum analyzer. Did it work? To a limited extent; the PCB material probably wasn’t right, and board houses are more accurate than a razor blade, but [SEB] did manage to create a 10 GHz filter out of fiberglass and copper tape.

You can check out the video for this experiment below.

Continue reading “Rapidly Prototyping RF Filters”

Smart Gun Beaten By Dumb Magnets

[Plore], a hacker with an interest in safe cracking, read a vehemently anti-smart-gun thread in 2015. With the words “Could you imagine what the guys at DEF CON could do with this?” [Plore] knew what he had to do: hack some smart guns. Watch the video below the break.

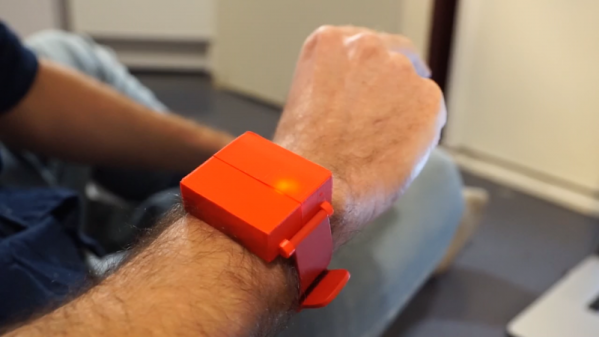
Armed with the Armatix IP1, [Plore] started with one of the oldest tricks in the book: an RF relay attack. The Armatix IP1 is designed to fire only when a corresponding watch is nearby, indicating that a trusted individual is the one holding the gun. However, by using a custom-built $20 amplifier to extend the range of the watch, [Plore] is able to fire the gun more than ten feet away, which is more than enough distance to be dangerous and certainly more than the few inches the manufacturers intended.

Not stopping there, [Plore] went to the other extreme, creating what he calls an “electromagnetic compatibility tester” (in other words, a jammer) that jams the signal from the watch, effectively preventing a legitimate gun owner from firing their gun at 10 to 20 feet!

Not one to call it quits, [Plore] realised that the gun prevented illicit firing with a simple metal pin which it moved out of the way once it sensed the watch nearby. However, this metal just happened to be ferrous, and you know what that means: [Plore], with the help of some strong magnets, was able to move the pin without any electrical trickery.

Now, we’ve already covered the many hurdles that smart guns face, and this specific investigation of the state of smart gun technology doesn’t make the picture look any brighter. We’re aware that hindsight is always 20/20, so let us know in the comments how you would fix the problems with the Armatix IP1.
Continue reading “Smart Gun Beaten By Dumb Magnets”

Robot: Do My Bidding!

Remote control robots are nothing new. Using Bluetooth isn’t all that unusual, either. What [SayantanM4] did was make a Bluetooth robot that accepts voice commands via his phone. The robot itself isn’t very remarkable. An Arduino and an HC05 module make up most of the electronics. A standard motor driver runs the two wheels.

The Arduino doesn’t usually do much voice processing, and the trick is–of course–in the phone application. BT Voice Control for Arduino is a free download that simply sends strings to a host computer via Bluetooth. If you say “Hello” into your phone, the robot receives *Hello# and that string could be processed by any computer that can receive Bluetooth data.

Continue reading “Robot: Do My Bidding!”

ISM Communications For Arduino

If you want to wirelessly communicate between devices, WiFi and Bluetooth are obvious choices. But there’s also the ISM (industrial, scientific, and medical) band that you use. There are inexpensive modules like the SX1278 that can handle this for you using LoRa modulation, but they haven’t been handy to use with an Arduino. [Jan] noticed the same thing and set out to build a shield that allowed an Arduino to communicate using LoRa. You can find the design data on GitHub. [Jan] calls it the LoRenz shield.

According to [Jan], the boards cost about $20 to $30 each to make, and most of that cost was in having PC boards shipped. LoRa lets you trade data rate for bandwidth, but typical data rates are fairly modest. As for range, that depends on a lot of factors, too, but we’ve seen ranges quoted in terms of miles.

Depending on where you live, there may be legal restrictions on how you use a radio like the SX1278. You should understand your local laws before you buy into using the ISM bands. We aren’t sure it would be wise, but the board can coexist with three other similar shields. So you could get 4 radios going on one Arduino if you had too and could manage the power, RF, and other issues involved. The breakout board the module uses has an antenna connector, so depending on your local laws, you could get a good bit of range out of one of these.

[Jan] promises a post on the library that makes it all work shortly, but you can find the code on GitHub now. If you look at the code in the examples directory, it seems pretty easy. You’d have to sling some software, but the SX1278 can support other modes in addition to LoRA including FSK and other data modulation techniques.

We’ve seen other LoRa shields, but not many. If you are interested in other wireless technologies, we’ve talked about them quite a bit. If you want a basic introduction to LoRa, [Andreas Spiess’] video below is a good place to start.

Continue reading “ISM Communications For Arduino”

ESP To Wireshark

Everyone’s favorite packet sniffing tool, Wireshark, has been around for almost two decades now. It’s one of the most popular network analysis tools available, partially due to it being free and open source. Its popularity guaranteed that it would eventually be paired with the ESP32/8266, the rising star of the wireless hardware world, and [spacehuhn] has finally brought these two tools together to sniff WiFi packets.

The library that [spacehuhn] created uses the ESP chip to save Pcap files (the default Wireshark filetype) onto an SD card or send the data over a serial connection. The program runs once every 30 seconds, creating a new Pcap file each time. There are many example scripts for the various hardware you might be using, and since this is written for the ESP platform it’s also Arduino compatible. [spacehuhn] has written this as a proof-of-concept, so there are some rough edges still, but this looks very promising as a network analysis tool.

[spacehuhn] is no stranger to wireless networks, either. His YouTube channel is full of interesting videos of him exploring various exploits and testing other pieces of hardware. He’s also been featured here before for using an ESP8266 as a WiFi jammer.

Continue reading “ESP To Wireshark”

The Breadboard RF103

When [ik1xpv] sets out to build a software-defined radio (SDR), he doesn’t fool around. His Breadboard RF103 sports USB 3.0, and 16-bit A/D converter that can sample up to 105 Msps, and can receive from 0 to 1800 MHz. Not bad. Thanks to the USB 3.0 port, all the signal processing occurs in the PC without the limitations of feeding data through a common sound port. You can see the device in action in the video below.

The Cypress FX3 USB device is an ARM processor, but it is only streaming data, not processing it. You can find the slightly modified firmware, a driver for using PC software, and schematics and board layouts on GitHub.

Continue reading “The Breadboard RF103”

Testing The Outernet Dreamcatcher SDR

What do you get when you cross an ARM-based Linux PC and an RTL-SDR? Sounds like the start of a joke, but the answer is Outernet’s Dreamcatcher. It is a single PCB with an RTL-SDR software defined radio, an L-band LNA, and an Allwinner A13 processor with 512MB of RAM and a 1 GHz clock speed. The rtl-sdr site recently posted a good review of the $99 board.

We’ll let you read the review for yourself, but the conclusion was that despite some bugs, the board was no more expensive than pulling the parts together separately. On the other hand, if you uses, for example, a Raspberry Pi 3, you might expect more support and more performance.

Despite the L-band hardware, there is a bypass antenna jack that allows you to receive other frequencies. There’s also two SD slots, one to boot from and another for storage. Several pieces of software had trouble running on the somewhat sluggish CPU, although some software that is optimized for the particular processor used fared better. You can read the details in the review.

The board is interesting, although unless you have a special packaging problem, you are probably as well off to combine a Pi and a dongle, as we have seen so many times before. If you have more horsepower you can even make the Pi transmit, although we’d suggest some filtering if you were going to do that for real.