Alarm Panel Hack Defeats Encryption By Ignoring It

As frustrating as it may be for a company to lock you into its ecosystem by encrypting their protocols, you have to admit that it presents an enticing challenge. Cracking encryption can be more trouble than it’s worth, though, especially when a device gives you all the tools you need to do an end-run around their encryption.

We’ll explain. For [Valdez], the encrypted communication protocols between a DSC alarm panel and the control pads on the system were serious impediments to integration into Home Assistant. While there are integrations available for these alarm panels, they rely on third-party clouds, which means that not only is your security system potentially telling another computer all your juicy details, but there’s also the very real possibility that the cloud system can either break or be shut down; remember the Chamberlain MyQ fiasco?

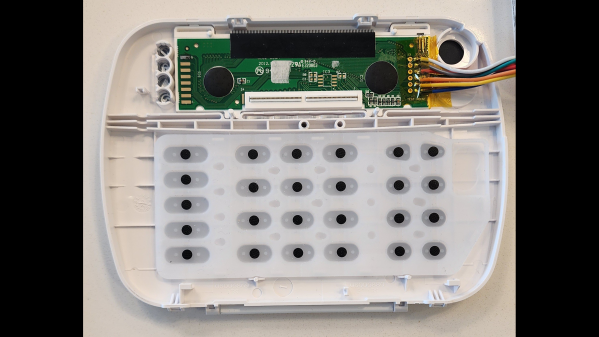
With these facts in mind, [Valdez] came up with a clever workaround to DSC encryption by focusing on physically interfacing with the keypad. The device has a common 16×2 LCD and a 25-key keypad, and a little poking around with a multimeter and a $20 logic analyzer eventually showed that the LCD had an HD44780 controller, and revealed all the lines needed to decode the display with an ESP32. Next up was interfacing with the keypad, which also involved a little multimeter work to determine that the keys were hooked up in a 5×5 matrix. Ten GPIOs on the ESP32 made it possible to virtually push any key; however, the ten relays [Valdez] originally used to do the switching proved unwieldy. That led to an optocoupler design, sadly not as clicky but certainly more compact and streamlined, and enabling complete control over the alarm system from Home Assistant.

We love this solution because, as [Valdez] aptly points out, the weakest point in any system is the place where it can’t be encrypted. Information has to flow between the user and the control panel, and by providing the electronic equivalents to eyes and fingers, the underlying encryption is moot. Hats off to [Valdez] for an excellent hack, and for sharing the wealth with the HA community.

Smooth Animations, Slick Bar Graphs, But No Custom Characters On This 16×2 OLED

Sometimes, finding new ways to use old hardware requires awesome feats of reverse engineering, software sleight of hand, and a healthy dose of good fortune. Other times, though, it’s just as simple as reading the data sheet and paying attention to details.

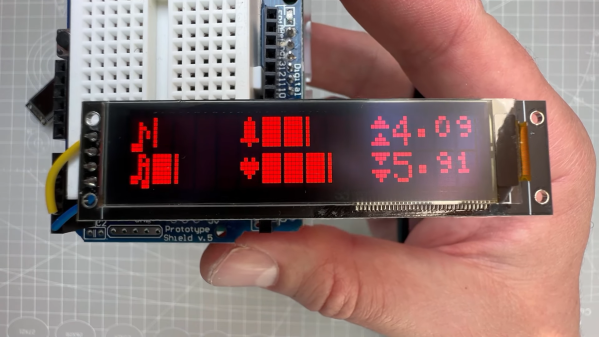
Not that we’re knocking [upir]’s accomplishment with these tricked-out 16×2 OLED displays. Far from it, in fact — the smoothly animated bar graph displays alphanumerics look fantastic. What’s cool about this is that he accomplished all this without resorting to custom characters. We’ve seen him use this approach before; this time around, the hack involves carefully shopping for a 16×2 OLED display with the right driver chip — a US2066 chip. You’ll still need a few tricks to get things working, like extra pull-up resistors to get the I2C display talking to an Arduino, plus a little luck that you got a display with the right character ROM.

Once all that is taken care of, getting the display to do what you want is mainly a matter of coding. In the video below, [upir] does a great job of walking through the finer points, and the results look great. The bar graphs in particular look fantastic, with silky-smooth animations.

Continue reading “Smooth Animations, Slick Bar Graphs, But No Custom Characters On This 16×2 OLED”

Spice Up The Humble 16×2 LCD With Big Digits

The 16×2 LCD display is a classic in the microcontroller world, and for good reason. Add a couple of wires, download a library, mash out a few lines of code, and your project has a user interface. A utilitarian and somewhat boring UI, though, and one that can be hard to read at a distance. So why not spice it up with these large-type custom fonts?

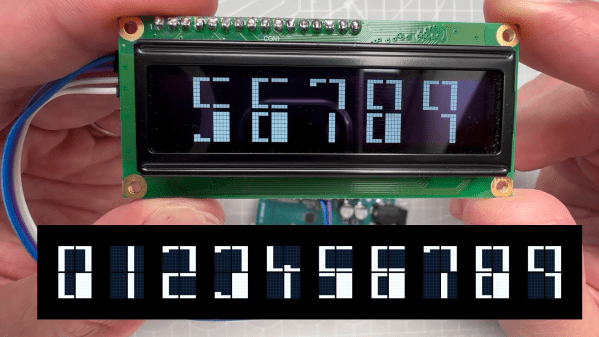
As [upir] explains, the trick to getting large fonts on a display that’s normally limited to two rows of 16 characters each lies in the eight custom characters the display allows to be added to its preprogrammed character set. These can store carefully crafted patterns that can then be assembled to make reasonable facsimiles of the ten numerals. Each custom pattern forms one-quarter of the finished numeral, which spans what would normally be a two-by-two character matrix on the display. Yes, there’s a one-pixel wide blank space running horizontally and vertically through each big character, but it’s not that distracting.

Composing the custom patterns, and making sure they’re usable across multiple characters, is the real hack here, and [upir] put a lot of work into that. He started out in Illustrator, but quickly switched to a spreadsheet because it allowed him to easily generate the correct binary numbers to pass to the display for each pattern. It seems to have really let his creative juices flow, too — he came up with 24 different fonts! Our favorite is the one he calls “Tron,” which looks a bit like the magnetic character recognition font on the bottom of bank checks. Everyone remembers checks, right?

Hats off to [upir] for a creative and fun way to spice up the humble 16×2 display. We’d love to see someone pick this up and try a complete alphanumeric character set, although that might be a tall order with only eight custom characters to work with. Then again, if Bad Apple on a 16×2 is possible…

Continue reading “Spice Up The Humble 16×2 LCD With Big Digits”

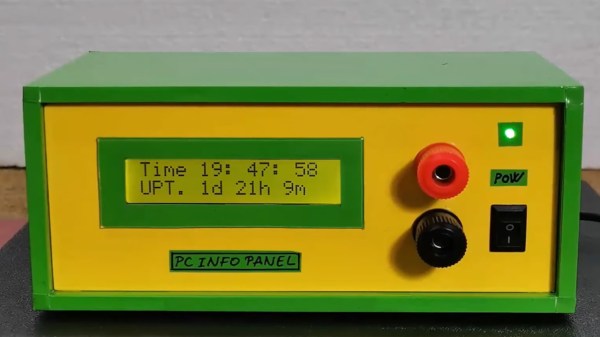
A small 16x2 LCD display housed in a green and yellow hobby box.

Arduino-Powered Info Display For Your Windows Computer

If you’ve been pining for a retro-chic 16×2 LCD display to enhance your Windows computing experience, then [mircemk] has got you covered with their neat Windows-based LCD Info Panel.

Your everyday garden variety Arduino is the hero here, sitting between the computer’s USB port and the display to make the magic happen. Using the ‘LCD Smartie‘ software, the display can serve up some of your typical PC stats such as CPU and network utilization, storage capacity etc. It can also display information from BBC World News, email clients, various computer games and a world of other sources using plugins.

It’s clear that the intention here was to include the display inside your typical PC drive bay, but as you can see in the video below, this display can just about fit anywhere. It’s not uncommon to see similar displays on expensive ‘gamer’ peripherals, so this might be an inexpensive way for someone to bring that same LED-lit charm to their next PC build. You probably have these parts sitting in your desk drawer right now.

If you want to get started building your own, there’s more info over on the Hackaday.io page. And if PC notifications aren’t your jam, it’s worth remembering that these 16×2 displays are good for just about anything, like playing Space Invaders.

Continue reading “Arduino-Powered Info Display For Your Windows Computer”

Reverse Engineering Saves Weller With A Wonky LCD From The Trash Pile

There’s nothing more satisfying than finding a broken piece of gear in the trash and bringing it back to life. Satisfying, but also potentially more time-consuming — someone tossed it for a reason, after all. Figuring out what that reason is and finding a way to back it better is where the fun — and the peril — are.

Luckily, some pieces of equipment have a relatively short list of well-known failure modes, a fact that [Lauri Pirttiaho] relied on for this fix of an old Weller WD1 soldering station. The unit, sporting the familiar light blue Weller livery and more than a few scratches and dings, had an LCD that was DOA. Typically it’s the driver that’s the problem here, but [Lauri]’s diagnosis revealed it was the LCD module itself that was bad.

With OEM replacements being basically unobtainium at this point, the fix was to intercept the data heading from the driver to the old LCD and send it to a new, easily sourced 16×2 character LCD display. This began with an inspection of the display controller’s datasheet, and a bit of probing of the old display to find out which segments and backplanes map to which pins. A little bit of case modding allowed the new display to fit, the old controller chip was removed, and a PIC16 went into its place, in a tidy nest of Kapton tape and bodge wires. The PIC does the job of translating the original display, which had a fair number of custom icons and symbols, into sensible text-based equivalents and sending them to the 16×2 via I2C. The video below shows the hack in action; it honestly looks like it could have come from the factory like that.

The nice thing here is that [Lauri]’s fix applies to a whole range of Weller stations, so if you find one in the trash, you might be able to resuscitate it. Failing that, you could always roll your own Weller from (more-or-less) scratch.

Continue reading “Reverse Engineering Saves Weller With A Wonky LCD From The Trash Pile”