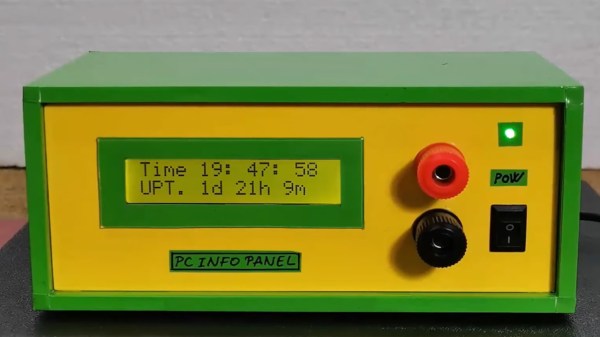
A small 16x2 LCD display housed in a green and yellow hobby box.

Arduino-Powered Info Display For Your Windows Computer

If you’ve been pining for a retro-chic 16×2 LCD display to enhance your Windows computing experience, then [mircemk] has got you covered with their neat Windows-based LCD Info Panel.

Your everyday garden variety Arduino is the hero here, sitting between the computer’s USB port and the display to make the magic happen. Using the ‘LCD Smartie‘ software, the display can serve up some of your typical PC stats such as CPU and network utilization, storage capacity etc. It can also display information from BBC World News, email clients, various computer games and a world of other sources using plugins.

It’s clear that the intention here was to include the display inside your typical PC drive bay, but as you can see in the video below, this display can just about fit anywhere. It’s not uncommon to see similar displays on expensive ‘gamer’ peripherals, so this might be an inexpensive way for someone to bring that same LED-lit charm to their next PC build. You probably have these parts sitting in your desk drawer right now.

If you want to get started building your own, there’s more info over on the Hackaday.io page. And if PC notifications aren’t your jam, it’s worth remembering that these 16×2 displays are good for just about anything, like playing Space Invaders.

Continue reading “Arduino-Powered Info Display For Your Windows Computer”

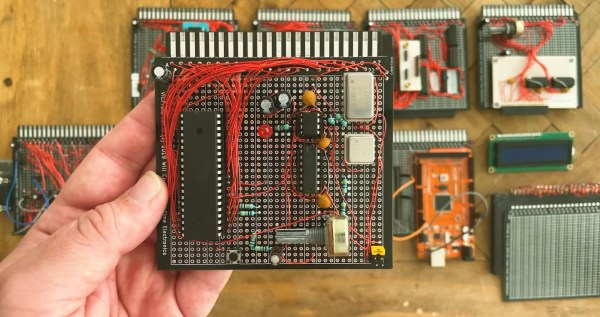
A Z80 CPU board built on a piece of prototype board with an edge connector

Designed From Scratch And Fully Handmade: The Modular Coleman Z80 Computer

While the phrase “I built my own computer” might sound impressive to the uninitiated, anyone with an interest in modern computer hardware knows that there’s really not much to it: buy a case, a motherboard with a CPU, some RAM and peripherals, and you’re pretty much there. What’s way more impressive is designing a complete computer system from the ground up, as [Joshua Coleman] just did when he built the Coleman Z80.

And when we say “from the ground up”, we mean it: everything down to the system bus was hand-drawn by [Joshua] himself. It does share something with modern PCs though: a strictly modular design. There’s a Z80 CPU board, a ROM and RAM board, and even two modules that you could describe as a video card and a sound card. All of these are built on prototyping boards with a 40-pin edge connector and hooked up to a single backplane carrying the main system bus.

Designed as an experimentation platform, the Coleman Z80 has many features that enable testing and debugging, such as an adjustable clock generator and a few beautiful vintage LED displays that show the status of the main bus. Input and output are mainly through a serial link and a 16×2 LCD, but [Joshua] is already planning a keyboard interface and composite video output to give it that proper 1980s home computer vibe. The software is currently limited to a ROM monitor that enables basic I/O commands, but with 256 KB of RAM there’s plenty of potential for writing useful software.

Just as impressive as the design itself is the fact that this was [Joshua]’s first electronic design project; we’ve certainly seen worse first projects! Over the years we’ve featured several cool homebrew Z80 computers, such as a super-minimalistic board, a modular system based on the powerful eZ80, and this cute little one that fits inside an Altoids tin.

Continue reading “Designed From Scratch And Fully Handmade: The Modular Coleman Z80 Computer”

Arduino Caller ID Display Is Better Late Than Never

It’s no secret that the era of the landline telephone is slowly coming to a close. As of 2020, it was estimated that less than half the homes in America still subscribed to plain old telephone service (POTS). But of course, that still amounts to millions upon millions of subscribers that might get a kick out of this Arduino caller ID developed by [Dilshan Jayakody].

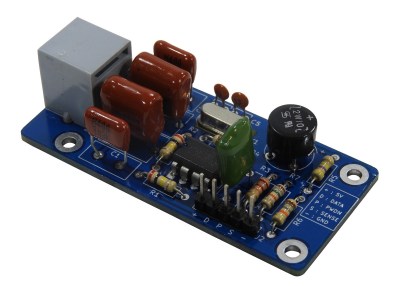
HT9032D caller ID decoder board
The completed HT9032D board.

Truth be told, until this point, we hadn’t really given a lot of thought to how the caller ID system works. But as [Dilshan] explains, you can actually pick up a dedicated IC that can decode incoming caller data that’s sent over the telephone line. In this case he’s using a Holtek HT9032D, which comes in a through-hole DIP-8 package and can be picked up for around $2 USD. The chip needs a handful of passives and a 3.58 MHz crystal to help it along on its quest, but beyond that, it’s really just a matter of reading the decoded data from its output pin.

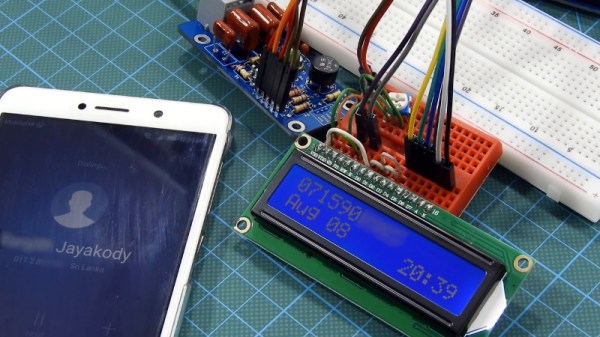
To display the caller’s information, [Dilshan] is using an Arduino Uno and common 16×2 HD44780 LCD. As a nice touch, the code will even blink the Arduino’s onboard LED when you’ve missed a call. As a proof of concept there’s been no attempt to condense the hardware or ditch the breadboard, but it’s not hard to imagine that all the components could be packed into a nice 3D printed enclosure should you want something a bit more permanent.

We’ve seen caller ID data being collected in previous projects, but they used a USB modem combined with a software approach. We really like the idea of doing it with a cheap dedicated IC, though we’ll admit this demonstration would probably have been a bit more exciting a decade ago.

Continue reading “Arduino Caller ID Display Is Better Late Than Never”

Big Time Character LCD Clock

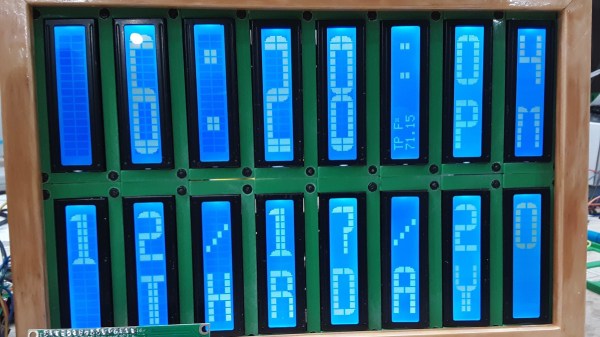
While the SSD1306 OLED has somewhat become the go-to display for up-to-date projects, the good old character displays with their Hitachi HD44780 controller don’t seem to be disappearing just yet either. And why would they, especially if you want to show just text, having a built-in font has certainly its perk compared to worrying about integrating your own characters — which you can still do on top as well. Or perhaps you can combine both worlds, which is what [oldmaninSC] did with his digital clock that takes an entire 16×2 LCD to show each single digit.

The whole clock uses 16 individual, upright rotated 16×2 LCDs that are arranged in two rows of eight LCDs each, turning the entire construct sort of into a giant 8×2 display itself. For some additional information such as the date, there’s also a smaller font available that uses only half the height, allowing up to four total rows of information. To communicate with each LCD via I2C, two TCA9548A I2C multiplexers are connected to an Arduino, along with an RTC to keep track of the time and date itself.

As the TCA9548A has three pins dedicated to define its own address, the entire clock could be scaled up to a total of 64 LCDs — so how about a 16×4 display made out of 16×4 displays? Sure, adding smooth scrolling might become a bit tricky at some point, but imagine playing Tetris on that one!

Teardown: Recon Sentinel

It might be hard to imagine now, but there was a time when the average home had only a single Internet connected device in it. This beige box, known as a “desktop computer” in those olden days, was a hub of information and productivity for the whole family. There was a good chance you might even need to wait for your turn to use it, since it’s not like you had a personal device in your pocket that let you log on from the bathroom whatever room you might be in at the time. Which is just as well, since even if you had broadband back then, you certainly weren’t shooting it around the house with the Magic Internet Beams that we take for granted now.

Things are a lot more complicated today. Your computer(s) are only part of the equation. Now there’s mobile phones and tablets sharing your Internet connection, in addition to whatever smart gadgets you’ve brought into the mix. When your doorbell and half the light bulbs in the house have their own IP address, it takes more than a fresh copy of Norton AntiVirus to keep everything secure.

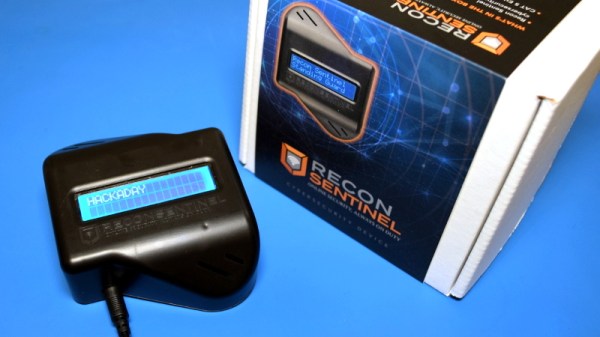
Which is precisely what Cigent Technology says the Recon Sentinel was designed for. Rather than protecting a single computer or device, this little gadget is advertised as being able to secure your entire network by sniffing out suspicious activity and providing instant notifications when new hardware is connected. According to the official whitepaper, it also runs a honeypot service Cigent calls a “cyber deception engine” and is capable of deploying “Active Defense Countermeasures” to confuse malicious devices that attempt to attack it.

It certainly sounds impressive. But for $149.99 plus an annual subscription fee, it better. If you’re hoping this teardown will tell you if it’s worth springing for the $899.99 Lifetime Subscription package, don’t get too excited. This isn’t a review, we’re only interested in cracking this thing open and seeing what makes it tick.

Continue reading “Teardown: Recon Sentinel”

Software Shortcut Keyboard Registers Many Macros

[FabroLabs Technologies] is an industrial designer who uses several creative-type software programs in a given day. Unfortunately, they all have slightly different shortcut schemes, and trying to remember all the different modifiers is a waste of time better spent elsewhere.

This lovely little macro keyboard is every bit as useful as it is cool looking. Spinning the rotary encoder cycles through a menu of programs on the 16×2 LCD, and the key map just updates automatically for the chosen program. At the heart of this build is an Arduino Pro Micro and 20 of the loudest key switches ever made — Cherry MX blues. We like that it manages to look like toy cash register and a serious peripheral all at once — it probably has something to do with those way-cool circular keycaps that were made on a resin printer.

We’re glad that [FabroLabs] laid down such a comprehensive and open build guide during the process of making this macro keyboard. The average hacker can learn a lot from industrial designers who show their work. Remember the time [Eric Strebel] showed us all how to improve our foam board design game?

Printed Arduino Turntable Takes Objects For A Spin

Have you built a 3D scanner yet? There’s more than one way to model those curves and planes, but the easiest may be photogrammetry — that’s the one where you take a bunch of pictures and stitch them into a 3D model. If you build a scanner like [Brian Brocken]’s that does almost everything automatically, you might consider starting a scan-and-print side hustle.

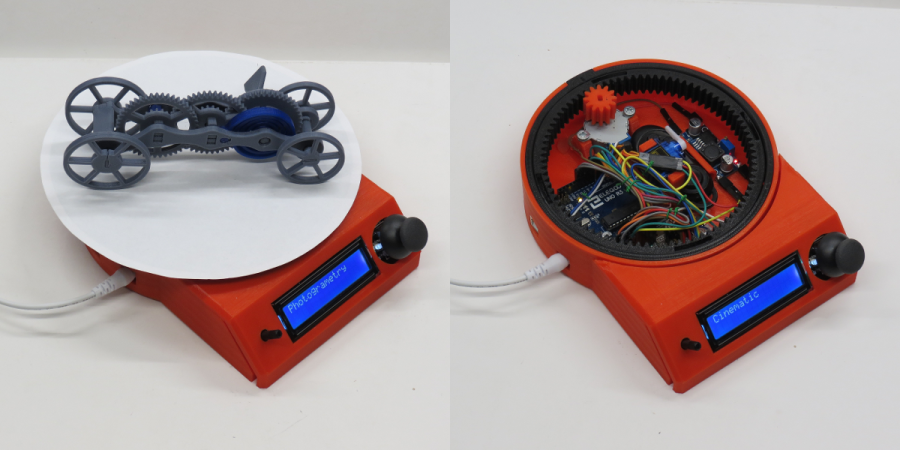
This little machine spins objects 360° and triggers a Bluetooth remote tethered to an iPhone. In automatic mode, it capture anywhere from 2-200 pictures. There’s a mode for cinematic shots that shoots video of the object slowly spinning around, which makes anything look at least 35% more awesome. A third mode offers manual control of the turntable’s position and speed.

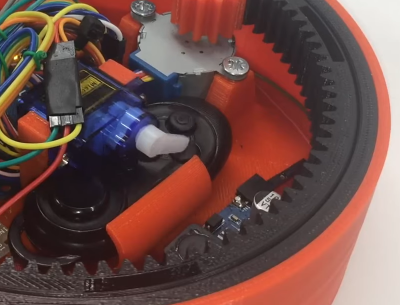
An Arduino UNO controls a stepper that moves the turntable via 3D printed-in-place bearing assembly. This project is a (vast) improvement over [Brian]’s hand-cranked version that we looked at over the summer, though both are works of art in their own right.

Our favorite part aside from the bearing is the picture-taking process itself. [Brian] couldn’t get the iPhone to play nice with HC-05 or -06 modules, so he’s got the horn of 9g servo tapping the shutter button on a Bluetooth remote. This beautiful beast is wide open, so fire up that printer. You can watch the design and build process of the turntable after the break.

Want to scan some really tiny things? Make a motorized microscope from movie machines.

Continue reading “Printed Arduino Turntable Takes Objects For A Spin”