Simple, Cheap Nitrate Tester Is Open Source

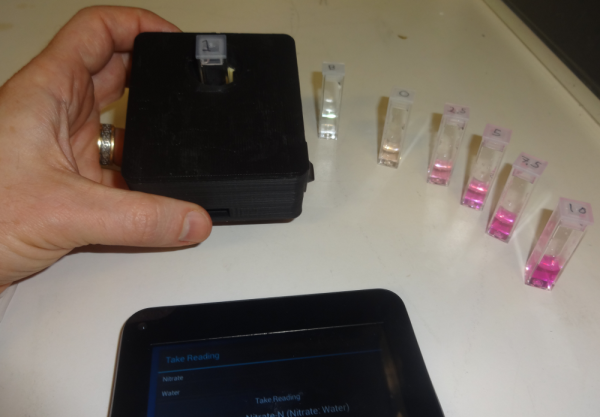
Too much of a good thing can be a bad thing, and nitrate pollution due to agricultural fertilizer runoff is a major problem for both lakes and coastal waters. Assessing nitrate levels commercially is an expensive process that uses proprietary instruments and toxic reagents such as cadmium. But [Joshua Pearce] has recently developed an open-source photometer for nitrate field measurement that uses an enzyme from spinach and costs a mere $65USD to build.

The device itself is incredibly simple – a 3D printed enclosure houses an LED light source and a light sensor. The sample to be tested is mixed with a commercially available reagent kit based on the enzyme nitrate reductase, resulting in a characteristic color change proportional to the amount of nitrate present. The instrument reads the amount of light absorbed by the sample, and communicates the results to an Android device over a Bluetooth link.

Open-source instruments like this can really open up educational opportunities for STEM groups to get out into the real world and start making measurements that can make a difference. Not only can this enable citizen scientists and activists, but it also opens the door for getting farmers involved in controlling nitrate pollution at its source – knowing when a field has been fertilized enough can save a farmer unnecessary expense and reduce nitrate runoff.

There are a lot of other ways to put an open-source instrument like this to use in biohacking – photometery is a very common measuring modality in the life sciences, after all. We’ve seen similar instruments before, like a DIY spectrophotometer, or this 2015 Hackaday Prize entry medical tricorder with a built-in spectrophotometer. Still, for simplicity of build and potential impact, it’s hard to beat this instrument.

Open Source, 3D Printed Rocket Engines

A liquid-fuel rocket engine is just about the hardest thing anyone could ever build. There are considerations for thermodynamics, machining, electronics, material science, and software just to have something that won’t blow up on the test rig. The data to build a liquid engine isn’t easy to find, either: a lot of helpful info is classified or locked up in one of [Elon]’s file cabinets.

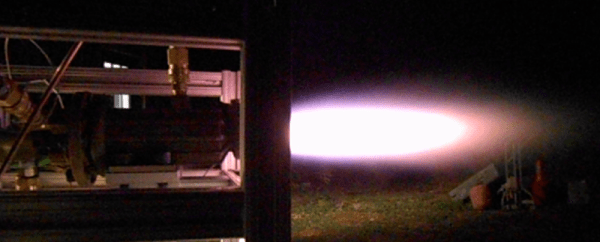
[Graham] over at Fubar Labs in New Jersey is working to change this. He’s developing an open source, 3D printed, liquid fuel rocket engine. Right now, it’s not going to fly, but that’s not the point: the first step towards developing a successful rocket is to develop a successful engine, and [Graham] is hard at work making this a reality.

This engine, powered by gaseous oxygen and ethanol, is designed for 3D printing. It’s actually a great use of the technology; SpaceX and NASA have produced 3D printed engine parts using DMLS printers, but [Graham] is using the much cheaper (and available at Shapeways) metal SLS printers to produce his engine. Rocket engines are extremely hard to manufacture with traditional methods, making 3D printing the perfect process for building a rocket engine.

So far, [Graham] has printed the engine, injector, and igniter, all for the purpose of shoving oxygen and ethanol into the combustion chamber, lighting it, and marveling at the Mach cones. You can see a video of that below, but there’s also a few incredible resources on GitHub, the Fubar Labs wiki, and a bunch of pictures and test results here.

Continue reading “Open Source, 3D Printed Rocket Engines”

3D Printed Surfboard

You whippersnappers these days with your 3D printers! Back in our day, we had to labor over a blank for hours, getting all sweaty and covered in foam dust. And it still wouldn’t come out symmetric. Shaping a surfboard used to be an art, and now you’re just downloading software and slinging STLs.

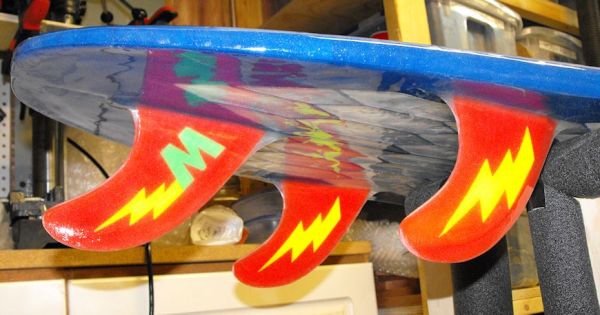
Joking aside, [Jody] made an incredible surfboard (yes, actual human-sized surfboard) out of just over 1 kilometer of ABS filament, clocking 164 hours of printing time along the way. That’s a serious stress test, and of course, his 3D printer broke down along the way. Then all the segments had to be glued together.

But the printing was the easy part; there’s also fiberglassing and sanding. And even though he made multiple mock-ups, nothing ever goes the same on opening night as it did in the dress rehearsal. But [Jody] persevered and wrote up his trials and tribulations, and you should give it a look if you’re thinking of doing anything large or in combination with fiberglass.

Even the fins are 3D printed and the results look amazing! We can’t wait for the ride report.

Shaka.

A Cute Little 3D Printed Skateboard

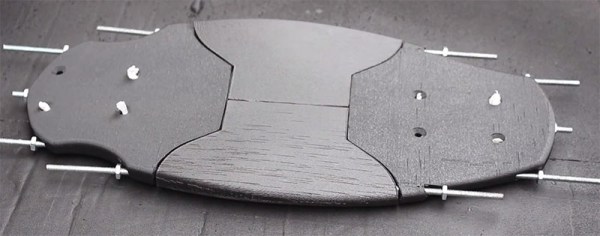
[Julian] has been wanting a tiny little skateboard for a while now, and decided to make something useful on his 3D printer. A little more than twenty hours later a tiny and cute printed skateboard popped out.

[Julian] got the files for his 3D printed skateboard from Thingiverse and printed them off on a MakerGear M2. The parts printed easily, each part taking about six hours to print. The parts are bolted together with five threaded rods, the trucks were screwed on, and the wheels popped into place.

While a normal skateboard probably wouldn’t stand up to the 3D printed parts and threaded rod construction, this Pennyboard is tiny, and most of [Julian]’s weight is right over the trucks at all times. This is also not a board that’s going to see a lot of tricks; it’s basically a micro longboard for moving from one place to another, not something you’ll need to find an abandoned in-ground pool to use properly.

You can check out the video below.

Continue reading “A Cute Little 3D Printed Skateboard”

Derby the Dog

Derby’s Got Legs, He Knows How To Use Them

There’s just something about the holidays and man’s best friend that brings out the best in people. [Tara Anderson], Director of CJP Product Management at 3D Systems, fostered a husky mix named Derby.  Derby was born with a congenital defect: his forelegs were underdeveloped with no paws.  This precluded the poor fellow from running around and doing all of the things dogs love to do.  [Tara] had fitted him with a wheel cart, but she still felt that Derby deserved more mobility and freedom.  Deciding that 3D-printed prosthetics was the answer, she turned to her colleagues and collaborated with Derrick Campana, a certified Animal Orthotist, to create a new set of forelegs for Derby.

The design is different from typical leg prosthetics; Tara felt that the typical “running man” design would not work for a dog, since they’d just sink right into the ground. Instead, the “loop” design was used, allowing for more playful canine antics. They were constructed using MultiJet Printing on the 3DS’ ProJet 5500X.  MultiJet Printing enabled the prosthetics to be printed with firm and soft parts, both needed for comfort and durability.

Continue reading “Derby’s Got Legs, He Knows How To Use Them”

Copter rotor hub

UAV Coaxial Copter Uses Unique Drive Mechanism

Personal UAV’s are becoming ubiquitous these days, but there is still much room for improvement. Researchers at [Modlab] understand this, and they’ve come up with a very unique method of controlling pitch, yaw, and roll for a coaxial ‘copter using only the two drive motors.

In order to control all of these variables with only two motors, you generally need a mechanism that adjusts the pitch of the propeller blades. Usually this is done by mounting a couple of tiny servos to the ‘copter. The servos are hooked up to the propellers with mechanical linkages so the pitch of the propellers can be adjusted on the fly. This works fine but it’s costly, complicated, and adds weight to the vehicle.

[Modlab’s] system does away with the linkages and extra servos. They are able to control the pitch of their propellers using just the two drive motors. The propellers are connected to the motors using a custom 3D printed rotor hub. This hub is specifically designed to couple blade lead-and-lag oscillations to a change in blade pitch. Rather than drive the motors with a constant amount of torque, [Modlab] adds a sinusoidal component in phase with the current speed of the motor. This allows the system to adjust the pitch of the blades multiple times per rotation, even at these high speeds.

Be sure to watch the demonstration video below. Continue reading “UAV Coaxial Copter Uses Unique Drive Mechanism”

3D-Printed Clock Tells Time With Gears

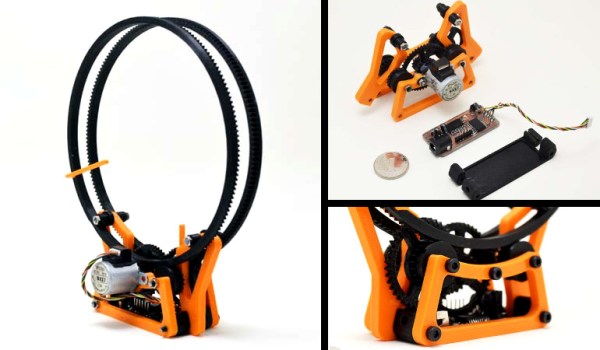
[ekaggrat] designed a 3d-printed clock that’s fairly simple to make and looks awesome. The clock features a series of 3d-printed gears, all driven by a single stepper motor that [ekaggrat] found in surplus.

The clock’s controller is based around an ATtiny2313 programmed with the Arduino IDE. The ATtiny controls a Darlington driver IC which is used to run the stepper motor. The ATtiny drives the stepper motor forward every minute, which moves both the hour and minute hands through the 3d-printed gears. The hour and minute are indicated by two orange posts inside the large gears.

[ekaggrat] etched his own PCB for the microcontroller and stepper driver, making the build nice and compact. If you want to build your own, [ekaggrat] posted all of his design files on GitHub. All you need is a PCB (or breadboard), a few components,  and a bit of time on a 3D printer to make your own clock.