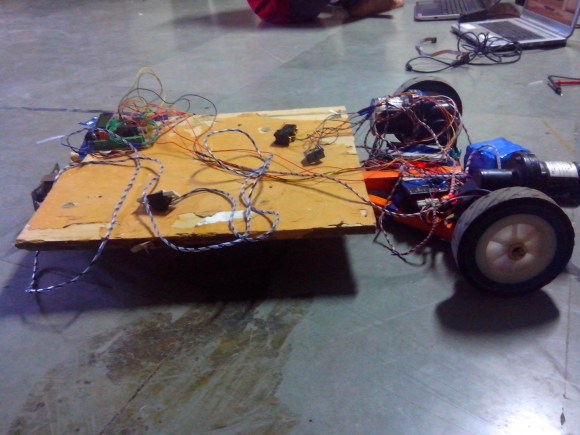
Rocketduino, For High-G, High Altitude Logging

rocketduino

Although the thrill of launching rockets is usually found in their safe decent back to Earth, eventually you’re going to want some data from your flight. Everything from barometric pressure, GPS logging, and acceleration data is a useful thing to have, especially if you’re trying to perfect your craft. [zortness] over on reddit created a data logging board created especially for amateur rocketry, a fabulous piece of work that stands up to the rigors of going very fast and very high.

The design of the board is a shield for the Arduino Mega and Due, and comes with enough sensors for over-analyzing any rocket flight. The GPS logs location and altitude at 66Hz, two accelerometers measure up to 55 G. Barometric, temperature, and compass sensors tell the ground station all the data they would need to know over a ZigBee 900MHz radio link.

Because this is an Arduino, setting up flight events such as deploying the main and drogue chutes are as easy as uploading a bit of code. [zortness] built this for a 4″ diameter rocket, but he says it might fit in a 3″ rocket. We just can’t wait to see some videos of it in action.

Rate Gyroscope Circuitry Explained

rate-gyroscope-driver

Hackaday alum [Adam Munich] shot a tutorial video on using a rate gyroscope.

Here he’s showing off the really fancy piece of ancient (technologically speaking) hardware. It would have set you back about fifteen grand in the 1960’s (inflation adjusted) but can be had these days for around $30. What a deal! These are not small, or power efficient when compared to the components that go into smart phones or gaming controllers, but they’re a heck of a lot more accurate than the ubiquitous modern parts. That’s because a rate gyroscope — which is the gold cylinder on the left — actually incorporates a spinning motor and a way to monitor how it is affected by changes in gravity. The driver/interface circuitry for this gets hairy relatively fast, but [Adam] does a solid job of breaking down the concept into smaller parts that are easy to manage.

Wondering what is different about this compared to a MEMS accelerometer? We know they’re really not the same thing at all, but wanted a chance to mention [The Engineer Guy’s] video on how those parts are made.

Continue reading “Rate Gyroscope Circuitry Explained”

Quadcopter Brain

quadcopter-brain

This project is the warm center of [Alan Kharsansky’s] thesis in Electronic Engineering. It’s an all-in-one control board for a quadcopter. This is the second iteration of the board, the first version he actually etched himself. As you can see after the break the firmware is not quite ready for prime-time. But that doesn’t stop us from appreciating the design choices he’s made.

You can see the effort he made to keep the board symmetrical which will help when it comes time to balance the aircraft. At the center of the PCB is the jewel of the sensor array, a combination accelerometer and gyroscope. This location will help easy the trouble of designing PID algorithms to drive the four propellers. Also included in the sensor array is a magnetometer for navigation, and a barometric pressure sensor which can be used as an altimeter. There are four multipurpose connectors used to drive the motors and provide feedback to the boards. He also included two more sets of pads on the board (without their own connectors) in case he wants to add more motors in the future. The quadcopter can be controlled from a base station via the XBee module.

Continue reading “Quadcopter Brain”

Pinoccio Web Rover

web-rover

Before assuming that the title should be “web crawler,” just shush your shussins’ and check out the video after the break. The Pinoccio, as previously noted, is a board in development as a sort of web-enabled by default Arduino. This makes it perfect for a project like this one where a little rover is controlled from 10,000 Kilometers away, or around 6000 Miles for those of us that dwell in the US.

This setup uses a cell-phone accelerometer in Brazil to allow control of this robot in Nevada. Although close, the control isn’t quite real time, so that has to be accounted for. Something like this could be easily used for a telepresence ‘bot.

If you want to build your own, the assembly time is estimated at 1 hour. Instructions, as well as source code can be found on their page after the video. Although the Pinoccio board won’t be available until at least this summer, maybe this will give someone inspiration to try something similar in the mean time! Continue reading “Pinoccio Web Rover”

Music Challenge Has You Flapping Your Wrist To Make Sounds

glove-based-music-challenge

This glove controller let you play a musical game. The challenge is to perform the correct wrist motions at the right tempo to play the intro to the song Where is my Mind by the Pixies. This is demonstrated in the video clip after the break.

We often see flex sensors used on the fingers of glove projects, but this one does it all with an accelerometer. That module, along with the Piezo buzzer used for playback are affixed to the small breadboard on the back side of his hand. Rubber bands connect the Arduino to his third and forth fingers. The tempo and rhythm are pre-programmed but the tone generated is based on the gravity reading at the start of each note. If you don’t have your hand positioned correctly the wrong tone will be played.

The code was published in link at the top. It would be fun to see this altered as a hacked Simon Says game.

Continue reading “Music Challenge Has You Flapping Your Wrist To Make Sounds”

Heat-seeking Firebot Drowns Out The Flames

This robot can find and extinguish fires automatically. It is the culmination of an Embedded Design class project from last school year. [Dan] and his classmates developed a turret that holds both a spray nozzle and heat sensor which would be a fantastic building block for a real-life tower defense game.

The jewel of the sensor array is a TPA81 thermopile array. Note the use of the term ‘array’ in the name. This is more like eight temperature sensors aligned with each other. By monitoring them all, the direction from which the most heat is coming can be determined. Once it’s zeroed in on the fire getting water to the right place can be a difficult task. That’s where the other sensors come into play. An accelerometer allows the bot to determine the angle of the spray nozzle (a weed sprayer was used in this case). An ultrasonic range finder and few algorithms let the Arduino which drives it all make sure that the arc of the water lands on the hot spot. This is all shown quite clearly in the clip below the jump.

Continue reading “Heat-seeking Firebot Drowns Out The Flames”

LED Cyber Eyes; More Nerdy Than Just Taping Your Glasses

Regular glasses are okay, but these light up and respond to your movement. [Dr. Iguana] is at it again, designing a very interestingly shaped PCB to augment your visual augmentation devices.

The circuit board has two thin curving wings which conform to the shape of a pair of glasses. In the middle there’s a larger area that holds most of the components but it’s still smaller than a common coin cell battery that powers the device. Over each eye there are a half dozen red LEDs which are driven by a PIC 12F1840. It can flash a bunch of patterns the but the interactivity is the real gem of the project. The doctor included an MMA8450 3-axis accelerometer. As you can see in the clip after the break, shaking your head this way and that will be reflected in the pattern of lights.

Continue reading “LED Cyber Eyes; More Nerdy Than Just Taping Your Glasses”