What’s Inside A USB Isolator?

Coil Die


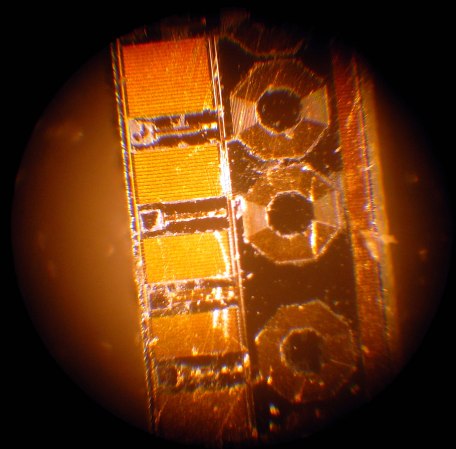
In this acid powered teardown, [Lindsay] decapped a USB isolator to take a look at how the isolation worked. The decapped part is an Analog Devices ADUM4160. Analog Devices explains that the device uses their iCoupler technology, which consists of on chip transformers.

[Lindsay] followed [Ben Krasnow]’s video tutorial on how to decap chips, but replaced the nitric acid with concentrated sulphuric acid, which is a bit easier to obtain. The process involves heating the chip while applying an acid. Over time, the packaging material is dissolved leaving just the silicon. Sure enough, one of the three dies consisted of five coils that make up the isolation transformers. Each transformer has 15 windings, and the traces are only 4μm thick.

After the break, you can watch a time lapse video of the chip being eaten by hot acid. For further reading, Analog Devices has a paper on how iCoupler works [PDF warning].

[Thanks to Chris for the tip!]

Continue reading “What’s Inside A USB Isolator?”

Boiling Acid Used To See Chip Die

When a project starts off by heating acid to its boiling point we say no thanks. But then again we’re more for the projects that use ones and zeros or a hot soldering iron. If you’re comfortable with the chemistry like [Michail] this might be right up your alley. He used boiling acid to expose and photograph the die from several integrated circuits.

The title of our feature is a play on words. In this case, die refers to the silicone on which the IC has been etched. To protect it the hardware manufacturer first attaches the metal pins to the die, then encapsulates it in plastic. [Michail] removes that plastic case by heating sulfuric acid to about 300 degrees Celsius (that’s 572 Fahrenheit) then submerges the chips in the acid inside of a sealed container for about forty minutes. Some of the larger packages require multiple trips through the acid bath. After this he takes detailed pictures of the die and uses post processing to color enhance them.

This isn’t the only way to get to the guts of a chip. We’ve seen nitric acid and even tree sap (in the form of bow rosin) do the trick.

DIY Science – Acid/Base Natural Indicators

natural-indicators

Nearly everything at [HAD] is at least based on science in some way or another. If, however, you would like to do some actual scientific experiments with stuff around the house, [Observationsblog] might be for you.

The particular posts that [Ken] wrote in to tell us about were all about acids, bases, and natural indicators. In his first post he goes over some definitions of acids, bases, and what pH exactly means. A good refresher for those that have forgotten some of their high school (or college) chemistry classes.

The other two posts have to do with making your own natural acid/base indicators. The first is called Anthocyanin, and can be extracted from Red Cabbage.  Quite specific directions can be found here. Similar directions can be found to turn the Indian spice of [Turmeric] into an indicator as well. Although these concepts probably won’t help build your next robot, they could easily be copied inspire young minds for a great science fair project!

Etching Your Own Boards Really, Really Fast

Sometimes the planets align and the Hackaday tip line gets two posts that are begging to be used together. Here’s two hacks to etch your own boards at home in just a few minutes.

Toner transfer PCBs on the quick

One way of putting an etch mask on a PCB is with the toner transfer method: print your circuit on a piece of inkjet photo paper using a laser printer, lay that circuit face down on a sheet of copper, and go at it with a clothes iron. This takes a heck of a lot of time and effort, but [Dustin] found another way. He used parchment paper instead of inkjet photo paper. Once the paper was on the board, he rolled it through a laminator. The results are awesome. It’s a very fast process as well – you don’t need to soak your board in water to get the photo paper off.

Etching that’s like wiping the copper away

[Royce] wrote in from the Milwaukee Makerspace to tell us about [Tom]’s etching process that is like wiping the copper off the board.  He used Muratic (Hydrochloric) acid and Hydrogen Peroxide with a sponge to wipe that copper away. The trick in this, we think, comes from the 30% H202 [Tom] picked up at a chemical supply company, but we’re pretty sure similar strengths can be purchased from beauty supply stores. Check out the video after the break to see [Tom] etch a 1 oz. board in just a few seconds.

Continue reading “Etching Your Own Boards Really, Really Fast”

Etch Aluminum Control Panels

This clever Instructable demonstrates how to etch beautiful aluminum control panels for electronics projects. We like how similar this process is to DIY circuit board etching. Both abide by the same technique and use blue transfer paper. The primary difference is in the use of muriatic acid and hydrogen peroxide for etching aluminum.

How-To: Etch A Single Sided PCB

Making a PCB is very simple; it does not consume a lot of time and the results look professional. After reading this How-To and watching the step by step video, you will be able to make your own PCB in your workshop using just a few inexpensive materials.

Many people use protoboard and point-to-point wire everything, but needing multiple copies of the same circuit is the reason that forces many away from using protoboard. After making your first circuit board, you might not point-to-point wire anything again!

Continue reading “How-To: Etch A Single Sided PCB”