Meowing Box Will Befuddle Your Friends

If you don’t own a cat, hearing the sound of one meowing from somewhere in the house probably comes as quite a shock. The Cat Prank box built by [Reuben] promises to deliver such hilarity with aplomb. 

The idea is simple: hide the Cat Prank box in a cupboard or other space in a friend’s house, and it will meow from its secret location. When found, either the light sensor or motion sensor will trigger the yowling of an angry feline, with hopefully startling effects.

An Arduino Mini is the brains of the operation, paired with an XY-V17B sound module which plays the required animal wailings. There’s also a 433 MHz radio module that lets the prankster trigger meowing via remote control.

Code is available for those wishing to build their own. We’d love to see a mod with a time delay built in, so the device could be hidden and left to start meowing at some later date when the prankster is far away.

Similar work has graced these pages before, like the devilishly fiendish OpenKobold design. Just make sure your friends are receptive to such jokes before you go ahead and invest time and hardware in the prank!

What Is This, A Battle-Bot For Ants?

Instructables user [Team_Panic] — inspired by the resurgence of robot battle arena shows — wanted to dive in to his local ‘bot building club. Being that they fight at the UK ant weight scale with a cap of 150 grams, [Team_Panic] built a spunky little Arduino Mini-controlled bot on the cheap.

The Instructable is aimed at beginners, and so is peppered with sound advice. For instance, [Team_Panic] advises building from “the weapon out” as that dictates how the rest of the robot will come together around it. There are also some simple design considerations on wiring and circuit boards considering the robot in question will take a few hits, as well as instructions to bring the robot together. To assist any beginners in the audience, [Team_Panic] has provided his design for a simple, “slightly crude,” wedge-bot, as well as his code. Just don’t forget to change the radio pipe so you aren’t interfering with other bots!

Continue reading “What Is This, A Battle-Bot For Ants?”

IoT Power Strip Lets You Control All Your Holiday Lights

As IoT devices become more prevalent in the consumer world, how long will it be before it’s cheaper to buy one, than to make one? Definitely not yet, which means if you want your very own IoT power strip — you’ll have to make your own. Good thing it’s not that hard!

[Dev-Lab] came up with this project which allows him to control several outlets with his phone. What we really like about it is that he designed a 3D printed housing that fits on the end of the power-strip. This keeps all messy wires out of sight, and it looks like it was designed to be there!

The beauty with an IoT device like this is that it doesn’t require any infrastructure besides a WiFi enabled device with an HTTP browser — the ESP8266 module means no server is necessary. An Arduino was used in the project just because it was quick an easy to do. But it really boils down to being a glorified pin expander. This could very easily be fixed by upgrading from an ESP01 to and ESP03 module to get more IO broken out on the carrier board. If you do this, let us know!

Continue reading “IoT Power Strip Lets You Control All Your Holiday Lights”

First Stab At Motion Sensor To Disconnect A Car Charger

motion-sensing-car-charger


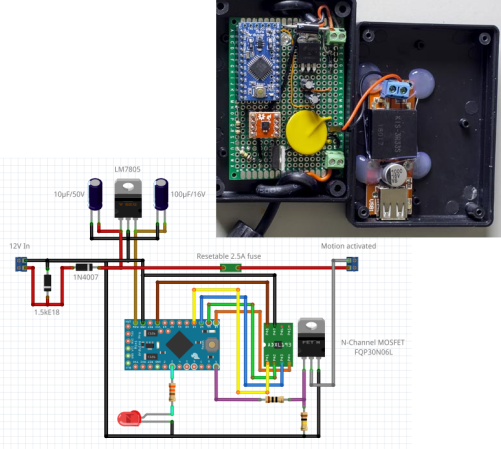
[Pixel] just sent in this automotive hack which disconnects his car charger when the vehicle stops moving for at least 10 minutes. Why would you need such a thing? The 12V outlet in his vehicle isn’t disconnected when the ignition is turned off. If he leaves a charger plugged in when parking the car, he often returns to a drained battery.

The fritzing diagram tells the story of this hack. He’s using a 7805 to power the Arduino mini. This monitors an ADXL362 accelerometer, starting the countdown when motion is no longer sensed by that chip. At the 10-minute mark the N-channel MOSFET kills the ground side of the outlet. Good for [Pixel] for including a resetable fuse on the hot side. But it was the diode all the way to the left that caught our eye. Turns out this is part of a filtering circuit recommended in a forum post. It’s a Zener that serves as a Transient-Voltage-Suppression diode.

Another comment on that thread brings up the issue we also noticed. The 7805 linear regulator is constantly powered. Do you think putting the uC into sleep and leaving the linear regulator connected is an adequate solution? If not, what would you do differently?

Can’t Stand Your Noisy Fan? Here’s A Plan, Man

[Brian] adores his GW Instek GPC-1850D power supply, but it’s annoyingly loud and disruptive to his audio projects. The thing works great, so he decided to regulate the fan’s speed based on usage level to save his sanity.

Once [Brian] got under the hood, he found that it actually has four separate heatsinks: one for the bridge rectifiers and one for each power transistor on the three output channels. The heatsinks are electrically and thermally isolated from each other and change temperature based on the channel being used.

[Brian] and his associates had several Microchip MCP9803 temperature sensors kicking around the lab from previous projects, so they put one on each heatsink. The great thing about these is their address selection pins which let all four of them sit together on the I²C bus to Arduinoville. Each sensor is insulated and clamped to its heatsink with a piece of meccano and a dab of thermal paste.

[Brian] used an Arduino Mini and built the circuit on stripboard. The fan runs at 24V, so he’s sharing that with the Arduino through a 7805. He controls the speed of the fan with PWM from the Arduino fed through a MOSFET. The Arduino reads from each sensor and determines which one is hottest. [Brian] wanted the fan to run at all times, so he set a base speed of 20%. When the heatsinks reach 30°C/86°F, the fan speed is increased to 40%. After that, the speed increases at 5°C/9°F intervals until it reaches max speed at 65°C/149°F.

You can grab the code and schematic from [Brian]’s repo. If you want to study your heatsinks, build this heatsink tester first.

Valentine’s Gift Counts The Days Spent Together

[Vegard Paulsen] dug deep down to the romantic geek at his core and built this box that counts the days he’s spent together with his Valentine. As you can see, it uses a four-digit seven segment display installed in the lid of a wooden box. An Arduino mini is responsible for driving the display, but as you might already know, to keep accurate time you’re going to need a reliable clock source. Instead of using a temperature compensated crystal oscillator like the ChronoDot he decided to pull time data from the Internet via a pair of RF modules.

His closing comments mention that this display will only work for around 27 years but he figures he can always build a bigger display. We’d keep this around, physically unaltered for sentimental value, but switch to a hexadecimal readout to track just over 179 years. Maybe that’s a bit too geeky.