Motor Controller Also Does Nyan Cat

As a freshman at UC Berkeley, [Keegan] has been helping out with his school’s Pioneers in Engineering program that gives high school students some hands on experience with engineering principles, usually by building robots. This year, [Keegan]’s project is a motor controller that just so happens to play the nyan cat song over the motor PWM output.

The motor controller is meant to replace the Pololu simple motor controller the PiE team is currently using. Onboard is an H-bridge chip and an ATmega328 that takes commands from an I2C bus. The ‘328 is loaded up with the Arduino bootloader making the firmware very accessible – a good thing for the high school students that will be building and programming these robots.

[Keegan] put up the Eagle files for the board up on the PiE Wiki. For now, just enjoy the dulcet tones of the pop tart cat theme song after the break.


Continue reading “Motor Controller Also Does Nyan Cat”

Self-balancing Transport Is Arduino-controlled

[Nick Thatcher] has built several iterations of a homebrew Segway, and the latest version is very impressive. When developing the project he figured there was just no way the thing would ever work, which led to its name, the No-way.

After the break you can catch a video of [Nick’s] test-ride. Looks like the two-wheeler is ready for daily use. You can just make out a red kill-switch on the right side of the polycarbonate body. This lets you disconnect the power if things get out of hand, or just when you’re done riding it. But there is also a dead-man’s switch which we believe uses two sensors where your feet go on the enclosure’s top surface. The handle has some indicator lights built into it, as well as buttons under each thumb which are used for steering. Control circuitry includes an Arduino UNO which reads a gyroscope/accelerometer sensor board from SparkFun. Two 7.2 Ah batteries provide 24V for the pair of electric scooter motors that turn the wheel-barrow wheels.

We love looking at these Segway clone project. So if you’re working on one of your own don’t forget to document your progress!

Continue reading “Self-balancing Transport Is Arduino-controlled”

Fashion Leads To Mind-controlled Skirt-lifting Contraption

This must be an example of when worlds collide. Who would have thought the geekery of Mindflex and Arduino could make its way into high fashion? But sure enough, this dress transforms based on the mental concentration of the model (must resist urge to crack joke here).

Details are a bit sparse, but you can get a look at the prototype in the video after the break. There’s no nudity; a larger skirt covers a more plain version. That over-skirt is connected to some type of motor system which is driven by an Arduino. When the EEG sensor in the hat detects a certain level of brain wave activity, the outer skirt is lifted and pulled to the back of the outfit, exposing the tighter version beneath.

[Lorenzo] wrote in to share the link to this garment hack. He mentions that a Lilypad and Mindflex are at work here. Looking more into the artist’s website we find this isn’t the only tech-wear produced. There’s a maternity outfit which can sense the baby’s beating heart, and harvest other data about both mother and baby, as well as a few others.

We can’t think this has much future as an everyday outfit, but more utilitarian versions are out there so we think the sky’s the limit on wearable tech.

Continue reading “Fashion Leads To Mind-controlled Skirt-lifting Contraption”

Storing Sketches In The Cloud

There’s a fine line between solving problems that don’t exist and solving problems that no one recognizes until a solution is found. The former shows up with housewares peddled on late-night infomercials, while the latter is summed up by [Henry Ford], “If I asked people what they wanted, they would have said faster horses.” [Dave]’s method of storing microcontroller code in the cloud definitely falls into the ‘useful’ category.

[Dave] first realized the problem when he was digging around the IDEO Toy Lab and came across an orphan project, a Barbie credit card swiper. [Dave] had no idea if the firmware for this project was saved on the server, or even if the current version was available. One solution to this problem could be burning a copy of the source onto the Flash or EEPROM on the board.

There’s a problem with this idea, though: storing the source in an Arduino’s memory takes space. Thinking laterally, [Dave] realized that editing source happens on a computer, computers are connected to the Internet, so why not keep the source “in the cloud?”

[Dave]’s solution is to host the source on GitHub, and tie every piece of code to a board’s unique USB serial number. This gives every Arduno a unique ID, allows for version control, and libraries of multiple files.

This very clever addition to the Arduino IDE is up on GitHub, ready to be added to any Arduino installation. Why the Arduino IDE doesn’t already have this feature is beyond us, but that’s what you get when you want a faster horse.

Kid-friendly RFID Media Center Playlist Control

rfid-dreambox-control

While young children have the tiny hands and fingers that most hackers/tinkerers wish they possessed from time to time, their fine motor skills aren’t always up to par when it comes to operating complicated electronics. People are always looking for ways to make their home entertainment systems accessible to their kids, and [Humpadilly] is no exception. Much like some of the other hacks we’ve seen this week, he has devised a way for his little ones (1 and 2 years old) to control his Dreambox Media Player using RFID, which seems to be the go-to technology for this sort of thing.

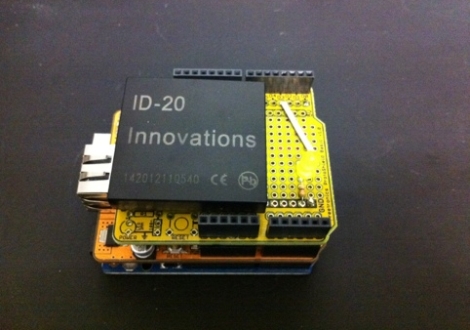
His RFID remote consists of three major components aside from the media player itself. An Arduino runs the show, and is connected to both an Ethernet shield and a breakout board fitted with an ID-20 RFID reader module. The Ethernet shield allows the Arduino to talk to his Dreambox over a telnet connection, while the RFID reader does what you would expect.

The device is in its infancy at the moment, and while [Humpadilly] hasn’t published a ton of details about the actual RFID devices he is using to control the system, he says that more details and improvements are forthcoming. In the meantime, you can check out his code here.

RFID Jukebox For The Kids

[Dominik] built a fun musical toy for his daughter [Anna]. It’s a jukebox that lets her play her favorite tunes using RFID tags to select between them.

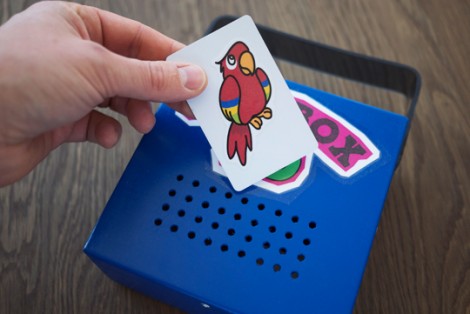
The project is simple, yet robust. The enclosure is a wooden craft box that you can pick up for a couple of bucks. Inside there’s an Arduino with a Wave Shield which handles the audio playback. An RFID reader takes input from the set of card-tags he procured. An internal Lithium battery powers the device, with a USB port for charging.

Sure, those guts have some cost involved in them. But there’s no LCD which can be broken, and we thing the boards will hold up well to abuse if mounted correctly. Plus there’s a lot of future potential here. When we saw the cards we thought of those toys which make the animal sounds (“what does the cow say… mooo”). This could be used for that with really young children. Then repurposed into this jukebox as they get a bit older. If you put the guts in a new enclosure it will appear to be a brand-new toy, right?

See a demo of the project in the clip after the break.

Continue reading “RFID Jukebox For The Kids”

Robotic Doodle Clock

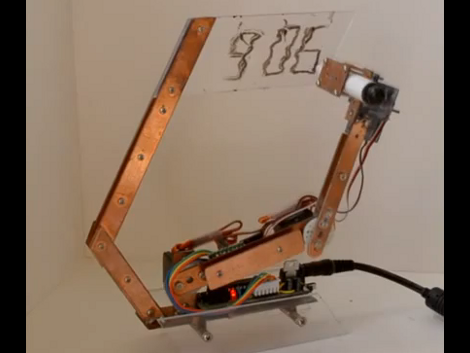
This clock has a robotic twist to it. It will show you the time by drawing it in dry-erase marker. There’s a bit of play in the arm joints and some loose motor precision which results in a wavy font that prompted [Ekaggrat] to name his project the Doodle Clock.

The shape and building material used here really make the timepiece look great. We think if the arm holding the acrylic writing surface had been at right angles this would not look nearly as pleasing. The video after the break shows the bot in action, at first flexing its wrist to switch back and forth between marker and eraser. From there it starts to draw the time, tracing the segments of each digit multiple times to achieve a readable number. The entire thing is driven by an Arduino compatible board mounted on the base of the clock.

This reminds us of that felt-tipped Turing Machine. A variation on that would also make a really nice clock display.

Continue reading “Robotic Doodle Clock”