Mama, just killed hit a man, Put a gun against his head, Pulled my trigger, now he’s dead. Mama, life had just begun, But now I’ve gone and thrown it all away…
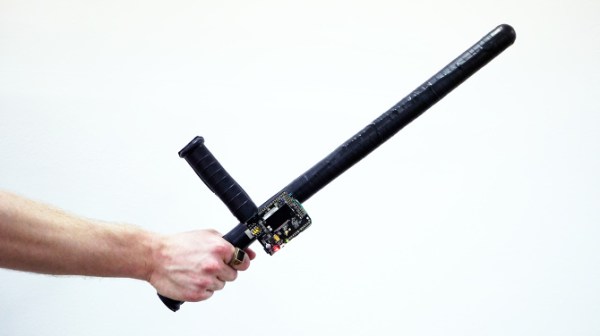
This latest piece of half-art / half-prototype from one of our favorite hacker-artists [vtol] is a billy club equipped with a GSM-module. It automatically sends an SMS to your mother with the text: “Mom, I hit a man.” He calls it the Antenna:
The idea of the project is to create a device which strictly controls the cruelty of police. As all the standard methods of control are ineffective, this project suggests the maternity as the last stronghold of human kindness and responsibility.
An Arduino is equipped with a piezo sensor to detect impact, and a GSM shield takes care of the texting. It’s an interesting concept, similar to requiring police officers to wear body cameras. You can debate the practicality, but we’re always interested in hearing about weapons monitoring tech concepts. One of our favorites has always been the DNA gun from (Judge) Dredd. Did you know there was an Internet Movie Firearms Database? But we digress, check out [vtol’s] demo video:
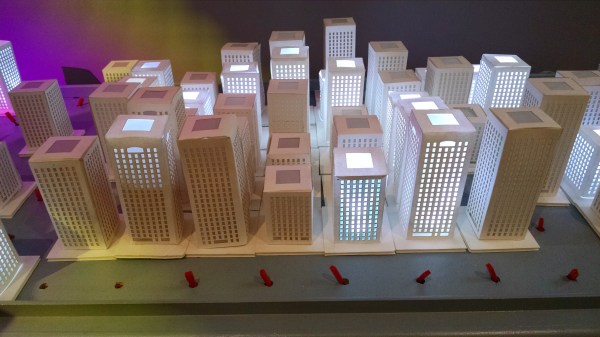
Metal fabrication is a an art that often goes under appreciated. The ability to take common stock in the form of sheet, pipe (square or round), and in this case rod, and make it into anything is intoxicating for the artist and super villain inside of each of us. Recently [asciiArtVandaly] took on an interesting job and was thoughtful enough to make a photo album of the process. He literally created the world out of metal.
The build is a wire-frame globe. The latitude and longitude rods are rolled to the proper arc, but holding them in place is a bit of a trick. This image shows the welding jig built just for this project. It has large and small nobs to match the increasing spacing of the rods, with washers holding down ever other joint. If you want to see an example of rod-rolling check out the unrelated How It’s Made segment found after the break.
This jig is visually stunning to look at, but the math used to lay something like this out is only mildly interesting compared to the work done to add the continents to the piece. Each of these were cut out and then hand hammered to match the curve of the globe before being welded in place and outfitted with lighting for cities. That’s a skill you can’t get without a lot of practice — and get this, [asciiArtVandalay] does it as a hobby. Who knew robot engineers needed hobbies?
The finished globe is about eighty pounds of stainless steel. The build ends up being corporate art for a company sure to turn [Tyler Durden’s] eye.
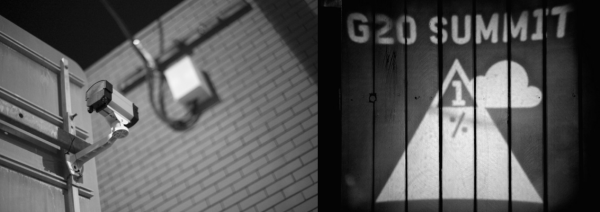
As a piece of protest art, “Covert Remote Protest Transmitters” ticks all the boxes. An outdoor covert projector that displayed anti-globalization messages at a G20 summit is protest. To disguise it inside a surveillance camera body housing — sticking it to the man from inside one of his own tools — is art. And a nice hack.
However you feel about the politics of globalization (and frankly, we’re stoked to be able to get cheap tech from anywhere in the world) the open-source DIY guidebook to building the rig (PDF) makes up for it all.
They installed the camera/projector long before the summit, where it sat dormant on a wall. A cell phone inside turned on the projector’s light with each ring because they attached a relay to the cell phone’s speaker circuit. In the instructions there’s an example of using a light-dependent resistor (CdS cell) to do the same thing, relying on the phone’s backlight functionality instead. There are a lot of ways to go here.
The optics consist of a couple of lenses aligned by trial and error, then fixed in place to a balsa wood frame with hot glue. A big fat Cree LED and driver provide the photons.
The video documentation of the piece is great. It’s mostly the news media reacting to the art piece as a “security breach”. A security breach would be a gun or a bomb. This was an overhead projector displaying messages that were out of the organizers’ control. Equating security with the supression of dissent is double-plus-ungood. Touché, CRPT.
Anyway, while you’re getting prepped for your next protest, have a look at the Image Fulgurator.
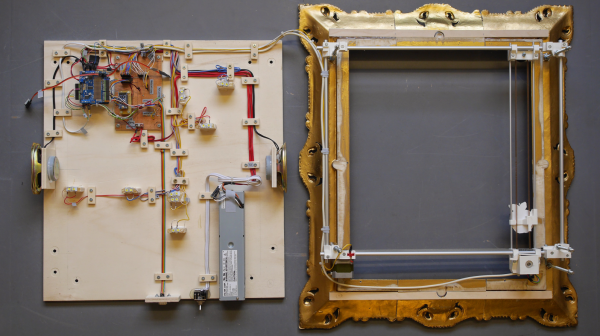
Here’s another example of how today’s rapid-prototyping technologies are allowing Artists and Craftsmen to create interactive works of art rapidly and easily. [Kati Hyypa] and [Niklas Roy] teamed up to transform a classic painting in to an interactive exhibit. It’s a painting of Adam, Eve and the apple with a joystick attached. Spectators can control the destiny of the apple with the joystick and thus explore the painting.
The “Forbidden Fruit Machine” is based on a painting called “The Fall of Man” created by [Cornelis Cornelisz van Haarlem] in 1592. The painting depicts Eve and Adam in the Garden of Eden, being tempted by the serpent to eat the forbidden fruit. A public domain, high-resolution scan of the painting is available for download from the Rijksmuseum Amsterdam. Starting with that, the arms were edited out, and replaced with articulated versions (mounted on acrylic) driven by servos. The apple was mounted on a X-Y gantry driven by two stepper motors. These are driven by a motor shield, which is controlled by an Arduino Uno. The Uno also controls a Music Maker shield to play the various audio tracks and sound effects. Finally, an additional Arduino Pro-Mini is used to control the LED lighting effects via a Darlington driver and also connect to the end stops for the X-Y gantry. The joystick is connected to the analog ports of the Uno.
The LED’s give clues on where to move the apple using the joystick, and pressing the red button plays an appropriate audio or sound effect. For example, pressing the button over the cat at Eve and Adam’s feet elicits a heart-breaking meow, while letting Eve eat the apple results in an even more dramatic effect including a thunder storm.
The machine is open source with code posted on Github and 3d files on Youmagine. Watch a video after the break. The artist’s names may be familiar to some some readers – that’s because both have had their earlier work featured on our blog, for example this awesome ball sucking machine and another one too.
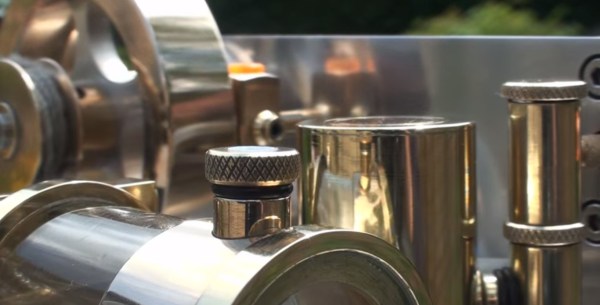
The sheer beauty of this build is blinding. We enjoy keeping a minimalistic household — not quite on the level of [Joe MacMillan] but getting there — yet this would be the thing we choose as decoration. It’s a hand-built 2-stroke Engine designed specifically to make the combustion process visible rather than locking it away inside of a block of metal.
If you have a nagging feeling you’ve seen this before it’s because the amazing craftsmanship is unforgettable. A couple years back we looked at the 4-stroke engine also built by [Huib Visser]. This new offering does away with the belt, leaving a build that is almost entirely glass and metal polished to a high sheen. The glass cylinder contains the combustion, pushing the graphite piston to drive the fly-wheel. A passing magnet triggers the spark plug to ignite the white-gas fuel, all of which is well-illustrated in the video after the break.
This is not for sale, which doesn’t surprise us. How hard would it be to part with something of such beauty especially knowing you created that beauty? But don’t worry, you can definitely build your own. Just make sure to set the bar lower for your first half dozen tries. We’ve even seen engine builds using hardware store parts.
Canada! Just in time for Spring to hit. I went to Toronto to speak at FITC, an arts and technology conference, co-host a Hackaday meetup with HackLab TO, visit the DigiPlaySpace at TIFF, and to check out Globacore’s new digs.
FITC is a conference which celebrates the creativity in technology. Pictured above is Diorama Rama designed by [Christopher Lewis] and [Creative Technologists of Toronto] and built over 4 days by participants at FITC. The buildings are laser cut paper, and participants create a simple circuit using an ATtiny. A message is coded into the chip in ASCII and the buildings blink an individual message back in Morse code, each building blinking a different message. It’s pretty interesting to use a Morse –> ASCII phone app (Morse Tools) to read the messages.
Looking at Diorama Rama with Morse Tools
Hackaday Prize judge [Micah Elizabeth Scott] gave a talk about her work. [Jessica Rosenkrantz] of Nervous System spoke about her company’s process when designing mathematically based objects. She spoke about her 3D printed dress pictured below and how it was made. Amazing! I also got to show off my newly minted Breathe project at FITC.
Kinematics by Nervous System
After FITC ended, HackLab co-hosted a meetup with us. A team from HackLab was a 2014 Hackaday Prize Semifinalist and won $1000 in components with their Retro Populator, a Pick and Place machine retrofit onto a 3D printer. We had beer as well as almond-cream flavored non-alcoholic drinks from the Luma Droid, a drink mixing robot. HackLab is a good-sized hackerspace, with a huge room for a meetup, a full kitchen and vegan dinner served frequently, plus a shop tools room all by itself.
Eric Boyd kicks it off
Luma Droid!
3D router
Retro Populator
Full house at HackLab
Among the lightning talks, [Pearl Chen] brought her Intel Edison-powered alarm clock that has but one function — to tell her when she is running late. [Johannes van der Horst] brought a USB current monitor that had many of us fascinated for about an hour at the end of the evening, plugging in a phone or a battery just to see the numbers climb. [Eric Boyd] talked about the DIY Bio projects that are going on at HackLab. They are testing meat using PCR to see if it is indeed, beef. Ew.
[Andrew Kilpatrick] of Kilpatrick Audio showed us an older version of his synthesizer before showing us his newest revision, Phenol, which looks pretty slick.
Pearl Chen
Johannes van der Horst’s USB current meter
Johannes van der Horst’s USB current meter
Pearl Chen’s smart clock
Andrew Kilpatrick’s Phenol synth
[Hugh Elliot] spoke about a light-photography project. [Leif Bloomquist] spoke about a gaming glove project that Hackaday had previously covered. Leif had a Commodore 64 with him and all the games on it fit into 1 GB! [Nadine Lessio] discussed how many programs claim that you can become an expert in a few hours, but in fact, things are not easy. [Jay Vaidya] showed us an IFTTT hack which controls heaters and AC. [Andy Forest] showed us an impressive interactive model of Ontario’s power system that kids at Steam Labs created.
Leif Bloomquist’s gaming glove
IFTTT hack
That was a super fun meetup! Thanks HackLab for hosting. We’ve got a bunch of upcoming meetups and larger events in LA, NYC, Bangalore, San Francisco and Shenzhen. Check our events page for what, where, and when, We’d love to see you.
I stopped by TIFF’s Bell Lightbox to see the DigiPlaySpace exhibit. [Micah Scott] did a collaboration with Ryerson University’s RTA School of Media which welcomes you as you walk in. Note: all photos are lifted directly from TIFF.net’s website.
Headrush
Forest
Alien
My final stop on this tour was to visit Globacore’s new offices. We spent a day or so hacking on a VR controller for their newest game called Power Cube. Power Cube is an Oculus Rift experience with a custom game controller holding an accelerometer, a gyroscope and magnetometer that links into the game directly.
Two of the ideas we keep at our core here at Hackaday: the free and open exchange of information and ideas; and “why” is the wrong question. These concepts are fully in line with the F.A.T. Lab. The Free Art and Technology Lab lives at the intersection of Open Source and Pop Culture and they’re inviting you to jump into the pool of awesome by joining them for the F.A.T. Gold Show in San Francisco May 21-31.
If you’re unfamiliar with the group, take a look at the video after the break and you’ll easily confirm that you need to check this out. We’ve enjoyed the work of F.A.T. Lab members for years now. [Brian] pointed out part of the importance of the “Open” aspect the group in this post on universal connectors for popular toy blocks. We also covered their collaboration on EyeWriter which shows how to build IR eye tracking for the disabled. The group hosts the Graffiti Research Labs (also a collaborator on EyeWriter); we built their Laser Graffiti project as part of a live Hackaday event in January of last year thanks to the open source code they published.
What will you see at this year’s show? The best work the group has to offer from the last eight years plus some debut exhibits. We wish we could be there but we’re planning to be in LA that weekend for the LayerOne conference.