Reverse Engineering Challenge Starts Off Simple

img_20130326_102537

We love seeing hard-core firmware reverse engineering projects, but the number of hackers who can pull those off is relatively small. It’s possible to grow the ranks of the hacker elite though. A hackerspace is a great place to have a little challenge like this one. [Nicolas Oberli] put together a capture the flag game that requires the contestants to reverse engineer Teensy 3.0 firmware.

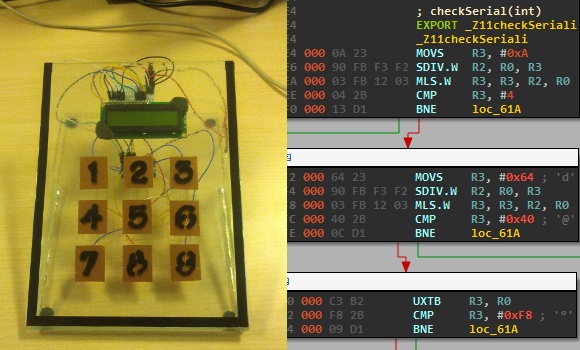
He developed this piece of hardware for the Insomni’hack 2013 event. It uses the Teensy 3.0 capacitive touch capabilities to form a nine-digit keypad with a character LCD screen for feedback. When the correct code is entered the screen will display instructions on how to retrieve the ‘flag’.

To the right you can see the disassembly of the .elf file generated by the Arduino IDE. This is what [Nicolas] gave to the contestants, which gets them past the barrier of figuring out how to dump the code from the chip itself. But it does get them thinking in assembly and eventually leads to figuring out what the secret code is for the device. This may be just enough of a shove in the right direction that one needs to get elbow deep into picking apart embedded hardware as a hobby.

Continue reading “Reverse Engineering Challenge Starts Off Simple”

Learn A Little Assembly Language For The 6502 Processor

6502-assembly-tutorial

Evern wanted to write your own Atari 2600 games? This won’t get you quite that far, but it will teach you the very basics. It’s an assembly tutorial for the 6502 processor. The nice thing is that you need nothing more than your browser to participate thanks to the embedded JavaScript emulator which acts as assembler, machine, and debugger in one.

The 6502 was in a lot of early equipment. In addition to the previously mentioned Atari they can be found in the Commodore 64, Apple II, and the original NES. You can even find folks building their own computers around the chip these days (most notable to us is the Veronica project). The guide starts off slowly, providing a working program and challenging the reader to play with to code in order to alter the outcomes. It moves on to an overview of registers and instructions, operators and branching, and culminates in the creation of a simple game.

[Thanks Mathilda]

Macro Assembly For AVR Chips

avr-macro-assembly

Here’s an interesting tip that can help improve your ability to write assembly code. In an effort to remove the complexity of assembly code for an AVR project [Quinn Dunki] figured out how to use macros when writing AVR code with the GNU toolchain. Anyone using AVR-GCC should keep this in mind if they ever want or need to pound out a project in assembly language.

If you look at the code snippet above you’ll see two commands that are obviously not assembly; PulseVRAMWrite and DisableVRAMWrite. These are macros that direct the assembler to roll in a hunk of code. But avr-as, the assembler used with this toolchain, lacks the ability to handle macros. That’s too bad because we agree with [Quinn] that these macros make the code easier to read and greatly reduce the probability of error from a typo since the code in the macro will be used repeatedly.

The answer is to alter the makefile to use GNU M4. We hadn’t heard of it, but sure enough it’s already installed on our Linux Mint system (“man m4” for more info). It’s a robust macro processor that swaps out all of her macros based on a separate file which defines them. The result is an assembly file that will play nicely with avr-as.

Her implementation is to help in development of the GPU for her Veronica computer project.

Try Out Your Assembly And BASIC Skills With A ZX Spectrum Project

It can be really hard to warm up to coding in Assembly. But this tutorial looks to make it understandable and (almost) easy. It focuses on programming a game for the ZX Spectrum. But you won’t need the hardware on hand as you can just use the ZX Spin emulator as you work your way through the code.

Ostensibly this is a 30-minute tutorial but that’s a gross underestimate. We finished a cursory read of the tutorial and the building blocks are certainly clear and easy to understand. But we like to make sure we understand every line of code and plan to spread that out over the coming weekend.

The first chapter eases us into machine code by combining it with a bit of BASIC. You’ll see how to manipulate the ZX Spectrum memory and then pluck that value back out into the BASIC program. But once chapter 2 hits it’s pretty much all assembly from there on out. The nice thing is that as you go along you learn how the hardware works and there are quite a few references to pages in the manual so you can do some extra learning along the way.

[Thanks Mathilda]

Programming Without A Toolchain; Crafting PIC Op Code By Hand

We’ve been living a life of luxury, writing our microcontroller code in a text editor and using — of all things — a compiler to turn it into something the chip can use. [Dan Amlund Thomsen] shows us a different way of doing things. He’s actually crafting the operation codes for a PIC microcontroller by hand. We’re glad he’s explained this in-depth because right now we feel way over our heads.

His program is pretty simple, it blinks a single LED and he’s chosen t work with a PIC 12F1840. The first order of business is to issues the words that configure the chip using 14-bit binary values from the datasheet. From there he goes on to write the program in assembly code. At this point he could pretty much just run this through the assembler, but he’s really just getting started now. He walks through the format necessary to package the configuration words, then goes on to illustrate the translation of assembly commands to binary op codes. We’re not sure we’ll ever get around to trying this ourselves, but it was certainly fun to read about it.

Raspberry Pi - rpi

Operating Systems Development With The Raspberry Pi

Even though the Raspberry Pi has, from the very beginning, been touted as an educational computer, we’ve seen neither hide nor hare of coursework, lesson plans, or even computer sciencey tutorials using the Raspi. We’re guessing academia works at a much slower pace than the average hardware hacker, but [Alex Chadwick] at Cambridge University has managed to put together an online tutorial on developing an operating system from scratch for the Raspi.

The goal of this tutorial is to throw a budding Raspi tinkerer into the strange and confusing world of registers, hexadecimal, and ARMv6 assembly. After going through the necessary toolchain, [Alex]’s tutorials cover blinking the ‘OK’ LED on the Raspberry Pi using only assembly.

The OS development guide goes on from there to include drawing graphics on the screen and even accepting input from a USB keyboard.

It’s important to point out what [Alex]’s tutorial isn’t; even though this series of tutorials goes through manipulating the bare metal of the Raspberry Pi, don’t expect to be porting UNIX to the Raspi after going through these guides. That being said, after completing these tutorials, you’ll be in a fabulous position for building your own homebrew OS on the Raspberry Pi.

A Detailed Tutorial On Speeding Up AVR Division

[Alan Burlison] is working on an Arduino project with an accelerometer and a few LEDs. Having the LEDs light up as his board is tilted to one side or another is an easy enough project a computer cowboy could whip out in an hour, but [Alan] – ever the perfectionist – decided to optimize his code so his accelerometer-controlled LEDs don’t jitter. The result is a spectacular blog post chronicling the pitfalls of floating point math and division on an AVR.

To remove the jitter from his LEDs, [Alan] used a smoothing algorithm known as an exponential moving average. This algorithm uses multiplication and is usually implemented using floating point arithmetic. Unfortunately, AVRs don’t have floating point arithmetic so [Alan] used fixed point arithmetic – a system similar to balancing your checkbook in cents rather than dollars.

With a clever use of bit shifting to calculate the average with scaling, [Alan] was able to make the fixed point version nearly six times faster than  the floating point algorithm implementation. After digging into the assembly of his fixed point algorithm, he was able to speed it up to 10 times faster than floating point arithmetic.

The takeaway from [Alan]’s adventures in arithmetic is that division on an AVR is slow. Not very surprising after you realize the AVR doesn’t have a division instruction. Of course, sometimes you can’t get around having to divide so multiplying by the reciprocal and using fixed point arithmetic is the way to go if speed is an issue.

Sure, squeezing every last cycle out of an 8 bit microcontroller is a bit excessive if you’re just using an Arduino as a switch. If you’re doing something with graphics or need very fast response times, [Alan] gives a lot of really useful tips.