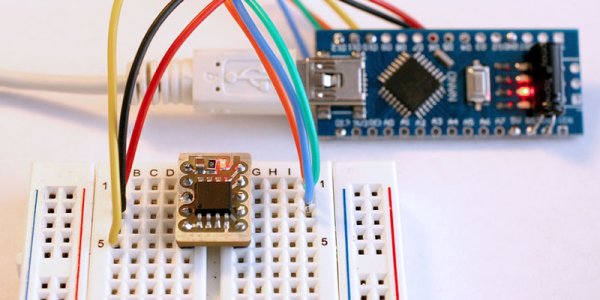
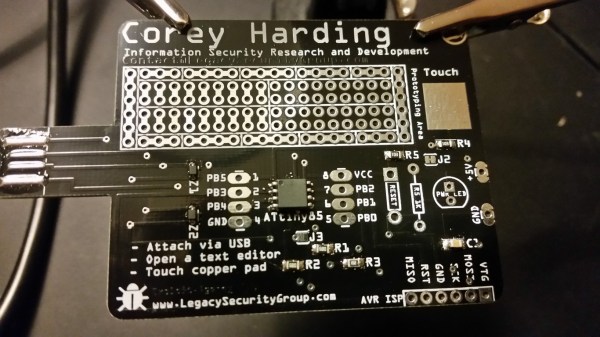
Saturday clock - 1 CPU clock cycle per day

Saturday Clock: An 0.000011574Hz ATtiny85 Clock

In these times when we try to squeeze out extra clock cycles by adding more cores to our CPUs and by enlisting the aid of GPUs, [Ido Gendel] thought it would be fun to go in the exact opposite direction, supply a clock to the ATtiny85 that cycles only once per day, or at 0.000011574Hz. What application could this have? Well, if he could do it in seven instructions or less, how about turning on an LED at sunset Friday evening, to indicate the start of the Jewish Shabbat (Saturday), and turn it off again at sunset Saturday evening.

Notice the subtlety. A clock that cycles once per day means you can execute at most one instruction per day. Luckily on AVR microcontrollers, the instructions he needed can execute in just one cycle. That of course meant diving down into assembly code. [Ido] wasn’t an assembly wizard, so to find the instructions, he compiled C code and examined the resulting assembly until he found what he needed. One instruction turns on the LED and the instruction immediately following turns it off again, which normally would make it happen too fast for the human eye to register. But the instruction to turn it on runs on Friday evening and the very next instruction, the one that turns it off, doesn’t run until Saturday evening. Do you feel like you’re in a science fiction story watching time slowed down? Freaky. A few NOPs and the jump for the loop take up the remaining five cycles for the week.

For the source of the clock he chose to use an LDR to detect when the light level dropped at the end of the day. The problem he immediately ran into was that clouds, bird shadows, and so on, also cause drops in the light level. The solution he found was to widen the light and dark range by adding a TLV3702 push-pull output comparator and some resistors. [Ido] gives a detailed explanation of the circuit in the video after the break.

Continue reading “Saturday Clock: An 0.000011574Hz ATtiny85 Clock”

Tea For Two: A Tiny Tea Timer

The ATtiny85 microcontroller doesn’t have all that much of anything: 8 KB of flash, an 8-bit architecture, and only eight pins (three of which are taken up with power and reset duties). And that’s exactly what makes it a great fit for tiny little projects.

[Mimile]’s Tea Timer has a switch, a button, eight LEDs, and a buzzer. Flip the switch to “set” and button presses run through the desired steeping times. Flip it to “run” and you’re timing. The LEDs blink and the buzzer plays “Tea for Two” in squawky square waves. Wonderful!

But wait, how to control all of this I/O with just five pins? With one pin each for the two switches and one for the buzzer, that leaves only two pins for the eight LED display. [Mimile]’s fun solution is to use a binary counter (a 74HC393) and the remaining two lines to count and reset. That means toggling a pin very fast 255 times to light up all the LEDs. That’s a bizarre way to go, but we like it!

Hackaday has proven unable to resist the siren song of the ATtiny85. Whether teaching it to swear, to speak I2C, or to transmit analog TV signals, there’s just something about this cute little chip that invites you to test your mettle.

Tiny Morse Code USB Keyboard

We’ve featured quite a few of [mitxela]’s projects here in the past, and many of them have the propensity to be labelled “smallest”. His Morse Code USB Keyboard Mk II adds to that list. It’s a Saturday afternoon project, with a few parts slapped onto a piece of perf-board, that allows using a Morse key as a USB keyboard. This project isn’t new or fresh, but we stumbled across it while trying to figure out a use for a Morse key lying in the author’s bin of parts. You can practise transmitting, by reading text and typing it out on the key, and then look it up on your computer to see if you made any mistakes. Or you can practise receiving, by asking a friend to punch it out for you. Either way, it’s a great way to hone your skills and prepare for your radio operators license exam.

The project is a follow up to his earlier one where he hooked up the Morse key via a RS-232 — USB converter directly to a computer and let the code do all the work. That turned out to be a very resource hungry, impractical project and made him do it right the next time around. The hardware is dead simple. An ATtiny85, a piezo buzzer, some decoupling capacitors, and a few resistors and zeners to allow a safe USB interface. The design accommodates a straight key, but there is one spare pin left over in the ATtiny to allow for iambic or sideswiper keys too. There is no speed adjustment, which is hardcoded at the moment. That isn’t very user friendly, and [mitxela] suggests adding a speed potentiometer to that last remaining pin on the ATtiny. This would prevent use of iambic/sideswiper keys. Or, you could use the RST pin on the ATtiny as a (weak) IO. The RST pin can read analog values between 5V and 2.5V, and will reset when voltage falls below 2.2V. Or just use another microcontroller as a last resort.

For the USB interface, [mitxela] is using the V-USB library after wasting some time trying to reinvent the wheel. And since this is designed to work as a HID, there are no drivers required – plug it in, and the OS detects it as a keyboard. He’s borrowed code from the EasyLogger project to use the internal oscillator and help free up the IO pins. And to detect the characters being typed, his code uses a long string of compare statements instead of a dictionary lookup. Writing that code was tedious, but it makes the identification quicker, since most characters can be identified in less that five comparisons (one dit = E, two dits = I, three dits = S and so on). This “tree” makes it easier to figure it out.

If you’d like to look up some of his other “tiny” projects, check out The smallest MIDI synthesizer, Smallest MIDI synth, again! and the ATtiny MIDI plug synth.

Continue reading “Tiny Morse Code USB Keyboard”

Making A Spectrum Analyzer The Wrong Way On An ATtiny85

Everyone’s a critic, but it’s hard to argue with success. And that’s exactly what [agp.cooper] has with his ATtiny85-based spectrum analyzer devices.

The “normal” way to build a spectrum analyzer is to collect a bunch of samples and run a Fast Fourier Transform (FFT) on them all in one shot. As the name implies, the FFT is fast, and the result is the frequency components of the sampled data. [agp.cooper]’s “wrong” way to do it takes the Goertzel algorithm, which is used for detecting the intensity of a particular frequency, and scanning across the frequency range of interest. It’s a lot slower than a single FFT but, importantly for the ATtiny85 that he implements this on, it’s less demanding of the RAM.

Continue reading “Making A Spectrum Analyzer The Wrong Way On An ATtiny85”

DIY I2C Devices With ATtiny85

[Pawel] has a weather station, and its nerve-center is a Raspberry Pi. He wanted to include a light sensor but the problem is, the Pi doesn’t have a built-in ADC to read the voltage off the light-dependent resistor that he (presumably) had in his junk box. You can, of course, buy I2C ADC chips and modules, but when you’ve already got a microcontroller that has ADC peripherals on board, why bother?

[Pawel] wired up a tremendously simple circuit, downloaded some I2C slave-mode code, and added an LED for good measure. It’s all up on GitHub if you’re interested.

cropped_shot_2016-10-21-112958
Bright by Day, Dark by Night!

We’re covering this because we rarely see people coding for I2C slave devices. Everyone and their mom uses I2C to connect to sensors, for which the Arduino “Wire” library or “i2c-tools” on the Pi do just fine. But what do you do when you want to make the I2C device? [Pawel]’s project makes use of TinyWireS, a slave-mode SPI and I2C library for AVR ATtiny Arduino projects.

Here, [Pawel] just wanted a light sensor. But if you’re building your own devices, the sky is the limit. What’s the most esoteric I2C sensor that you can imagine? (And is it really the case that we haven’t seen an I2C slave device hack since 2010?)

How Hot Is Your Faucet? What Color Is The Water?

How hot is the water coming out of your tap? Knowing that the water in their apartment gets “crazy hot,” redditor [AEvans28] opted to whip up a visual water temperature display to warn them off when things get a bit spicy.

This neat little device is sequestered away inside an Altoids mint tin — an oft-used, multi-purpose case for makers. Inside sits an ATtiny85 microcontroller  — re-calibrated using an Arduino UNO to a more household temperature scale ranging from dark blue to flashing red — with additional room for a switch, while the 10k ohm NTC thermristor and RGB LED are functionally strapped to the kitchen faucet using electrical tape. The setup is responsive and clearly shows how quickly [AEvans28]’s water heats up.

Continue reading “How Hot Is Your Faucet? What Color Is The Water?”

Hackaday Links Column Banner

Hackaday Links: October 30, 2016

Diablo. Mech Warrior. Every LucasArts game. There are reasons to build an old PC, and no, emulation cannot completely capture the experience of playing these old games. [Drygol] set out to create a retro PC and succeeded brilliantly. The built features an old desktop AT case (when is the last time you saw one of them?), a 233MHz Pentium with MMX technology, an ancient PCI video card, and an old ISA Ethernet card (with AUI connector). Incoming upgrades will be an ATI 3D Rage PRO, PCI SoundBlaster, and hopefully Windows 98SE.

Right now, we’re gearing up for the Hackaday Superconference next weekend. It’s going to be awesome, and we’re going to announce the winner of the Hackaday Prize. We have another contest going on right now – the Enlightened Raspberry Pi Contest. The name of the game here is documentation. Build something, document it on hackaday.io, and you get some cool prizes.

Continue reading “Hackaday Links: October 30, 2016”