Maurice Brings Immersive Audio Recording To The Masses

Immersive audio is the new hotness in the recording world. Once upon a time, mono was good enough. Then someone realized humans have two ears, and everyone wanted stereo. For most of us, that’s where it stopped, but audio connoisseurs kept going into increasingly baroque surround-sound setups — ending in Immersive Audio, audio that is meant to fully reproduce the three-dimensional soundscape of the world around us. [DJJules] is one of those audio connoisseurs, and to share the joy of immersive audio recording with the rest of us, he’s developed Maurice, a compact, low-cost immersive microphone.

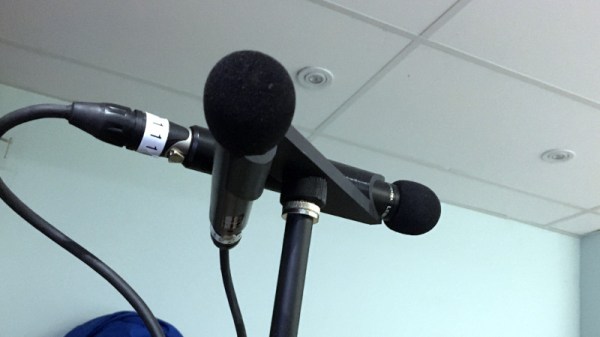
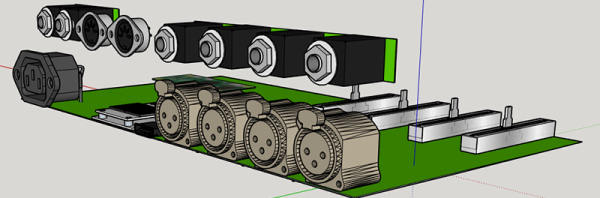
Maurice is technically speaking, a symmetrical ORTF3D microphone array. OTRF is not a descriptive acronym; it stands for Office de Radiodiffusion Télévision Française, the fine people who developed this type of microphone for stereo use. The typical stereo ORTF setup requires two cardioid microphones and angles them 110 degrees apart at a distance of 17 cm. Maurice arrays four such pairs, all oriented vertically and facing 90 degrees from one another for fully immersive, 8-channel sound. All of those microphones are thus arrayed to capture sound omnidirectionally, and give good separation between the channels for later reproduction. The mountings are all 3D printed, and [DJJules] kindly provides STLs.

This is the speaker setup you need to get full use of Maurice’s recordings. Now let’s see Paul Allen’s speakers.

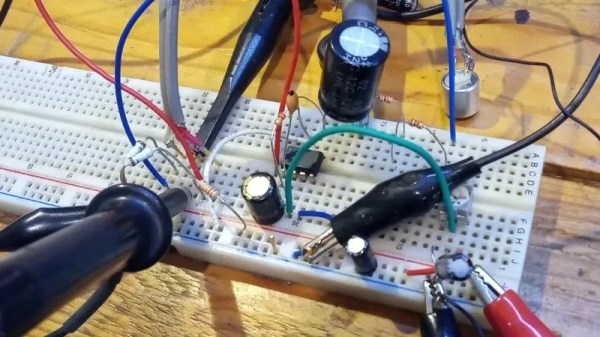
Recording eight audio channels simultaneously is not trivial for the uninitiated, but fortunately, [DJJules] includes a how-to in his post. We particularly like his tip to use resistor color coding to identify the XLR cables for different microphone channels. Playback, too, requires special setup and processing. [DJJules] talks about listening on his 7.1.4 stereo setup, which you can find in a companion post. That’s a lot of speakers, as you might imagine.

There are high-end headphones that claim to reproduce an immersive sound field as well, but we can’t help but wonder if you’d miss the “true” experience without head tracking. Even with regular department-store headphones, the demo recordings linked via the Instructable sound great, but that probably just reflects the quality of the individual microphones.

Audio can be a make-or-break addition to VR experiences, so that would seem to be an ideal use case for this sort of technology. Maurice isn’t the only way to get there; we previously focused on [DJJules]’s ambisonic microphone, which is another way to reproduce a soundscape. What do you think, is this “immersive audio” the new frontier of Hi-Fi, or do we call it a stereo for a reason? Discuss in the comments!

Low-Cost Electret Microphone Preamplifiers

Before the invention of microelectromechanical system (MEMS) microphones, almost all microphones in cell phones and other electronics were a type of condenser microphone called the electret microphone. The fact that this type of microphone is cheap and easy enough to place into consumer electronics doesn’t mean they’re all low quality, though. Electret microphones can have a number of qualities that make them desirable for use recording speech or music, so if you have a struggling artist friend like [fvfilippetti] has who needs an inexpensive way to bring one to life, take a look at this electret microphone pre-amp.

The main goal of the project is to enhance the performance of these microphones specifically in high sound pressure level (SPL) scenarios. In these situations issues of saturation and distortion often occur. The preampl design incorporates feedback loops and an AD797 opamp to reduce distortion, increase gain, and maintain low noise levels. It also includes an output voltage limiter using diodes to protect against input overload and can adjust gain. The circuit’s topology is designed to minimize distortion, particularly in these high SPL situations.

Real-world testing of the preamp confirms its ability to handle high SPL and deliver low distortion, making it a cost-effective solution for improving the performance of electret microphones like these. If you want to go even deeper into the weeds of designing and building electret microphones and their supporting circuitry, take a look at this build which discusses some other design considerations for these types of devices.

Stereo Recording Made Easy With A 3D-Printed Mount

When making a recording it can be surprisingly difficult to capture a good stereo image. A well-known technique is the ORTF microphone arrangement in which two cardoid microphones sit at 110 degrees to each other and 17cm apart, and thus pick up a readily reproducible stereo separation. It’s something that we’ve been known to do in our student days with a pair of Shure SM58s and a stack of Post Office elastic bands, but [marsairforce] has done a much nicer job with a very neat 3D-printed microphone clip.

Designed in OpenSCAD, the first iteration printed on a resin printer proved to be too brittle for the task, so a second version was printed on an FDM machine. This incorporated significant strengthening, as well as a screw mount for a microphone stand. The result is an extremely useful and cheap addition to any recording set-up, and anyone who has wrestled with achieving a good stereo image will appreciate it. You can see some of what went into it in the video below the break.

If this is your field of interest, you might also wish to look at a binaural microphone.

Continue reading “Stereo Recording Made Easy With A 3D-Printed Mount”

Tunes You Can Eat

This week retro-gadget collector and video blogger [Techmoan] featured perhaps the most delicious audio recording format that we know of — a chocolate gramophone record. (Video, embedded below.) Compared to his typical media format explorations, the chocolate record is of quite recent vintage. He first heard of them back in 2015 when Tasmanian artist [Julia Drouhin] offered chocolate recordings as part of her art project. The one that [Techmoan] finally obtained was from a UK chocolatier who offers them with custom labelling and your choice of two songs. There are some pointers in the video about how to playback your chocolate disk without ruining it (use the lightest stylus tracking force as possible). These disks are recorded at 45 RPM on one side only, and are about the same size as a standard single. But being about five times thicker, they pack a lot more calories than your typical phonograph disk.

No reflection on the Tewkesbury Town Band, but this is probably the lowest fidelity recording media ever, but at least you can eat it when you’re done listening — label and all. We hope the Mission Impossible movie producers are paying attention so we can see the secret audio briefing being eaten instead of going up in smoke next film.

Continue reading “Tunes You Can Eat”

A Pi Powered Recording Studio

In the mid-90s, you recorded your band’s demo on a Tascam cassette tape deck. These surprisingly cheap four-track portable studios were just low tech enough to lend an air of authenticity to a band that calls itself, ‘something like Pearl Jam, but with a piano’. These tape decks disappeared a decade later, just like your dreams of being a rock star, replaced with portable digital recording studios.

The Raspberry Pi exists, the Linux audio stack is in much better shape than it was ten years ago, and now it’s possible to build your own standalone recording studio. That’s exactly what [Daniel] is doing for our Raspberry Pi Zero contest, and somewhat predictably he’s calling it the piStudio.

Although the technology has moved from cassette tapes to CompactFlash cards to hard drives, the design of these four-track mini recording studios hasn’t really changed since their introduction in the 1980s. There are four channels, each with a fader, balance, EQ, and a line in and XLR jack. There are master controls, a few VU meters, and if the technology is digital, a pair of MIDI jacks. Since [Daniel] is using a Raspberry Pi for this project, he threw in an LCD for a great user interface.

As with all digital recorders, the money is in the analog to digital converters. [Daniel] is using a 24-bit, 216kHz, four-channel chip, Texas Instruments’ PCM4204. That’s more than enough to confuse the ears of an audiophile, although that much data will require a hard drive. Good thing there will be SATA.

Although you can buy an eight-channel solid state recorder for a few hundred dollars – and [Daniel] will assuredly put more than that into this project, it’s a great application of a ubiquitous Linux computer for a device that’s very, very useful.


Raspberry_Pi_LogoSmall

The Raspberry Pi Zero contest is presented by Hackaday and Adafruit. Prizes include Raspberry Pi Zeros from Adafruit and gift cards to The Hackaday Store!
See All the Entries || Enter Your Project Now!