Low-Cost Electret Microphone Preamplifiers

Before the invention of microelectromechanical system (MEMS) microphones, almost all microphones in cell phones and other electronics were a type of condenser microphone called the electret microphone. The fact that this type of microphone is cheap and easy enough to place into consumer electronics doesn’t mean they’re all low quality, though. Electret microphones can have a number of qualities that make them desirable for use recording speech or music, so if you have a struggling artist friend like [fvfilippetti] has who needs an inexpensive way to bring one to life, take a look at this electret microphone pre-amp.

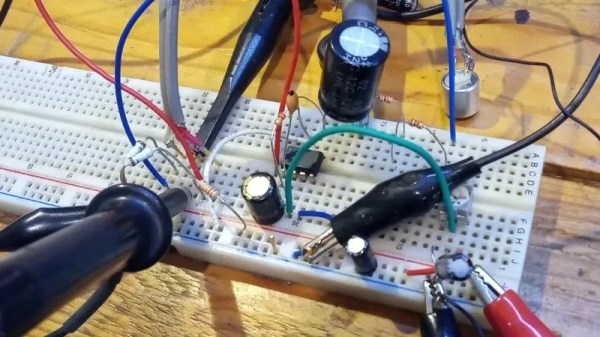
The main goal of the project is to enhance the performance of these microphones specifically in high sound pressure level (SPL) scenarios. In these situations issues of saturation and distortion often occur. The preampl design incorporates feedback loops and an AD797 opamp to reduce distortion, increase gain, and maintain low noise levels. It also includes an output voltage limiter using diodes to protect against input overload and can adjust gain. The circuit’s topology is designed to minimize distortion, particularly in these high SPL situations.

Real-world testing of the preamp confirms its ability to handle high SPL and deliver low distortion, making it a cost-effective solution for improving the performance of electret microphones like these. If you want to go even deeper into the weeds of designing and building electret microphones and their supporting circuitry, take a look at this build which discusses some other design considerations for these types of devices.

Obsessively Explaining The Visual Effects In Flight Of The Navigator

[Captain Disillusion] has earned a reputation on YouTube for debunking hoaxes and spreading a healthy sense of skepticism while having some of the highest production value on the platform and pretending to be some kind of inter-dimensional superhero. You’ve likely seen him give a careful explanation of how some viral video was faked alongside a generous dose of sarcastic humor and his own impressive visual effects. VFXcool is a series on his channel that takes deep dives into movies that are historically significant in the effects industry. For this installment, [Captain Disillusion]’s “intern”, [Alan], takes over to breakdown how filmmakers brought a futuristic spaceship to life in 1986’s Flight of the Navigator.

Making a movie requires hacks upon hacks, and that goes double in the era when the technology and techniques we now take for granted were being developed even as they were being put to film. The range of topics covered here is extreme: from full-scale props to models; from robotic motion control rigs to stop motion animation; from early computer graphics to the convoluted optical compositing that was necessary before digital workflows were possible. The tools themselves may be outdated, but understanding the history and the processes allows for a deeper insight into how we accomplish these kinds of effects today. And, really, it’s just so… cool.

[Captain Disillusion]’s previous VFXcool is all about the Back to the Future trilogy, and it’s a little shorter with more information on motion control rigs. We also love seeing how people make DIY effects in their own homes. LEGO actually seems like a pretty popular option for putting together whole scenes in amateur filmmaking.

Continue reading “Obsessively Explaining The Visual Effects In Flight Of The Navigator

Filmmaking From Home With Projection Mapping

Stuck at home in self-quarantine, artist and filmmaker [Kira Bursky] had fewer options than normal for her latest film project. While a normal weekend film sprint would have involved collaborating with actors, set designers, and cinematographers in a frenzied attempt to finish in less than 48 hours, she instead chose to indulge in her curiosity for projection mapping, a technique that involves projecting visuals onto three-dimensional or flat surfaces.

In order for the images to properly map onto a surface, the surface first has to be mapped so that the projection is able to properly transform the flat image in order to produce the illusion of the light wrapping around the object. The technique is done in layers, in software similar to Photoshop, making it easier for the designer to organize the different interacting components in their animation.

[Kira] used a tool called Lightform to design her projections, which relies on a camera to calibrate the location of the surface and a projector to display the visuals. Her animated figures are drawn with loose lines and characterized by their slow gradients and ethereal movements. In the background of her film, a rhythmic sound plays while she brings the figures closer to view. Their outlines come into greater focus until the figures transform into her physical body, which also dances with the meandering lights.

Check out the short film below.

Continue reading “Filmmaking From Home With Projection Mapping”

Atomic Clapperboard

Whether you know it as a clapperboard, a slate, slate board, time slate, or by another name, you probably recognize this staple of movie making. It’s a handy way to help synchronize sound with video, and to keep track of clips when it comes time to edit. But this clapperboard is quite a bit more accurate than most. It’s got an atomic clock source for dead-on accuracy.

The project came from the growing availability of Rubidium clock source modules on eBay. They can be had for under $100 and you’ll enjoy accuracy of 0.1 ppm. [Luddite Tech] grabbed one for himself and included it in this build. As you can see in the clip after the break, the contrast of the eight-digit display is adjustable, and shines brightest when the marker is snapped. We’d guess the cable he connects at the beginning of the demo is used to set the initial time reference. After that the in-built WiFi can be used to push the time markers to a computer.

Continue reading “Atomic Clapperboard”

Toyaanisqatsi: Time Lapse Control Using LEGO Parts

[youtube=http://www.youtube.com/watch?v=Fm1fFQfGc9M&feature=player_embedded]
A simple panning motion can add impact to the already-dramatic effect of time lapse photography. To accomplish this, frugal cinematographers sometimes build [Rube Goldberg] contraptions from clock motors, VCR parts or telescope tracking mounts. Hack a Day reader [Stephan Martin] has assembled a clever bargain-basement system using an Arduino-driven stepper motor and a reduction gear system built up from LEGO Technic parts, along with some Processing code on a host PC to direct the show.

While the photography is a bit crude (using just a webcam), [Stephan’s] underlying motion control setup might interest budding filmmakers with [Ron Fricke] aspirations but Top Ramen budgets. What’s more, unlike rigid clock motor approaches, software control of the camera mount has the potential for some interesting non-linear, fluid movements.