Optimizing AVR LCD Libraries

A while ago, [Paul Stoffregen], the creator of the Teensy family of microcontrollers dug into the most popular Arduino library for driving TFT LCDs. The Teensy isn’t an Arduino – it’s much faster – but [Paul]’s library does everything more efficiently.

Even when using a standard Arduino, there are still speed and efficiency gains to be made when driving a TFT. [Xark] recently released his re-mix of the Adafruit GFX library and LCD drivers. It’s several times faster than the Adafruit library, so just in case you haven’t moved on the Teensy platform yet, this is the way to use one of these repurposed cell phone displays.

After reading about [Paul]’s experience with improving the TFT library for the Teensy, [Xark] grabbed an Arduino, an LCD, and an Open Workbench Logic Sniffer to see where the inefficiencies in the Adafruit library were. These displays are driven via SPI, where the clock signal goes low for every byte shifted out over the data line. With the Adafruit library, there was a lot of wasted time in between each clock signal, and with the right code the performance could be improved dramatically.

The writeup on how [Xark] improved the code for these displays is fantastic, and the results are impressive; he can fill a screen with pixels at about 13FPS, making games that don’t redraw too much of the screen at any one time a real possibility.


Mimimalist Arduino Gaming Platform

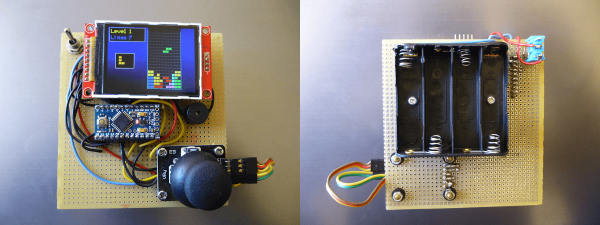
A pretty color LCD screen, an Arduino, a buzzer and a joystick is all you need for a minimalist gaming console for under $20. At least, that’s all [João Vilaça] needed to get this sweet version of Tetris up and running. He’s working on Breakout right now. His Breakout looks even better. See the postscript below for details.

It’s a testament to the current state of the hardware hacking scene that [João] could put this device together in an afternoon for so cheap, presumably after waiting a while for shipments from China. The 320×240 SPI color TFT LCD screen used to cost twice as much as this whole project did. And wiring it up is a simple matter of connecting this pin to that pin. Almost child’s play.

Equally impressive is the state of open source software. A TFT library from Seeed Studios makes the screen interface a piece of cake. [João] wrote his own sound and joystick code, and of course the Tetris gameplay itself, but it’d be much more than a few weeks’ work without standing on the shoulders of giants. Check out [João]’s Github for the project code and stick with us after the break for a demo video and some of our other favorite Arduino gaming hacks.

Continue reading “Mimimalist Arduino Gaming Platform”

Arduino IDE Becomes More Open, Less Snarky

Version 1.6.4 of the Arduino IDE has been out for a little while now, and it has a couple of notable changes. To our eyes, the most interesting change makes adding support for non-standard boards and their configurations within the Arduino IDE a lot simpler. We’ll get into details below.

unnamedBut before that, it’s time to bid farewell to the cheeky little popup window that would deliver a warning message when using a board bearing the USB IDs of their former-partner-turned-competitor. We absolutely agree with [Massimo] that the issues between Arduino SRL / Smart Projects and Arduino LLC are well-enough known in the community, and that it’s time for the popup to fade away.

Now on to the meat of this post. The new “Board Manager” functionality makes it significantly easier for other non-Arduino products to be programmed within the Arduino IDE. Adafruit has a tutorial on using the Board Manager functionality with their products, and it basically boils down to “enter the right URL, click on the boards you want, download, restart Arduino, bam!”

The list of unofficially supported third-party boards is still a bit short, but it includes some stellar entries. For instance, Adafruit has provided the files needed for the ESP8266, which recently received the Arduino treatment. This means that you can simply point your IDE at Adafruit’s URL, and it’ll set you up with everything needed to develop for the ESP8266 from within the comfy Arduino IDE.

Continue reading “Arduino IDE Becomes More Open, Less Snarky”

Review: UISP Programmer For AVR

I got into AVR chips because they are easy to program, and that has become more and more true over the years with the ever-falling cost of programmers. But it’s pretty easy to make a mistake when burning the fuses on the chips and if you don’t have a proper programmer (my first programmer was a horrifyingly slow self-built DAPA cable) you’ll have a brick on your hands. This little board may be able to help in that situation. I gave the USB µISP a try this week. The half-stick-of-gum-sized board flashes firmware like a champ and includes a rescue pin for when you have clock source problems.

My full review is below. All technical information for the µISP can be found in the User’s guide. The board itself is now available to purchase in the Hackaday Store.

Continue reading “Review: UISP Programmer For AVR”

Measuring Temperature On An AVR Without A Sensor

There are a few AVR microcontrollers with onboard temperature sensors. These temperature sensors are neither accurate nor precise, but they do work for a few use cases. [Thomas] came up with a little bit of code that runs on all AVR microcontrollers, and is at least as accurate as the sensors in the rare AVRs that have them.

Although not all AVRs have a temperature sensor, they do all have RC oscillators, and these RC oscillators are temperature sensitive. By combining the RC oscillator and watchdog timer, [Thomas]’ code can get a vague idea if it’s getting hotter or colder.

To prove his code works, [Thomas] took an ATtiny13A chip loaded up with a few bits of code and placed a heated coin on it. The chip was programmed to turn on an LED when it detected a rise in temperature, and predictably, the LED lit up. With a coin chilled in a bowl of ice water, another bit of code ran, flashing the LED.

While we’re sure it’s neither accurate nor precise, it does have its uses – overheating protection or a simple thermostat. You can check out a video of the code in action below.

Continue reading “Measuring Temperature On An AVR Without A Sensor”

Slick Six-Voice Synth For AVRs

He started off making an AVR synthesized guitar, but [Erix] ended up with much more: a complete six-voice AVR wavetable synthesis song machine that’ll run on an ATMega328 — for instance, on an Arduino Uno.

If you’re an AVR coder, or interested in direct-digital synthesis or PWM audio output, you should have a look at his code (zip file). If you’d just like to use the chip to make some tunes, have a gander at the video below the break.

Continue reading “Slick Six-Voice Synth For AVRs”

Showing An AVR Programmer Who’s Boss

[Bogdan] makes a good point. When you use a dev board you get programming, debugging, power sourcing, and usually a UART. When you go to the trouble of hooking up a programmer why don’t you get the same thing? Astutely, he points out that all you usually get with programmers is programming. So he set out to add features to the hardware he uses to program XMEGA.

The first part of the trick hinges on his use of PDI programming. This is slightly different from ISP programming. Both use a six-pin connector cable but with PDI two of these pins are unused. He took this opportunity to reroute the chip’s TX and RX pins through the cable, which now gives him an avenue to use a UART-to-USB adapter without adding any cables to his target board. Rather than add a second USB cable he rolled a USB hub into the mix. An LM1117 regulates the 5V USB rail down to 3.3V as a source for the target board.

The programmer being used is an Atmel ICE. As you might imagine he didn’t want to make permanent alterations to it. His modifications are all handled externally, with one IDC cable connecting the programmer to his added circuitry and another headed off to the target board. For now he’s jumpering RX/TX to the programming header but plans to route the signals on future PCBs.