The Trouble With Cordless Power Tools

If you grow up around a small engineering business you are likely to gain something of an appreciation for power tools. You’ll see them of all ages, sizes, manufacturers, and technologies. When thinking of the power tools constantly on hand in the workshop of a blacksmith like my dad for instance, I’m instantly seeing a drill and an angle grinder. The drill that most comes to mind is a Makita mains powered hand drill, and given that I remember the day he bought it to replace his clapped-out Wolf in 1976, it has given phenomenal service over four decades and continues to do so.

41 years of hard use, and still going strong.
41 years of hard use, and still going strong…

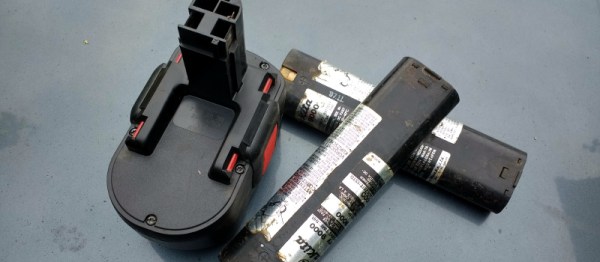
Of course, the Makita isn’t the only drill in his possession. A variety of others of different sizes and speeds have come and gone over the years, and there is always one at hand for any given task. The other one I’d like to single out is I think the most recent acquisition, a Bosch cordless model he bought several years ago. It’s similar in size and capabilities to the Makita save for its bulky battery pack, and it is a comparably decent quality tool.

So, we have two drills, both of similar size, and both of decent quality. One is from the mid 1970s, the other from the end of the last decade. One is a very useful tool able to drill holes all day, the other is little more than a paperweight. The vintage model from the days of flared trousers is a paperweight, you ask? No, the not-very-old Bosch, because its battery pack has lost its capacity. The inevitable degradation due to aged cell chemistry has left it unable to hold enough charge for more than maybe a minute’s use, and what was once a tool you’d be glad to own is now an ornament.

Continue reading “The Trouble With Cordless Power Tools”

Rescuing A Proprietary Battery Pack With A Cell From A Camera

If you have an older handheld battery-powered device, you may be fighting a diminishing battery capacity as its lithium-ion cells reach the end of their life. And if you are like [Foxx D’Gamma], whose device is an Alinco DJ-C7 handheld transceiver, you face the complete lack of availability of replacement battery packs. All is not lost though, because as he explains in the video below the break, he noticed that a digital camera battery uses a very similar-sized cell, and was able to graft the camera battery into the shell of the Alinco pack.

Cracking open the Alinco pack, he was rewarded with the rectangular Li-Ion cell and two PCBs, one for the connector and another for the battery management circuitry. By comparison the camera battery had a much smaller battery management PCB, and it fit neatly into the space vacated by the Alinco cell once those covers had been removed. A fiddly soldering job to attach the connector PCB, and he was rewarded with a working Alinco pack and an unexpected bonus when he found out that the transceiver was a dual band model.

Along the way he’s at pains to point out the safety aspects of handling Li-Ion cells, and to ensure that the polarity of the cell is correct. It’s also worth our reminding readers that these packs must always be accompanied by their battery management circuitry. The result though is pleasing: a redundant piece of equipment made obsolete by a proprietary battery, given a new lease on life.

Continue reading “Rescuing A Proprietary Battery Pack With A Cell From A Camera”

Tesla Model S Battery Pack Teardown

We’ve heard a lot about the Tesla Model S over the last few years, it’s a vehicle with a habit of being newsworthy. And as a fast luxury electric saloon car with a range of over 300 miles per charge depending on the model, its publicity is deserved, and that’s before we’ve even mentioned autonomous driving  driver-assist. Even the best of the competing mass-produced electric cars of the moment look inferior beside it.

Tesla famously build their battery packs from standard 18650 lithium-ion cells, but it’s safe to say that the pack in the Model S has little in common with your laptop battery. Fortunately for those of a curious nature, [Jehu Garcia] has posted a video showing the folks at EV West tearing down a Model S pack from a scrap car, so we can follow them through its construction.

The most obvious thing about this pack is its sheer size, this is a large item that takes up most of the space under the car. We’re shown a previous generation Tesla pack for comparison, that is much smaller. Eye-watering performance and range come at a price, and we’re seeing it here in front of us.

The standard of construction appears to be very high indeed, which makes sense as this is not merely a performance part but a safety critical one. Owners of mobile phones beset by fires will testify to this, and the Tesla’s capacity for conflagration or electrical hazard is proportionately larger. The chassis and outer cover are held together by a huge array of bolts and Torx screws, and as they comment, each one is marked as having been tightened to a particular torque setting.

Under the cover is a second cover that is glued down, this needs to be carefully pried off to reveal the modules and their cells. The coolant is drained, and the modules disconnected. This last task is particularly hazardous, as the pack delivers hundreds of volts DC at a very low impedance. Then each of the sixteen packs can be carefully removed. The packs each contain 444 cells, the pack voltage is 24 V, and the energy stored is 5.3 kWh.

The video is below the break. We can’t help noticing some of the rather tasty automotive objects of desire in their lot.

Continue reading “Tesla Model S Battery Pack Teardown”

Fail Of The Week: Battery Pack Jack Wired Backwards

Last Saturday I had a team of teenage hackers over to build Arduino line-following robots from a kit. Everything went well with the mechanical assembly and putting all the wires on the correct pins. The first test was to check that the motors were moving in the proper direction. I’d written an Arduino program to test this. The first boy’s robot worked fine except for swapping one set of motor leads. That was anticipated because you cannot be totally sure ahead of time which way the motors are going to run.

The motor’s on the second robot didn’t turn at all. As I checked the wiring I smelled the dreaded hot electronics smell but I didn’t see any smoke. I quickly pulled the battery jack from the Arduino and – WOW! – the wires were hot. That didn’t bode well. I checked and the batteries were in the right way. A comparison with another pack showed the wires going into the pack were positioned properly. I plugged in another pack but the motors still didn’t run.

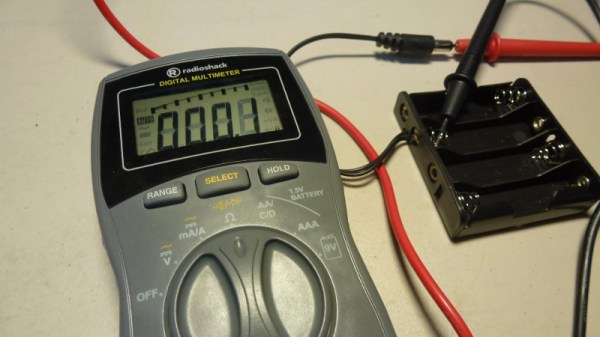
I got my multimeter, checked the voltage on the jack, and it was -5.97 V from center connector to the barrel. The other pack read 6.2 V. I had a spare board and pack so swapped those and the robot worked fine. Clearly the reverse polarity had zapped the motor control ICs. After that everyone had a good time running the robots on a course I’d laid out and went home pleased with their robots.

After they left I used the ohmmeter to check the battery pack and found the wiring was backwards, as you can see in the feature photo. A close inspection showed the wire with a white line, typically indicating positive, indeed went to the positive battery terminal. I shaved the barrel connector down to the wires and the white line wire was connected to the outside of the barrel. FAIL!

This is a particularly bad fail on the part of the battery pack supplier because how hard is it to mess up two wires? You can’t really fault the robot kit vendor because who would expect a battery pack to be bad? The vendor is sending me a new battery pack and board so I’m satisfied. Why did I have an extra board and pack, actually an entire kit? For this exact reason; something was bound to go wrong. Although what I had imagined was for one of the students to break a mechanical part or change wiring and zap something. Instead, we were faced with a self-destructing kit. Prudence paid off.

Electric Longboard Has A Flexy Battery Pack Design

DIY electric longboards are a ton of fun to build and ride (we’ve featured several builds before). Most boards have batteries strapped to the bottom of a rigid board, or they have battery packs near each truck so the board can still flex. Instead of going with either of these designs, [Ben] created a custom battery pack design that’s able to flex with the board.

[Ben]’s pack is made up of A123 26650 cells nestled in his custom-fabricated enclosure. [Ben] designed his pack in CAD and used a CNC machine to create a foam mold. He used the mold to do a fiberglass layup, vacuum-bagged it, and left it to cure. Since the fiberglass bonded really well to the foam, [Ben] used acetone to dissolve the foam while leaving his fiberglass layup intact.

Bendy battery pack on longboard[Ben]’s pack fits 18 cells which he soldered together with some flexible copper grounding wire. The top side of the enclosure is covered with a layer of insulating rubber, and the rim is covered with a soft foam to form a gasket against the board. As you can see, the pack bends really well with the board, and  it doesn’t look like [Ben] has had any issues with his design so far. Check out [Ben]’s blog for more info and for more details on the overall design of his board.

DIY Drill Battery Replacement

Replacing Dead Battery Pack Cells Saves You Some Coin

No one will deny that cordless drills can be super convenient. Sure, they need to be charged once in a while but that’s not a big deal. The big deal is when the batteries no longer hold a charge. Buying a new battery pack from the drill OEM is not cheap. If you need several, it’s almost cheaper to buy a new drill/battery combo.

It is not uncommon for only one cell is bad in the battery pack. Getting a replacement cell makes economic sense. And at about $1 per cell, even replacing all of the cells in the pack is way cheaper than the alternatives. [ksickafus] had a battery pack that did not work and not only did he replace all the cells, he wrote a great instructable about it.

The process started by removing the cells from the plastic container. Since they were soldered together they came out in one unit. The cluster of cells was then laid down on a piece of paper and the perimeter of each cell was marked to document the cell orientation. Next, the leads connecting each cell to its neighbor were noted on the same sketch.

The new cells were then laid out on the template to make sure they were in the same orientation as the originals. [ksickafus] uses braided shielding as his new tabs to connect the cells together and learned from experience that flux is necessary for this type of repair. Once everything is soldered up, it’s time to re-assemble the cells in the plastic case and give it a charge. If you do this at home, make sure you keep an eye on it the first time so nothing goes wrong!

If replacing NiCd’s with NiCd’s isn’t cool enough for you, maybe popping some LiPo’s in your drill would be up your alley.

Fail Of The Week: Battery Packin’

[NeXT] got himself an IBM ThinkPad TransNote and yeah, we’re pretty jealous. For the uninitiated, the TransNote was IBM’s foray into intelligent note transcription from roughly fifteen years ago. The ThinkPad doesn’t even have to be on to capture your notes because the proprietary pen has 2MB of flash memory. It won an award and everything. Not the pen, the TransNote.

Unfortunately, the battery life is poor in [NeXT]’s machine. The TransNote was (perhaps) ahead of its time. Since it didn’t last on the market very long, there isn’t a Chinese market for replacement batteries. [NeXT] decided to rebuild the replacement battery pack himself after sending it off with no luck.

The TransNote’s battery pack uses some weird, flat Samsung 103450 cells that are both expensive and rare. [NeXT] eventually found some camera batteries that have a single cell and a charge controller. He had to rearrange the wiring because the tabs were on the same side, but ultimately, they did work. He got the cells together in the right configuration, took steps to prevent shorts, and added the TransNote’s charge controller back into the circuit.

Nothing blew up, and the ThinkPad went through POST just fine. He plugged it in to charge and waited a total of 90 minutes. The charging rate was pretty lousy, though. At 94% charge, the estimated life showed 28 minutes, which is worse than before. What are your thoughts on the outcome and if it were you, what would be the next move?


2013-09-05-Hackaday-Fail-tips-tileFail of the Week is a Hackaday column which runs every Wednesday. Help keep the fun rolling by writing about your past failures and sending us a link to the story — or sending in links to fail write ups you find in your Internet travels.