Friday Hack Chat: The Incredible BeagleBoard

Over the last year or so, the BeagleBoard community has seen some incredible pieces of hardware. The BeagleBone on a Chip — the Octavo OSD335x — is a complete computing system with DDR3, tons of GPIOs, Gigabit Ethernet, and those all-important PRUs stuffed into a single piece of epoxy studded with solder balls. This chip made it into tiny DIY PocketBones and now the official PocketBeagle is in stock in massive quantities at the usual electronic component distributors.

For this week’s Hack Chat, we’re talking about the BeagleBoard, BeagleBone, PocketBeagle, and PocketBone. [Jason Kridner], the co-founder of BeagleBoard and beagle wrangler, will be on hand to answer all your questions about the relevance of the Beagle platform today, the direction BeagleBoard is going, and the inner workings of what is probably the best way to blink LEDs in a Linux environment.

Topics for this Hack Chat will include the direction BeagleBoard is going, the communities involved with BeagleBoard, and how to get the most out of those precious programmable real-time units. As always, we’re taking questions from the community, submit them here.

As an extra special bonus, this week we’re giving away some hardware. Digi-Key has offered up a few PocketBeagle boards. If you have an idea for a project, put it on the discussion sheet and we’ll pick the coolest project and send someone a PocketBeagle.

join-hack-chat

Our Hack Chats are live community events on the Hackaday.io Hack Chat group messaging. This Hack Chat will be going down noon, Pacific time on Friday, October 13th. Wondering why the Brits were the first to settle on a single time zone when the US had a more extensive rail network and the longitude so time zones made sense? Here’s a time zone converter! Use that to ponder the mysteries of the universe.

Click that speech bubble to the right, and you’ll be taken directly to the Hack Chat group on Hackaday.io.

You don’t have to wait until Friday; join whenever you want and you can see what the community is talking about.

The BeagleBone Blue – Perfect For Robots

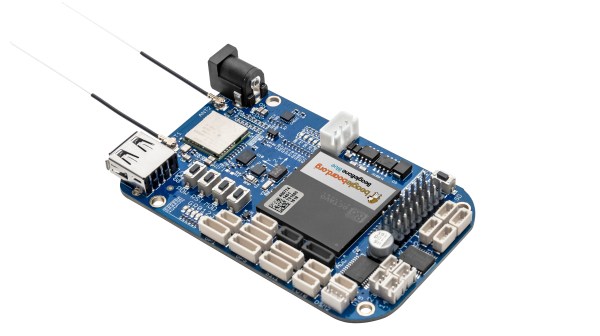
There’s a new BeagleBone on the block, and it’s Blue. The BeagleBone Blue is built for robots, and it’s available right now.

If a cerulean BeagleBone sounds familiar, you’re not wrong. About a year ago, the BeagleBone Blue was introduced in partnership with UCSD. This board was meant for robotics, and had the peripherals to match. Support for battery charging was included, as well as motor drivers, sensor inputs, and wireless. If you want to put Linux on a moving thingy, there are worse choices.

The newly introduced BeagleBone Blue is more or less the same. A 9-axis IMU, barometer, motor driver, quad encoder sensor, servo driver, and a balancing LiPo charger are all included. The difference in this revision is the processor. That big square of epoxy in the middle of the board is the Octavo Systems OSD3358, better known as a BeagleBone on a chip. This is the first actual product we’ve seen using this neat chip, but assuredly not the last – a few people are working on stuffing this chip onto a board that fits in mini Altoids tins.

Join The GUI Generation: QTCreator

More and more projects require a software component these days. With everything being networked, it is getting harder to avoid having to provide software for a desktop or phone environment as well as the code in your embedded device.

If you’ve done a lot of embedded systems work, you probably already know C and C++. If so, it is pretty easy to grab up a C compiler and write a command-line application that does what you want. The problem is that today’s users have varying degrees of fear about the command line ranging from discomfort to sheer terror. On a mobile device, they probably don’t even know how to get to a command line. I’ve been waiting for years for the WIMP (Windows/Icon/Mouse/Pointer) fad to fade away, but even I have to admit that it is probably here for the foreseeable future.
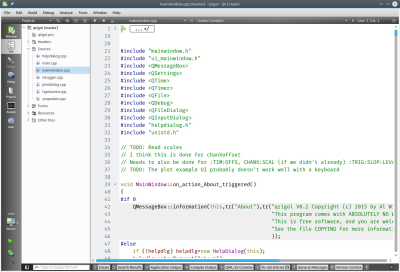
qtrigolSo what’s the alternative? There are actually quite a few. However, I wanted to talk about one that is free, has a wide range of deployment options, uses C++, and is easy to pick up: Qt. Specifically, creating programs with QtCreator (see right). Yes, there are other options, and you can develop Qt programs in a number of ways.

You might think Qt isn’t free. There was a time that it was free for open source projects, but not for commercial projects. However, recent licensing changes (as of version 4.5) have made it more like using gcc. You can elect to use the LGPL which means it is easy to use the Qt shared libraries with closed software. You might also think that a lot of strange constructs that “extend” C++ in unusual ways. The truth is, it does, but with QtCreator, you probably won’t need to know anything about that since the tool will set up most, if not all, of that for you.

Background

If you ever used Visual Basic or something similar, you will feel right at home with QtCreator. You can place buttons and text edit boxes and other widgets on a form and then back them up with code. Buttons create signals when you push them. There are lots of signals like text changed or widgets (controls) being created or destroyed.

To handle a signal, an object provides a slot. There is a meta-compiler that preprocesses your C++ code to get all the signal and slot stuff converted into regular C++. Here’s the good news: you don’t really care. In QtCreator you can write code to handle a button push and exactly how that happens isn’t really much of a worry.

QtCreator has kits that can target different platforms and — in general — the code is reasonably portable between platforms. If you do want to do mobile development for Android or iOS, be sure that you understand the limitations before you start so you can avoid future pitfalls.

You Need Class

Like many similar frameworks, Qt uses an application class (QtApplication) that represents a do-nothing application. Your job is to customize a subclass and have it do what you want. You add widgets and you can even add more screens, if you like. You can connect signals to existing slots or new slots.

There are many classes available, and the online documentation is quite good. Depending on which version of Qt you are using, you’ll need to find the right page (or ask QtCreator to find it for you). However, just to whet your appetite, here’s the Qt5 reference page. From there you can find classes for GUI widgets, strings, network sockets, database queries, and even serial ports.

I could do an entire tutorial on using QtCreator, but it would be a duplication of effort. There’s already a great getting started one provided. You’ll find there is plenty of documentation.

Portability

How do you enumerate serial ports? It depends on the platform, right? In Qt, the platform-specific part is hidden from you. For example, here’s a bit of code that fills in a combo box with the available serial port:

MainWindow::MainWindow(QWidget *parent) :
 QMainWindow(parent),
 ui(new Ui::MainWindow)
{
 ui->setupUi(this);
// initialize list of serial ports
 ports = QSerialPortInfo::availablePorts();
// fill in combo box
 for (int i=0; i<ports.length(); i++) 
 {
   ui->comport->addItem(ports[i].portName(), QVariant(i));
 }
}

The QSerialPortInfo object provides an array of serial port objects. The ui->comport is a combo box and the addItem method lets me put a display string and a data item in for each selection. In this case, the display is the portName of the port and the extra data is just the index in the array (as a variant, which could be different types of data, not just a number). When you select a port, the index lets the program look up the port to, for example, open it.

When the combo box changes, a currentIndexChanged signal will occur. Here’s the slot handler for that:

void MainWindow::on_comport_currentIndexChanged(int index)
{
 QString out;
 // get selected index
 int sel=ui->comport->currentData().toInt();
// build up HTML info string in out
 out="<h1>Serial Port Info</h1>";
 ui->output->clear();
 out += ports[sel].portName() + " " + ports[sel].description() + "
";
 out += ports[sel].systemLocation() + "
";
 if (ports[sel].hasVendorIdentifier() && ports[sel].hasProductIdentifier())
 out += ports[sel].manufacturer() + " ("+ QString::number(ports[sel].vendorIdentifier(),16) + ":" + QString::number(ports[sel].productIdentifier(),16) + ")";
 // and put it on the screen
 ui->output->setText(out);
}

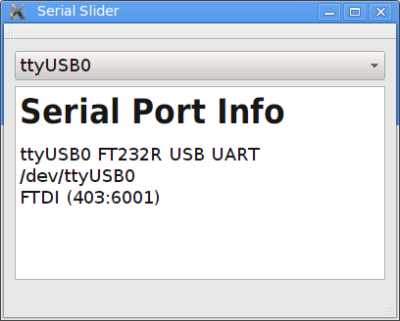
In this case, the result is information about the serial port. You can see the resulting output, below. The QString is Qt’s string class and, obviously, the text display widget understands some HTML.
qtserial

Not Just for GUIs

You can develop console applications using Qt, but then many of the provided classes don’t make sense. There’s even a Qt for Embedded (essentially Linux with no GUI). You can find guides for Raspberry Pi and BeagleBoard.

On the mobile side, you can target Android, iOS, and even Blackberry, along with others. Like anything, it probably won’t just be “push a button” and a ported application will fall out. But it still should cut down on development time and cost compared to rewriting a mobile app from scratch.

And the Winner Is…

I’m sure if you want some alternatives, our comment section is about to fill up with recommendations. Some of them are probably good. But it strikes me that not everyone has the same needs and background. The best tool for you might not work as well for me. I find Qt useful and productive.

Even if Qt isn’t your tool of choice, it still can be handy to have in your tool bag. You never know when you will need a quick and dirty cross-platform application.

New Part Day: The BeagleBoard Gets Bigger

Officially, the latest hardware revision we’ve seen from BeagleBoard is the BeagleBone Black, a small board that’s perfect for when you want to interface hardware to a Linux software environment. This last summer, the BeagleBone Green was introduced, and while it’s a newer hardware release, it’s really just a cost-reduced version of the BB Black. Over the entire BeagleBoard family, it’s time for an upgrade.

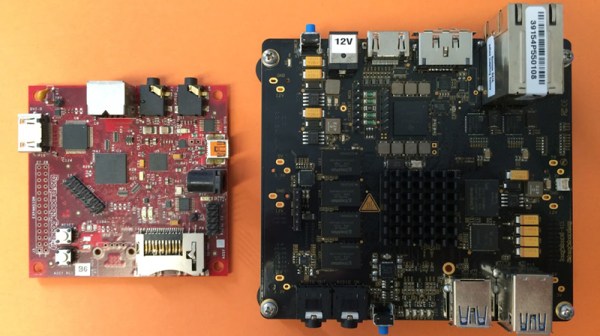
It’s been talked about for more than a year now, but the latest and greatest from the BeagleBoard crew is out. It’s called the BeagleBoard X15, and not only is it an extremely powerful Linux board, it also has more ports than you would ever need.

The new BeagleBoard features a dual-core ARM Cortex A15 running at 1.5GHz. There is 2GB of DDR3L RAM on board, and 4GB of EMMC Flash. Outputs include three USB 3.0 hosts, two Gigabit Ethernet controllers, one eSATA connector, LCD output, two PCIe connectors, and an HDMI connector capable of outputting 1920×1080 at 60 FPS. The entire board is open hardware, with documentation for nearly every device on the board available now. The one exception is the PowerVR SGX544 GPU which has a closed driver, but the FSF has proposed a project to create an open driver for this graphics engine so that could change in the future.

The expected price of the BeagleBoard X15 varies from source to source, but all the numbers fall somewhere in the range of $200 to $240 USD, with more recent estimates falling toward the high end. This board is not meant to be a replacement for the much more popular BeagleBone. While the development and relationship between the ~Board and ~Bone are very much related, the BeagleBone has always and will always be a barebone Linux board, albeit with a few interesting features. The BeagleBoard, on the other hand, includes the kitchen sink. While the BeagleBoard X15 hardware is complete, so far there are less than one hundred boards on the planet. These are going directly to the people responsible for making everything work, afterwards orders from Digikey and Mouser will be filled. General availability should be around November, and certainly by Christmas.

While it’s pricier than the BeagleBone, the Raspberry Pi, or dozens of other ARM Linux boards out there, The BeagleBone has a lot of horsepower and plenty of I/Os. It’s an impressive piece of hardware that out-competes just about everything else available. We can’t wait to see it in the wild, but more importantly we can’t wait to see what people can do with it.

Title image credit: Vladimir Pantelic

BeagleBones At MRRF

[Jason Kridner] – the BeagleBone guy – headed out to the Midwest RepRap Festival this weekend. There are a lot of single board computers out there, but the BeagleBoard and Bone are perfectly suited for controlling printers, and motion control systems thanks to the real-time PRUs on board. It’s not the board for you if you want to play retro video games or build a media center; it’s the board for building stuff.

Of interest at the BeagleBooth were a few capes specifically designed for CNC and 3D printing work. There was the CRAMPS, a clone of the very popular RAMPS 3D printer electronics board made for the Beagle. If you’re trying to control an old mill that is only controllable through a parallel port, here’s the board for you. There are 3D printer boards with absurd layouts that work well as both printer controller boards and the reason why you should never come up with the name of something before you build it.

[Jason]’s trip out to MRRF wasn’t only about extolling the virtues of PRUs; Machinekit, a great motion control software, was also there, running on a few Beagles. The printer at the BeagleBooth was running Machinekit and apart from a few lines of GCode that sent the head crashing into the part, everything was working great.

Continue reading “BeagleBones At MRRF”

BeagleSNES For Game Boy, Game Boy Advance, NES, And – Yes – SNES

By far the most common use for the Raspberry Pi is shoving a few dozen emulators on an SD card and calling it a day. Everybody’s got to start somewhere, right? There are other tiny, credit card-sized Linux boards out there, and [Andrew] is bringing the same functionality of the Raspi to the BeagleBone Black and BeagleBoard with BeagleSNES, an emulator for all the sane pre-N64 consoles.

BeagleSNES started as a class project in embedded system design, but the performance of simply porting SNES9X wasn’t very good by default. [Andrew] ended up hacking the bootloader and kernel, profiling the emulator, and slowly over the course of three years of development making this the best emulator possible.

After a few months of development, [Andrew] recently released a new version of BeagleSNES that includes OpenGL ES, native gamepad support through the BeagleBone’s PRU, and support for all the older Nintendo consoles and portables. Video demos below.

Continue reading “BeagleSNES For Game Boy, Game Boy Advance, NES, And – Yes – SNES”

Turn Your BeagleBoneBlack In To A 14-channel, 100Msps Logic Analyzer

The BeagleBoneBlack is a SoC of choice for many hackers – and quite rightly so – given its powerful features. [abhishek] is majoring in E&E from IIT-Kharagpur, India and in 2014 applied for a project at beagleboard.org via the Google Summer of Code project (GSoC). His project, BeagleLogic aims to realize a logic analyzer using the Programmable Real-Time units on board the AM335X SoC family that powers the BeagleBone and the BeagleBone Black.

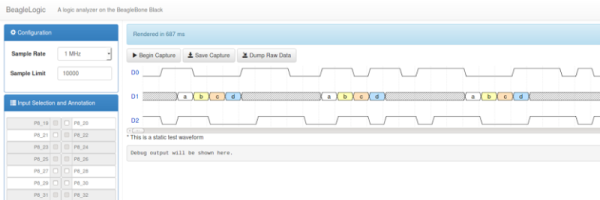
The project helps create bindings of the PRU with sigrok, and also provides a web-based front-end so that the logic analyzer can be accessed in much the same way as one would use the Cloud9 IDE on the BeagleBone/BeagleBone Black to create a new application with BoneScript.

Besides it’s obvious use as a debugging tool, the logic analyzer can also be a learning tool that can be used to understand digital signals. BeagleLogic turns the BeagleBone Black into a 14-channel, 100Msps Logic Analyzer. Once loaded, it presents itself as a character device node /dev/beaglelogic. In stand-alone mode, it can do binary captures without any special client software. And when used in conjunction with the sigrok library, BeagleLogic supports software triggers and decoding for over 30 different digital protocols.

The analyzer can sample signals from 10Hz upto 100MHz, in 8 or 16 bits and up to a maximum of 14 channels. Sample depth depends on free RAM, and upto 320MB can be reserved for BeagleLogic. There’s also a web interface, which, once installed on the BeagleBone, can be accessed from port 4000 and can be used for low-volume captures (up to 3K samples).

[abhishek] recently added the BeagleLogic Cape which can be used to debug logic circuits up to 5V safely. Source files for BeagleLogic as well as the Cape are available via his github repos. [abhishek] blogged about his project on his website where there’s a lot more information and links to be found. Catch a video of BeagleLogic after the break.

Continue reading “Turn Your BeagleBoneBlack In To A 14-channel, 100Msps Logic Analyzer”