Fail Of The Week: Reset Issues With 595 And HD44780

fotw-reset-issues-595-character-lcd

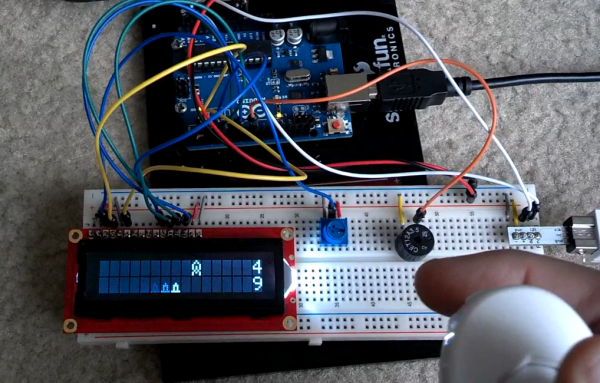
We really like to see hardware hackers stepping out of the safe and polished boundaries of available Arduino libraries. One example of this is a project which [Matteo] thought worked: using a shift register to drive a character LCD. This can be a desirable way to do things, because it takes the GPIO usage down from six to just three connections. If you don’t remember seeing that one earlier this month take another look. The gist of it is that [Matteo] hacked one function in the LiquidCrystal library to make it happen.

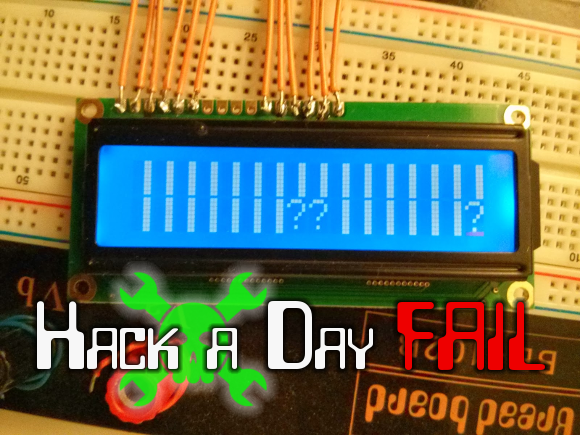
What makes this a truly great fail is that the problem was not immediately apparent, and is difficult to reliably reproduce. The LCD is unstable depending on how the Arduino board is reset. When connecting the Arduino to a computer the screen doesn’t work until you press the reset button. But press the reset button repeatedly and you get a non-functional screen plus the gibberish seen above.

There’s not much to go on here, but we think it’ll be a lot of fun to state your theory on the malfunction and suggesting for testing/fixing the issue. This could be a lot of things, the controller on the display getting mixed-up, the 595 missing an edge (or something along those lines). Do you fix this with hardware (ie: capacitor to avoid voltage dip), a software issue (need a longer delay after startup), or a combination of the two?


2013-09-05-Hackaday-Fail-tips-tileFail of the Week is a Hackaday column which runs every Wednesday. Help keep the fun rolling by writing about your past failures and sending us a link to the story — or sending in links to fail write ups you find in your Internet travels.

Hackaday Links: February 9, 2014

hackaday-links-chain

Here’s a quick tip to extend the usefulness of your multimeter. It’s a set of mini test hooks soldered to alligator clips with a short hunk of stranded wire in between. You can buy mini test hooks that go right on the metal probes of your meter, but the weight and bulk of the meter probes and cords sometimes get in the way. This rig allows more flexibility because of that wire.

Staying on the theme of test equipment tips, here’s a simple way to make a Y-connector for logic analyzers. [Thomas] uses a dual-row pin header, shorting each pair of pins so that both rows are connected. When this is plugged into a pin socket it leave two pins for connecting your test equipment and the rest of the project hardware.

After seeing our feature of a 3-wire Character LCD [Chad] wrote in to mention he built a 1-wire version using an ATmega328.

If you’re going to be in Anaheim this week you can stop by the ATX-West expo and see a 3D printer with a 1m x 1m x 0.5m printing area. [Thanks Martin]

Speaking of 3D printers, here’s a big delta robot (seven feet tall) outfitted for alternative material printing. It’s printing a CT scan of ribs and a heart in hot glue. This seems to be a popular material for more artistic uses. We just saw a hexapod which deposits hot glue as it roams.

The weaponized quadcopter post from Tuesday was a controversial one. The really bad part of it was the laser, which strapped to anything is extremely dangerous. But the other hack may have just been poorly executed. Hackaday alum [Jeremy Cook] wrote in to mention that fireworks and quadcopters can be used more responsibly. He strapped a sparkler to his quadro and used it to make light graffiti. You may remember that [Jeremy] wrote an introduction to light graffiti for us back in November.

Minimalist User Interface For Headless Raspberry Pi Applications

minimial-ui-for-headless-rpi

[Jason Birch] just finished building a beautifully simple user interface for the Raspberry Pi. The goal was to keep it small and intuitive while still providing a range of functionality. His add-on hardware gives feedback using several LEDs and a four-line character LCD screen. It provides control using just four momentary press switches.

The base for the add-on hardware is a chunk of protoboard the same size as the Pi itself. This is just slightly wider than the LCD screen, leaving room along the top for the row of buttons with different colors of LEDs in between them. Look closely in that nest of point-to-point wiring and you’ll find the dual pin-socket which mates with the RPi GPIO header. One important note from [Jason] mentions that the LCD screen R/W pin must be tied to ground. This keeps it from going into read mode, which would push 5V over the I/O pins, potentially damaging the 3.3V tolerant header on the RPi.

Throw in a battery and that pretty much covers the hardware. To see how he’s using it you’ll want to view the video clip after the break.

Continue reading “Minimalist User Interface For Headless Raspberry Pi Applications”

Space Invaders Played On A 16×2 Character Display

This Space Invaders game does more with less. [Rjk79] managed to make a video game using a two-line character display. The game consists of a wave of invaders on the top line, with the defender cannon on the bottom. The invader isn’t just stationary, but randomly moves to the left and the right. The image above captured a little bit of motion blur from the defender moving into position before firing on the enemy.

An Arduino board controls the 16×2 HD44780 character display. The game also includes sounds generated by the piezo buzzer seen on the breadboard. All the way to the right you can see the Wii Nunchuk breakout board which provides directional control and the firing trigger. If you want to recreate this one for yourself [Rjk79] is sharing the source code on Pastebin. There’s also a demo video found after the jump.

If you don’t have a character LCD on hand you might try this other Space Invaders clone that uses an 8×8 led matrix.

Continue reading “Space Invaders Played On A 16×2 Character Display”

Hackathon Results In The Facebook Book

[Jeremy Blum] and [Jason Wright] pose with their project at the end of a 24 hour hackathon. The Facebook headquarters in New York City held the event as part of their Summer of Hack program. As an homage to the hosts, the hacking duo decided to create a physical book and populate it with the virtual Facebook. And what do you call such a creation? The Face(book)^2.

The video after the break gives the best overview of the hardware, but here’s the gist of it: They started with the largest hardcover book they could find, hollowing out its pages to house their own hardware. When you open the book it calls back to a computer over an Xbee link with a request for data. The python script on the computer pulls the newest from a Facebook feed, sending it back to the book to be displayed. There is a graphic LCD and four character LCDs built in for this purpose. There’s also an accelerometer which is used for detecting page turns when the cover is jostled. The rest of the interactivity is provided by a few tactile switches mounted next to the smaller LCD screens for navigation and the ‘like’ feature.

Continue reading “Hackathon Results In The Facebook Book”

Using An HD44780 Character LCD With The Raspberry Pi

[Tech2077] is one of the lucky ones who already got his hands on a Raspberry Pi. He’s been looking into different interface options with the GPIO header and just posted a guide to using an HD44780 character display with the RPi. We like this approach because instead of doing some hard-core LCD work he’s using prototyping equipment you probably already have on hand.

Getting a character LCD running should be really simple. The gotcha is the logic level gap between the devices. If you’ve been working with Arduino, your add-ons are probably meant for a 5V power rail  and logic levels. The RPi outputs 3.3V logic. You could use a level converter (you’d need at least 7 pins to be converted in this case) or you can be a bit more clever. [Tech2077] grabbed an I2C port expander that uses just 2 of the RPi lines to address even lines of the display (four data bits plus three control bits). This is a bit of a hack, as the 3.3V logic is 0.2V below the recommended minimum for a digital 1 on the port expander. But it seems to work just fine! If it didn’t, a couple of NPN transistors would do the trick as well.

Addressing the new peripheral is just a matter of loading the i2c module and writing some Python.

Small Life On A Character LCD

[Duality] just finished programming Conway’s Game of Life on a character LCD. The game is a great programming exercise that everyone should undertake at one point or another. It uses a very simple set of rules to evolve the playing area from a given starting state. In this case the game grid is only 64 pixels, one for each of the positions on this 16×2 character LCD screen. This makes for very quick games as the cells tend to quickly reach an equilibrium as they arrive at the outer borders. See for yourself in the clip after the break.

We could have sworn we’ve seen this before, but with four times the playing space thanks to some custom characters. We couldn’t find an example of that, but the idea is to use a larger grid (something more like what’s seen on this graphic LCD) by generating a set of custom characters that slices each 5×8 pixel character into four smaller discrete areas. Something along the lines of what is being done with this spectrum analyzer.

Continue reading “Small Life On A Character LCD”