Illustrated Kristina with an IBM Model M keyboard floating between her hands.

Keebin’ With Kristina: The One With The Curved Typewriter

Aerodox Flies on Wireless Wings

Aerodox, a wireless, split keyboard.[Simon Merrett] didn’t know anything about keyboards when he started this project, but he didn’t let that stop him. [Simon] did what any of us would do — figure out what you like, learn enough to be dangerous, and then start fiddling around, taking all that inspiration and making a mashup of influences that suits your needs.

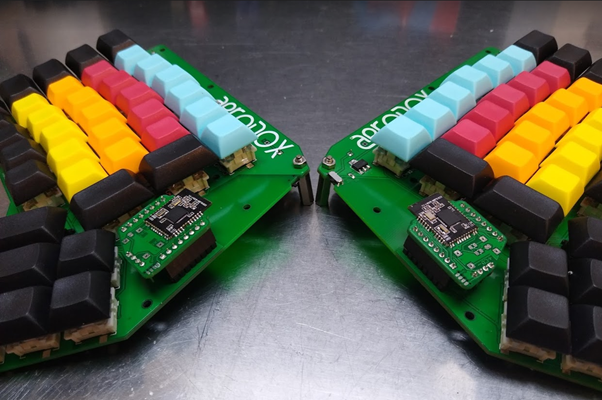
The Aerodox design became a cross between the ErgoDox‘s key layout and the logic and communication of the Redox Wireless, itself a reduced-size version of the ErgoDox. Interestingly, [Simon] chose the ErgoDox’s dimensions and spacing, and not those of the Redox. Like a lot of people out there, I found the ErgoDox to be too big for my hands, mostly in that the thumb cluster is too far away from the mainland. It’s nice to see that it suits some people, though.

[Simon] worked up a custom hot-swap footprint that makes the board reversible, much like the ErgoDox. Each half has an NRF51822 for a brain, and there’s a third one that acts as a receiver. This external NRF board is connected over UART to an Arduino Pro Micro, which acts as the USB HID and runs QMK. It’s an interesting journey for sure, so go dig into the logs.

Continue reading “Keebin’ With Kristina: The One With The Curved Typewriter”

Custom Macro Keyboard Looks Good In Wood

There’s more than one way to make a mechanical macro pad, and this wooden wonder represents one of our favorites. [Tauno Erik] had an old rubber dome rectangle keyboard lying around that still worked, but the poor thing was missing some of its caps. After salvaging the controller, [Tauno Erik] got to work on the tedious task of figuring out the mapping of the matrix, which was made easier with a Python script.

Almost every component of this beauty is wood, including the mounting plate and those thicc and lovely keycaps — their top layer is solid oak, and the bottom bit is birch plywood. In order to interface the ‘caps with the switches, [Tauno Erik] designed and printed connector pieces that sit inside the extra large keycaps and accept the stems of the key switches.

Speaking of switches, we’re not sure if [Tauno Erik] ended up using Cherry green switches, browns, or a mix of both (that would be interesting), but each one is mounted on a custom PCB along with a diode and a pull-up resistor. You can see more build pictures at [Tauno Erik]’s site, and stick around for a visual tour of the completed build after the break.

Wood is a great choice for keycaps, and we imagine they’ll only look better with age and use. A more common use for wood on a keyboard build is in surprisingly comfortable wrist rests.

Optical Keyboards Have Us Examining Typing At Light Speed-ish

There’s a newish development in the world of keyboards; the optical switch. It’s been around for a couple years in desktop keyboards, and recently became available on a laptop keyboard as well. These are not replacements for your standard $7 keyboard with rubber membrane switches intended for puttering around on your raspberry pi. Their goal is the gamer market.

The question, though, is are these the equivalent of Monster Cables for audiophiles: overpriced status symbols? Betteridge would be proud; the short answer is that no, there is a legitimate advantage, and for certain types of use, it makes a lot of sense.

Continue reading “Optical Keyboards Have Us Examining Typing At Light Speed-ish”

A Macro Keyboard In A Micro Package

Remember back in the early-to-mid 2000s when pretty much every cheap USB keyboard you could find started including an abundance of media keys in its layout? Nowadays, especially if you have a customized or reduced-sized mechanical keyboard, those are nowhere to be seen. Whenever our modern selves need those extra keys, we have to turn to external peripherals, and [Gary’s] Knobo is one that looks like it could’ve come straight out of a fancy retail package.

The Knobo is a small macro keypad with 8 mechanical Cherry-style keys and a clickable rotary encoder knob as its main feature. Each key and knob gesture can be customized to any macro, and with five gestures possible with the knob, that gives you a total of thirteen inputs. On top of that, the build and presentation look so sleek and clean we’d swear this was a product straight off of Teenage Engineering’s money-printing machine.

The actions you can do with those inputs range from simple media controls with a volume knob all the way to shortcuts to make a Photoshop artist’s life easier. Right now you can only reprogram the Knobo’s Arduino-based firmware with an In-Circuit Serial Programmer to change what the inputs do, but [Gary] is currently working on configuration software so that users without any programming knowledge will be able to customize it too.

Knobs are just one of those things that everyone wants to use to control their computers, much like giant red buttons. Alternative input devices can range from accessibility-designed to just downright playful. Whatever the inspiration is for them, it’s always nice to see the creativity of these projects.

Continue reading “A Macro Keyboard In A Micro Package”

Cherry MX to LEGO keypads

Connecting Cherry MX Key Switches To LEGO Just Got Easier

The Cherry MX Blue keyswitch

Here on Hackaday, we like keyboard hacks. Given how much time we all spend pounding away on them, they’re natural hacks to come up with. If you’re pulling the circuitry from an existing keyboard then chances are the keys are pressed either by pushing down on rubber domes (AKA the membrane type), or on mechanical switches. [Jason Allemann] has just made it easier to do keyboard hacks using LEGO by building one for a circuit board with mechanical Cherry MX key switches. That involved designing parts to connect LEGO bricks to the switches.

For those custom parts, he recruited his brother [Roman], who’s a mechanical engineer. [Roman] designed keycaps with a Cherry MX stem on one side for snapping onto the key switches, and LEGO studs on the other side for attaching the LEGO bricks. The pieces also have a hole in them for any keys which have LEDs. Of the 100 which [Jason] ordered from Shapeways, around ten were a bit of a loose fit for the LEGO bricks, but only if you were doing extreme button mashing would they come off.

The easy part was the keyboard circuit board itself, which he simply removed from an old Cooler Master Quick Fire Rapid keyboard and inserted into his own LEGO keyboard base.

LEGO mechanical keyboard

We do like his creative use of bricks for the keys. For one thing, the letter keys have no letters on them and so is for toufh-typosts touch-typists only. The Caps Lock is a baseball cap, which would be awkward to press except that no one ever does anyway. ESC is a picture of a person running from a dinosaur and F1, which is often the help-key, is the Star of Life symbol for medical emergency services such as ambulances. Scroll Lock is, of course, a scroll. And to make himself type faster, he incorporated blue racing stripes into the frame, but you can judge for yourself whether or not that trick actually works by watching his detailed build-video below.

Continue reading “Connecting Cherry MX Key Switches To LEGO Just Got Easier”

Hackaday Prize Entry: A Double Action Keyboard

Mechanical keyboards are the in thing right now and building your own is at least two extra levels of nerd cred. This project, entered in the Hackaday Prize, is a DIY keyboard unlike you’ve ever seen. It is a fundamental shift in the ideas of how a computer keyboard can work. It’s a double action keyboard. Press a key lightly, and one character will show up on the screen. Press hard, and a different character will show up on the screen. You’ve never seen anything like this before.

[Jaakob] designed this keyboard so that each keycap would have two switches underneath. He did this by taking regular ‘ol Cherry MX switches and modifying them so the ‘plunger’ would stick out of the bottom of the switch when it was fully depressed. These Cherry switches were mounted to a piece of perfboard, and a small tact switch soldered underneath. It’s an idea similar to what’s found in touch-sensitive MIDI controllers or the other type of keyboard. The difference here is that instead of using two switches to sense how hard a key is being pressed, it maps to two different functions.

Once [Jaakob] figured out how to put two switches under one keycap, he wired up a matrix, attached a Teensy, and took a crack at the firmware. The build isn’t quite done yet, but this is one of the most innovative DIY keyboards we’ve seen in recent memory. There’s a lot of potential here, and this method of ganging two switches together still allows for the fantastic clack and great feel of a mechanical switch.