A Foolproof Raspberry Pi Media Player

The media landscape in the home has changed precipitously over the years. Back in the days when torrents were king, DVD players and TVs started to sprout USB ports and various methods of playing digital videos, while hackers repurposed office machines and consoles into dedicated media boxes. [Roiy Zysman] is a fan of a clean, no-fuss approach, so built his PiVidBox along those lines.

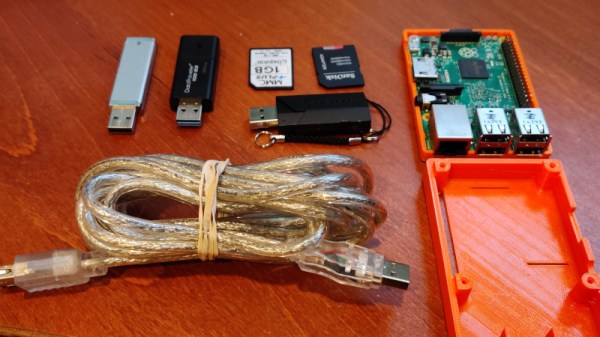
The build, unsurprisingly, starts with a Raspberry Pi. Cheap, capable of playing most common codecs, and fitted with an HDMI port as standard, it’s a perfect platform for the job. Rather than fiddle with complex interfaces or media apps, instead, the PiVidBox uses a simple script. The Pi is configured to continually scan the /media folder for mounted devices, and play any videos it comes across. Simply pop in an SD card or USB drive, and the content starts rolling. No buttons, remotes, or keyboards needed!

It’s a interface without much flexibility, but it makes up for that in barebones simplicity. We can imagine it would come in handy for a conference room or other situation where users grow tired of messing around with configurations to get screens to work. The Raspberry Pi makes a rather excellent basis for a media player build, and we’ve seen some stunning examples in the past!

Colorizing Images With The Help Of AI

The world was never black and white – we simply lacked the technology to capture it in full color. Many have experimented with techniques to take black and white images, and colorize them. [Adrian Rosebrock] decided to put an AI on the job, with impressive results.

The method involves training a Convolutional Neural Network (CNN) on a large batch of photos, which have been converted to the Lab colorspace. In this colorspace, images are made up of 3 channels – lightness, a (red-green), and b (blue-yellow). This colorspace is used as it better corresponds to the nature of the human visual system than RGB. The model is then trained such that when given a lightness channel as an input, it can predict the likely a & b channels. These can then be recombined into a colorized image, and converted back to RGB for human consumption.

It’s a technique capable of doing a decent job on a wide variety of material. Things such as grass, countryside, and ocean are particularly well dealt with, however more complicated scenes can suffer from some aberration. Regardless, it’s a useful technique, and far less tedious than manual methods.

CNNs are doing other great things too, from naming tomatoes to helping out with home automation. Video after the break.

Continue reading “Colorizing Images With The Help Of AI”

If You Can’t Buy The Keyboard You Want, Build It Instead

The great thing about being a maker is that when the market fails to meet your needs, you can strike out on your own. [GuzziGuy] did just that, building a bespoke mechanical keyboard that’s stylish to boot.

The aim was to create a keyboard well suited to working without a mouse, and with a keypad on the opposite side to suit a left-hander’s predilections. The case consists of an aluminium top plate with an attractive walnut base, both cut on a Workbee CNC machine. Keycaps are sourced from YDMK and Amazon, with the parts chosen giving the build a striking early 1980s workstation look.

The keys are handwired to a series of DuPont connectors for easy disassembly. These hook up to an Elite-C controller, a USB-C remix of the popular Arduino Pro Micro. Based on the ATmega32U4, it’s got native USB HID functionality, making it perfect for keyboard builds.

The fit and finish is what really makes this project, going to show that a few hours well spent on the CNC can turn you out a beautiful project. As far as mechanical keyboards go, your imagination really is the limit!

A Mechanical Shutter Release For A Digital Camera

Most digital cameras these days come with some kind of electronic remote shutter release. Various solutions exist, using USB cables, smartphone apps, or dedicated remotes. [Steloherd] wasn’t happy with the options available for his Ricoh GRII, though, so built a rig to do things the old fashioned way.

The spring plate helps protect the shutter button from damage.

[Steloherd] wanted to use an old-school mechanical release cable, so devised a way to use it to trigger the Ricoh’s standard shutter button. A small aluminium bracket was created, attached to the hot shoe on top of the camera via a mounting foot from a standard flash accessory. A spring plate was then created to help spread the load from the mechanical release pin, ensuring it triggers the camera effectively without damaging anything.

Installing the mechanical release proved difficult, as the DIN standard calls for an obscure M3.4 conical tapped thread. Rather than muck about finding rare tooling, [Steloherd] simply recut the thread on the release cable to a straight M3x0.5, and did the same for the bracket.

Overall, it’s a tidy hack, and one that could be adapted to other cameras fairly easily. Other methods we’ve seen involve such odd choices as linear actuators harvested from air fresheners, if you’d believe it. As always, if it works, it works!

This RGB Tree Has Its Roots In A PCB

[Paczkaexpress]’s RGB tree is a mix of clever building techniques and artistic form that come together into quite a beautiful sculpture.

The branches of his tree are made from strands of enameled copper wire capped with an RGB LED and terminated in a female header. The separate wires are all wound and sculpted into the form of a tree. The wire is covered in a very thin layer of plastic, which we highly recommend observing under a microscope, that allow it to maintain a uniform and reflective copper color without shorting, adding to the effect.

The part we found an especially pleasing mix of form and function was how the “roots” of the tree clicked home in the PCB base. The PCB holds the STM32, power components, and an LED Driver. It doesn’t hide how the magic works, and the tree really does get its nutrients from the soil it’s planted in. This would be a fun kit to build. Very clever and you can see the final effect after the break.

Continue reading “This RGB Tree Has Its Roots In A PCB”

A Newbie Takes The SMD Challenge At Supercon

First-time visitors to Disneyworld often naively think they’re going to “do” the park in three days: one day for the Magic Kingdom, one day for Epcot, and one day for everything else. It’s easy to spot such people, collapsed on a bench or dragging exhausted kids around while trying to make their way to the next must-see attraction. Supercon is something like that — a Disney-esque theme park for hackers that will exhaust you if you don’t have a plan, and if you don’t set reasonable expectations. Which is why I was glad that I set only one real goal for my first Supercon: take the SMD Soldering Challenge.

Now, while I’m pretty handy with a soldering iron, I was under no illusion that I would be at all competitive. All my soldering experience has been with through-hole components, and while I also used to doing some production soldering on fine-pitch connectors, the whole surface-mount thing is new to me. I entered mainly because I wanted to see what was possible coming in raw. At best I’d learn what my limits are, and at worst I’d fail spectacularly and provide grist for a “Fail of the Supercon” post. It’s a win either way.

Continue reading “A Newbie Takes The SMD Challenge At Supercon”

Used EDM Electrodes Repurposed As Air Bearings For Precision Machine Tools

If you’ve ever played air hockey, you know how the tiny jets of air shooting up from the pinholes in the playing surface reduce friction with the puck. But what if you turned that upside down? What if the puck had holes that shot the air downward? We’re not sure how the gameplay would be on such an inverse air hockey table, but [Dave Preiss] has made DIY air bearings from such a setup, and they’re pretty impressive.

Air bearings are often found in ultra-precision machine tools where nanometer-scale positioning is needed. Such gear is often breathtakingly expensive, but [Dave]’s version of the bearings used in these machines are surprisingly cheap. The working surfaces are made from slugs of porous graphite, originally used as electrodes for electrical discharge machining (EDM). The material is easily flattened with abrasives against a reference granite plate, after which it’s pressed into a 3D-printed plastic plenum. The plenum accepts a fitting for compressed air, which wends its way out the micron-sized pores in the graphite and supports the load on a thin cushion of air. In addition to puck-style planar bearings, [Dave] tried his hand at a rotary bearing, arguably more useful to precision machine tool builds. That proved to be a bit more challenging, but the video below shows that he was able to get it working pretty well.

We really enjoyed learning about air bearings from [Dave]’s experiments, and we look forward to seeing them put to use. Perhaps it will be in something like the micron-precision lathe we featured recently.

Continue reading “Used EDM Electrodes Repurposed As Air Bearings For Precision Machine Tools”