The (Copper) Crystal Method

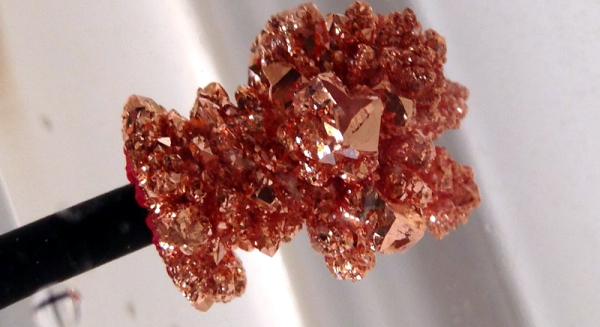
One of the staples of kitchen chemistry for kids is making sugar crystals or rock candy. Why not? It is educational and it tastes good, too. [Science with Screens] has a different kind of crystal in mind: copper crystals. You can see the result in the video below.

To grow pure metal crystals, he used copper wire and copper sulfate. He also used a special regulated power supply to create a low voltage to control the current used to form the crystal. The current needed to be no more than 10mA, and an LM317 holds the voltage constant. However, that regulator only goes as low as 1.25V, so diodes cut a volt off the output.

Continue reading “The (Copper) Crystal Method”

Growing Copper And Silver Crystals For Art

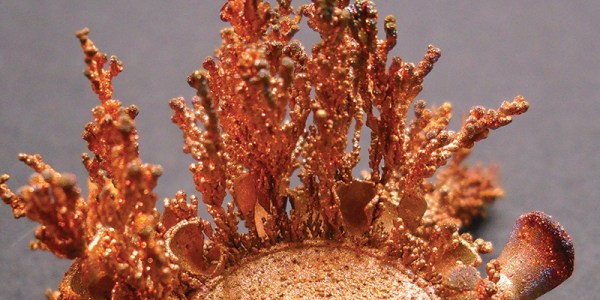
Usually when Hackaday covers electroplating techniques, it’s to talk about through-hole PCB plating. But did you know you can use the same method to produce beautiful copper and silver crystal structures?

[Fred and Connie Libby] are kind enough to share how they make their crystals that they sell in tiny glass vials you can wear around your neck. The process is simple as you would think; it’s just an electrolyte solution, with a current passing through it, depositing the metal in an ion-exchange. Rather then stop once the part is sufficiently covered, you let the process run amok, and soon large crystal formations begin to emerge. [Fred and Connie] share their technique very briefly, so if you’re looking for a more detailed how-to guide, you can find one here.

Although silver crystals are a bit out of our budget, we wonder how large of a copper crystal could be grown? Large enough to be displayed on a coffee table? Surely such a work of art and science could be an interesting conservation piece in any hacker’s home.

Brass Clock Face Etched With PCB Techniques

Over the last few months, [Chris] has been machining a timepiece out of brass and documenting the entire process on his YouTube channel. This week, he completed the clock face. The clock he’s replicating comes from a time before CNC, and according to [Chris], the work of engraving roman numerals on a piece of brass would have been sent out to an engraver. Instead of doing things the traditional way, he’s etching brass with ferric chloride. It’s truly artisan work, and also provides a great tutorial for etching PCBs.

[Chris] is using a photoresist process for engraving his clock dial, and just like making PCBs, this task begins by thoroughly scrubbing and cleaning some brass with acetone. The photoresist is placed on the brass, a transparency sheet printed off, and the entire thing exposed to four blacklights. After that, the unexposed photoresist is dissolved with a sodium carbonate solution, and it’s time for etching.

The clock face was etched in ferric chloride far longer than any PCB would; [Chris] is filling these etchings with shellac wax for a nice contrast between the silvered brass and needs deep, well-defined voids.

You can check out the video below, but that would do [Chris]’ channel a disservice. When we first noticed his work, the comments were actually more positive than not. That’s high praise around here.

Continue reading “Brass Clock Face Etched With PCB Techniques”

This One May Come As A Shock To Some

[Chris] seems to have commandeered a decent portion of the wife’s sewing room for his electronic adventures. As it is still her claim, she made it clear that his area needed some organization and a new desk. Dissatisfied with the look and feel of the replacement IKEA desk-like substance they acquired, he took it upon himself to ratchet up both the style and value by adding a copper laminate.

His decision is not purely based in aesthetic. If you’re following along, this means that his new electronics work surface is conductive. And yeah, it’s connected to ground at the wall. Although he doesn’t care for the stank of of anti-static mats or their susceptibility to fading and cracking, he does intend to use a tiny patch of it to keep his silicon happy.

[Chris] used a 20-gauge copper sheet that he cut and scored down to fit his Swedish sandwich wood base with enough margin for overhang. After scratching up one side of the copper sheet and one of the receiving base, he squidged down some adhesive nasty enough to require the rubber glove protocol and clamped it all together for several hours. Stay put the copper did, but stay flat it did not. After hammering down the overhang, [Chris] hand-burnished the copper in small swirls with a Scotch Brite pad to visually break up the slightly wavy surface. Instructional and hilarious play-by-play after the break.

Continue reading “This One May Come As A Shock To Some”

Copper Electroplating The Cheap And Safe Way

[A_Steingrube] has posted a guide to his favorite method of copper electroplating. Plating copper onto other metals is popular with the steampunk crowd, but it does have other uses. Copper plate is often used as a prep step for plating other metals, such as nickel and silver. It also (usually) increases the conductivity of the metal to be plated. [A_Steingrube] is using the copper acetate method of plating. What is somewhat novel about his method is that he chose to make his own electrolyte solution from household chemicals. The copper acetate is created by mixing distilled vinegar and household hydrogen peroxide in a 50/50 ratio. The mixture is heated and then a piece of copper scouring pad is placed in. The scouring pad is partially dissolved, providing copper ions, and turning the solution blue.

The next step is to clean the material to be plated. [A_Steingrube] uses Cameo Aluminum and Stainless cleaner for this, though we think any good degreaser will work. The actual electroplating process consists of connecting a piece of copper to the positive terminal of a 6 volt battery. Copper scouring pad is again used for its high surface area. The material to be plated is connected to the negative side of the battery. He warns to keep the solution and the material being plated in constant motion to avoid heavy “burn spots”, which can flake off after the plating process. The results speak for themselves. As with any bare copper material, the electroplated layer will quickly oxidize if not protected.

Copper Kettle Just For The Hipster Coffee Scene

04-copper-kettle

Handmade coffee is a feature we need to write. But for now we present this copper kettle which is designed to pour out the boiling water very slowly in order to achieve the perfect cup of slow-drip java.

[CHS] made the kettle for his friend [Nate]. The entire process starts off with an arc of flat copper sheet which makes a slightly conical cylinder when curved until the two ends meet. Getting a water tight seal on this seam is imperative and it took four or five tries to reach perfection.

To get the kettle in shape [CHS] improvised a mandrel out of a thin slice of railroad track. After polishing it smooth it goes on the inside of the copper and gives him something to hammer against. We think this step is magic… It’s kind of like the old sculpting adage that you remove everything that isn’t what you’re trying to end up with. The beauty of the piece really pops out as the final curves are hammered into the work.

Continue reading “Copper Kettle Just For The Hipster Coffee Scene”

Etching Brass And Copper With The Etchinator

If you’re in to making your own PCBs at home, you know the trials of etching copper clad boards. It’s slow, even if you’re gently rocking your etch tank or even using an aquarium pump to agitate your etching solution. [cunning_fellow] over on Instructables has the solution to your etching problems, and can even produce printmaking plates, jewelry, photochemically machine small parts, and make small brass logos of your second favorite website.

The Etchinator is a spray etcher, so instead of submerging a copper clad board into a vat of ferric or cupric chloride, etching solution is sprayed onto the board. We’ve seen this technique before, but previous builds use pumps to spray the etching solution and cost a bundle. [cunning_fellow]’s Etchinator doesn’t used pumps; it’s driven by two cordless drill motors sucking up etching solution through a hollow tube.

The basic idea behind the build is sticking a vertical PVC pipe in a box with etching solution. Mount an impeller in the bottom of the tube, drill many small holes in the side of the tube, and spin it with a motor up top. The solution is sucked up the tube, sprayed out the sides, and falls back down into the reservoir. Put a masked off copper board in the tank and Bob’s your uncle.

Not only did [cunning_fellow] come up with an awesome PCB etching solution, but the same machine can be used for etching brass plate for printmaking, and even photoetching brass sheets for model planes, trains, and automobiles. The quality is really amazing; the Instructables robot above was etched out of 0.7 mm thick brass, with an etch depth of 0.35 mm with only 0.05 mm of undercut. A very awesome build that is already on our ‘to build’ project list.